

 AhsayCBS
Ahsay Go - VMware Restore
There are four (4) major types of restore options, namely:
- Run-Direct Restore
- Non-Run Direct Restore
- Restore Raw File
- Granular Restore
| Restore a Virtual Machine with Run Direct |
|---|
| This restore method can power up a VM instantly by running it directly from the backup files in the backup destination. |
| Pros |
|
| Cons |
| Changes made to the running VM during Run Direct power up process will be lost when the VM is powered down if not committed to the VM by completing a successful migration. |
| Restore a Virtual Machine without Run Direct |
|---|
| This is the conventional restore method where VM data is restored from the backup destination to the original VM host, another datastore of the original VMware host or another VMware host. |
| Pros |
| Complete VM restore can be done in one take; no data migration needed afterwards. |
| Cons |
|
| Restore a Virtual Machine in Raw File (VMDK Format) |
|---|
| If you wish to restore the VM to another VMware host (ESXi server) directly without using Ahsay Go. |
| Pros |
| You can manually restore the VM to another VMware host (ESXi server) off-site without having to use Ahsay Go as the restore channel. |
| Cons |
| Restore procedures are relatively complicated. |
| Granular Restore |
|---|
|
Ahsay Go makes use of granular restore technology to enable a file level restore from a virtual disk file (VHD) of guest VM backup possible. It is particularly useful if you only need to restore individual file(s) from a guest VM, which would normally take a long time to restore and then power up before you can gain access to the files on the virtual disks. Granular restore gives you a fast and convenient way to recover individual files on a guest VM. For more details about Granular Restore, refer to Granular Restore below. |
| Pros |
|
| Cons |
| No encryption and compression for backup set. |
To restore a virtual machine, follow the steps below:
-
Click the Restore icon on the main interface of Ahsay Go.
-
Select the backup set, destination and restore mode.
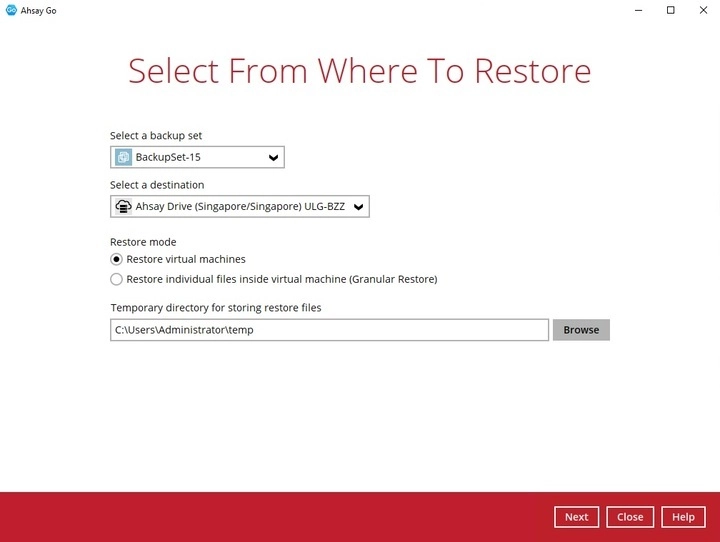
- For Non-Run Direct, Run Direct and Individual Virtual Disk Restore, select Restore virtual machines.
- While for Granular Restore, select Restore individual files inside virtual machine (Granular Restore).
The options Restore virtual machines and Restore individual files inside virtual machine (Granular Restore) will not be available on a VMware Workstation, VMware Player, or VMware Fusion Backup Set. This is due to a limitation that prohibits Granular Restore on VMware Workstation, Player, and Fusion. Please refer to Granular Restore section for more details.
You may change the path under “Temporary directory for storing restore files” by clicking the Browse button. This will allow you to select the directory that will be used to store the temporary files.

Click Next to proceed.
-
ONLY FOR GRANULAR RESTORE:
The following screen will only be displayed if Granular Restore is performed on the machine for the first time. Make sure you click Install to confirm mounting of the virtual disk on this machine. Clicking No will exit the restore process.

-
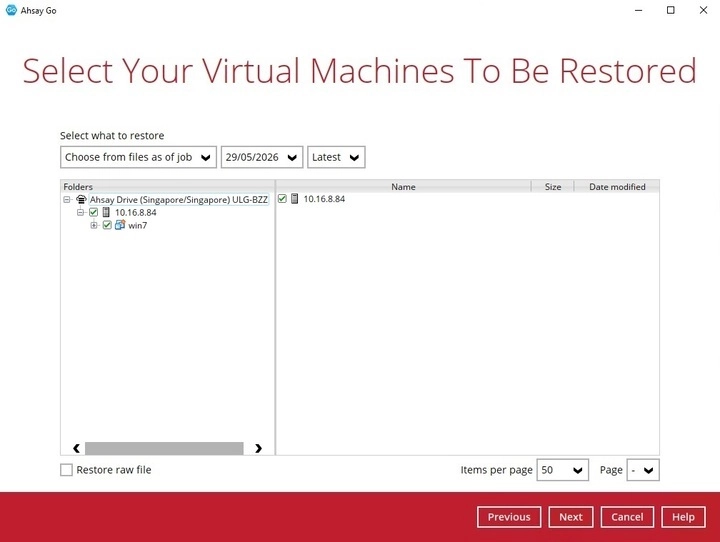
Select the virtual machine that you would like to restore. Click Next to proceed.
For Raw File Restore Only:
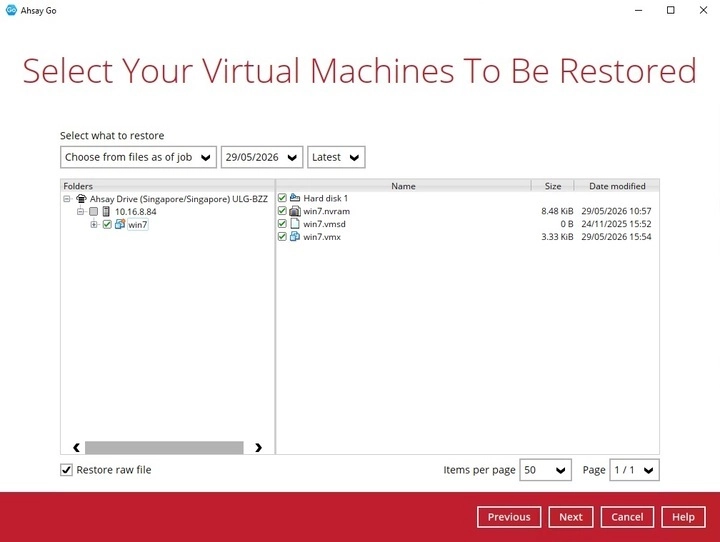
If you wish to restore the VM to another VMware host (ESXi server), you can restore the VM in raw file format, where the. vmdk disk format file will be included by clicking the Restore raw file button at the bottom left corner. Refer to the steps in the "Restore a Virtual Machine in VMDK format" table.
-
The next screen that will be displayed depends on the type of restore to be done.
Non-Run Direct and Run Direct Restore
-
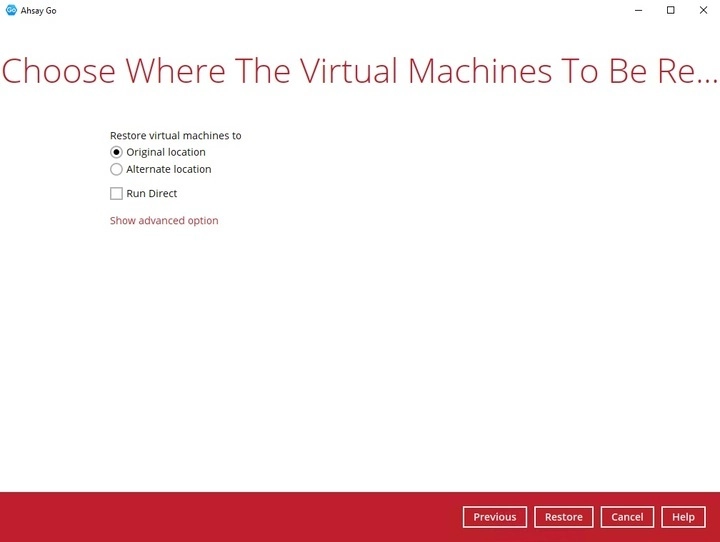
Select to restore the VM to its Original location or to an Alternate location.
-
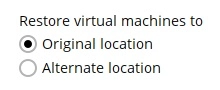
Original location - the VM will be restored to the original VMware host and datastore.
-
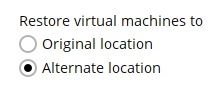
Alternate location - the VM will be restored to another datastore on the original VMware host or another VMware host.
Click Next to proceed.
Enter the VMware host and access information of where you would like the VM to be restored to.
For restoration to another VMware host (ESXi or vCenter server), select the “Version”, then enter the “Username”, “Password”, “Host”, “Port” and “SSH Port” of the new / original host.
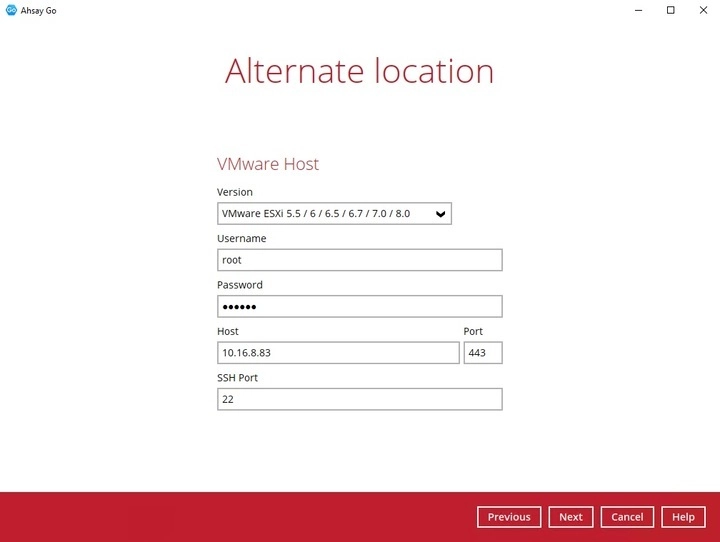
Click Next to proceed when you are done with the settings.
Enter a new “Name” for the VM, then click Browse to modify the "Inventory Location", "Host/Cluster", "Resource Pool" and "Storage" settings, according to where you would like the VM to be restored to.
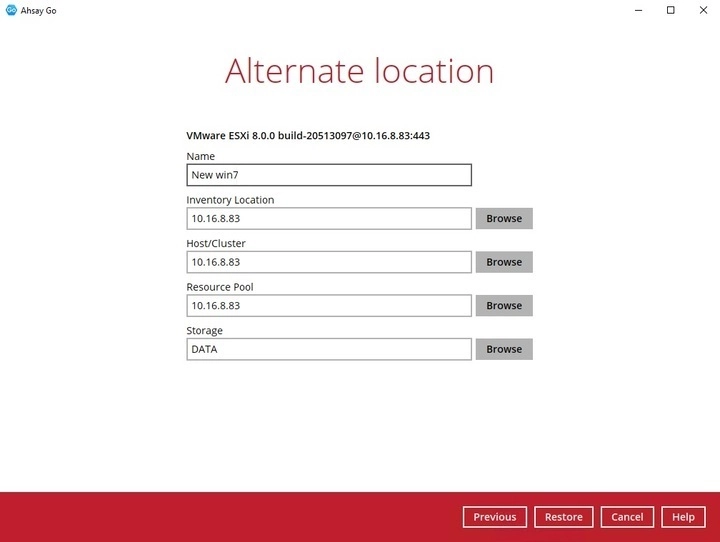
When restoring to a vSAN datastore, it is important to select the vSAN cluster where the VM will be restored even if it is in the same vCenter.
-
-
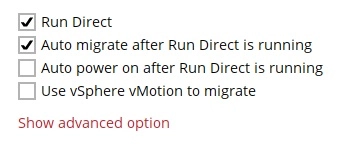
You can configure the type of restore to be done whether it is Non-Run Direct or Run Direct by ticking/unticking the Run Direct checkbox.

-
The option “Auto migrate after Run Direct is running”, “Auto power on after Run Direct is running”, and “Use vSphere vMotion to migrate” will only be available once “Run Direct” is ticked.
-
Auto migrate after Run Direct is running
Enable this option to auto migrate the VM to a permanent location on the original VMware host \ another datastore of the original VMware host \ another VMware host, according to the “Restore virtual machines to” option.
This will finalize the recovery of the VM; The migration will be performed after the VM is powered on.
-
Auto power on after Run Direct is running
Enable this option to power up the virtual machine automatically, after Run Direct is running for the VM.
-
Use vSphere vMotion to migrate
Enable this option to allow live migration while the VM remains running.
-
-
To configure other restore settings, click Show advanced option.

When “Verify checksum of in-file delta files during restore” is enabled, this will verify the checksum of in-file delta files and will make the restore process time longer. It is recommended to enable the feature only if you want to verify if the merged files were correct.
-
Click Restore to start the restoration.
Refer to Finalize Virtual Machine Restore for instructions on how to finalize the VM recovery.
Raw File Restore (VMDK Format)
-
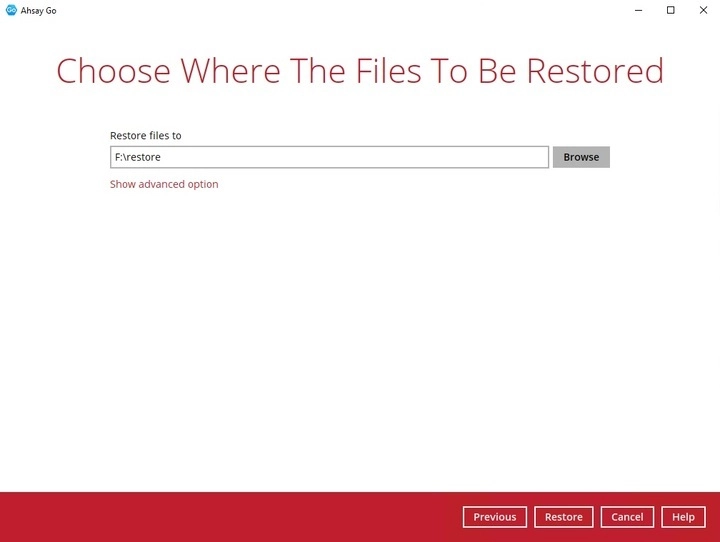
Select a location where you wish to restore the VM to. Click Browse to select a location.
-
Click Show advanced option if you would like to enable "Verify checksum of in-file delta files during restore".
-
Click Restore to start the VM restore process.
Refer to the "Restore a Virtual Machine in VMDK Format" table for instructions on how to restore to another VMware host.
-
-
The following screen shows when the VM has been restored successfully.
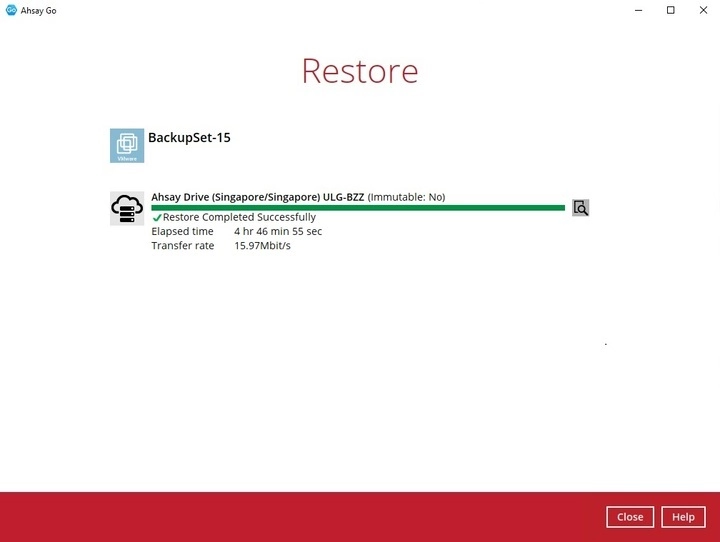
Another way of checking the progress of the restore is from EXSi web console. The restore has started when a NAS datastore was created, and it is completed when the virtual machine is powered on.
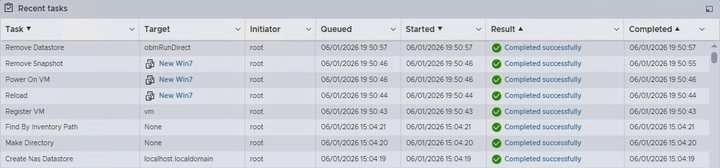
In cases when Run Direct restore encounters an error or Ahsay Go crashes during a Run Direct restore, the temporarily files will remain on the VMware Host. These temporary files must be manually cleaned. For instructions on how to do this, please refer to the Appendix.
Verifying Run Direct Restore Connection
When a Run Direct restore is initiated, the following steps are taken at the backend.
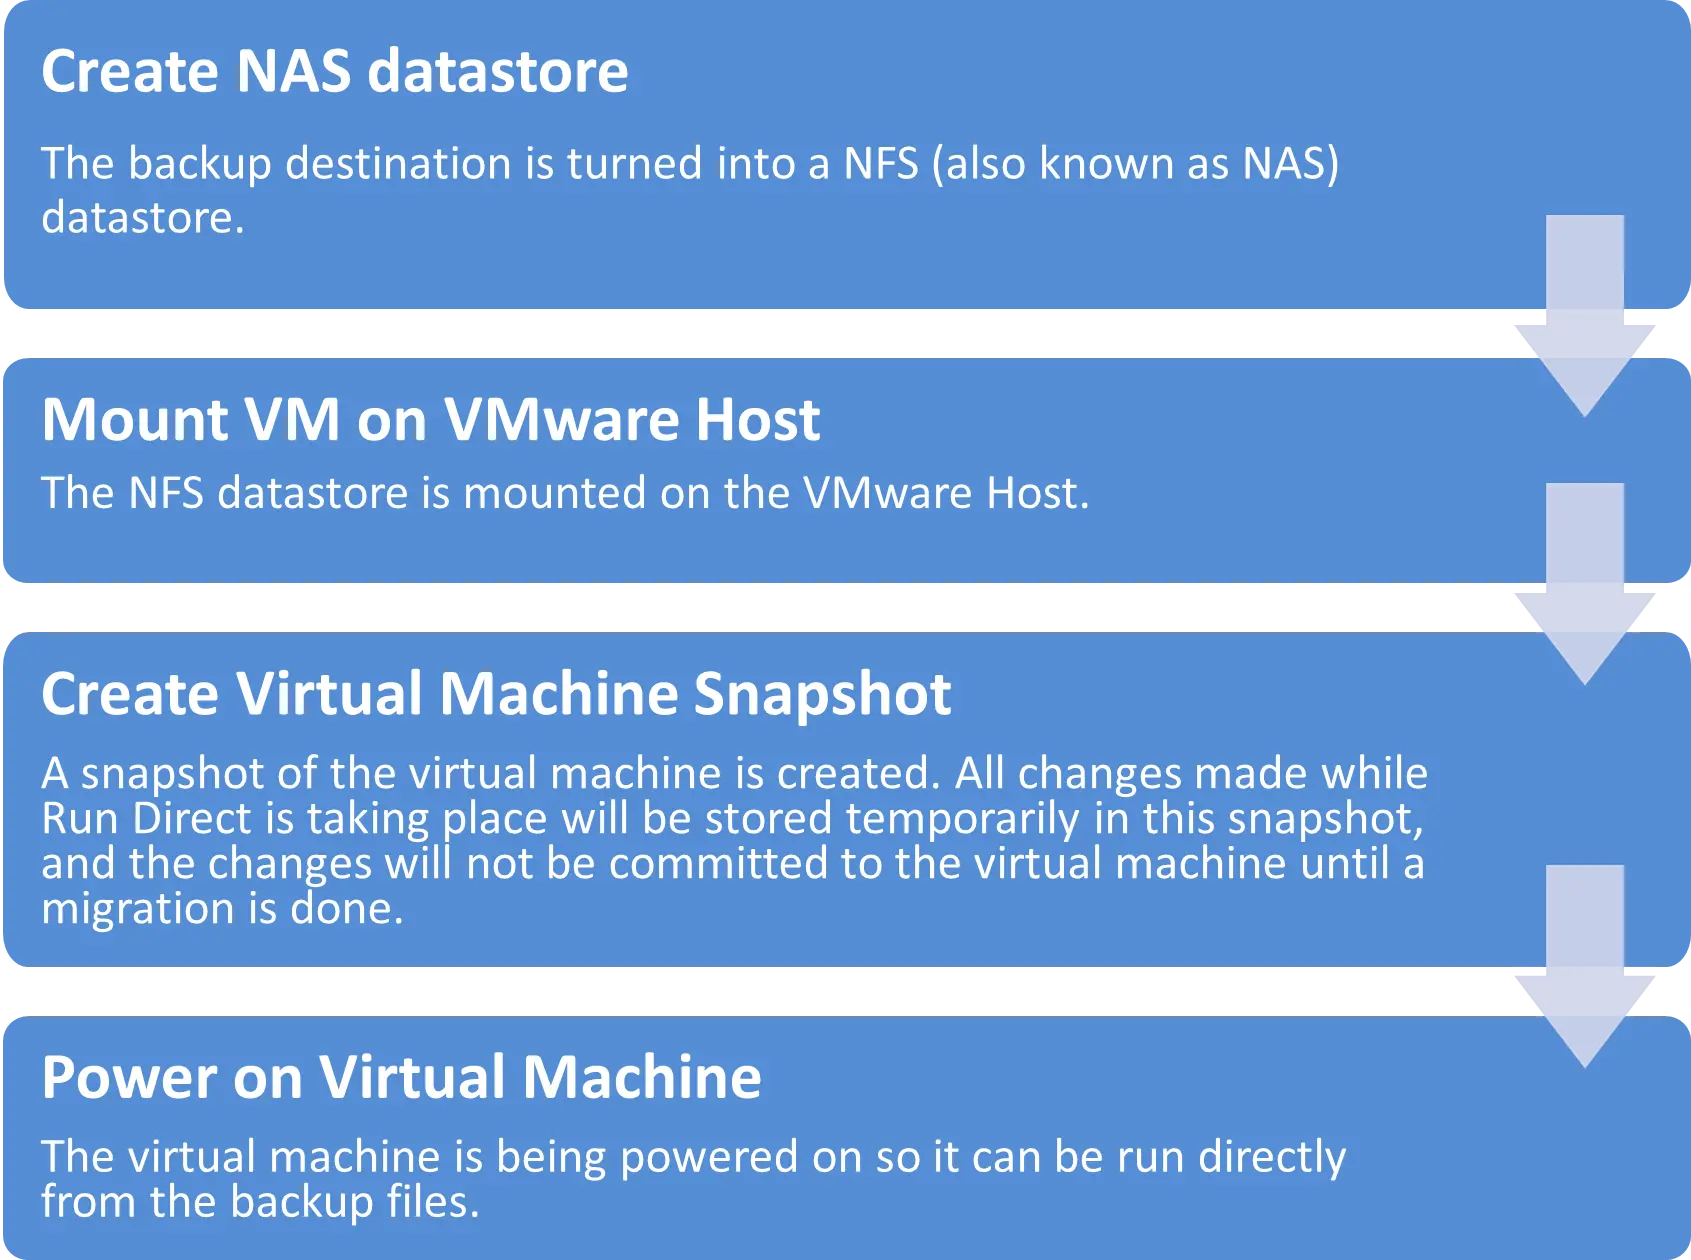
Check the following items to verify if the Run Direct restore connection has been established between the backup destination and the VMware host.
-
The following screen with the text “Restore Completed Successfully” displayed in your Ahsay Go.
-
You should also be able to see the restored VM being run directly from the backup files in the backup destination.
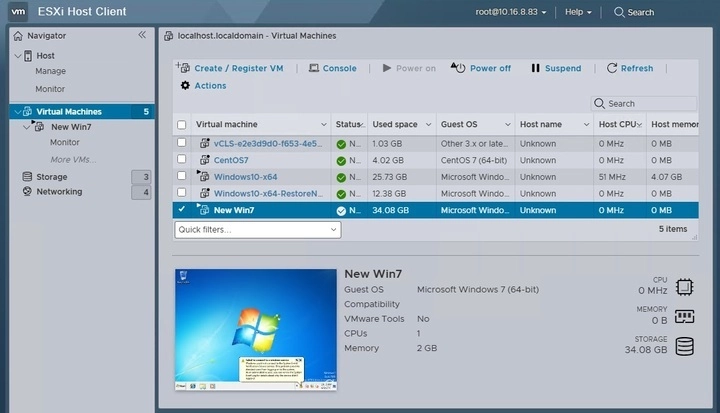
Do not exit from the Ahsay Go application when a Run Direct restored VM is still running. Run Direct must be stopped (e.g. by finalizing recovery of the VM or stopping the VM) before exiting Ahsay Go.
When the restored VM is starting up, there may be an error screen prompted to alert you that Windows was not shut down properly. This message shows as a result of the VM’s runtime status not being backed up. You may simply select to start up Windows as normal to proceed with the startup.
Only for Run Direct Restore
Finalize Virtual Machine Restore
To finalize recovery of a VM, migrate it to a permanent location on the VMware host.
-
Click Migrate Virtual Machine to manage all Run Direct virtual machines.
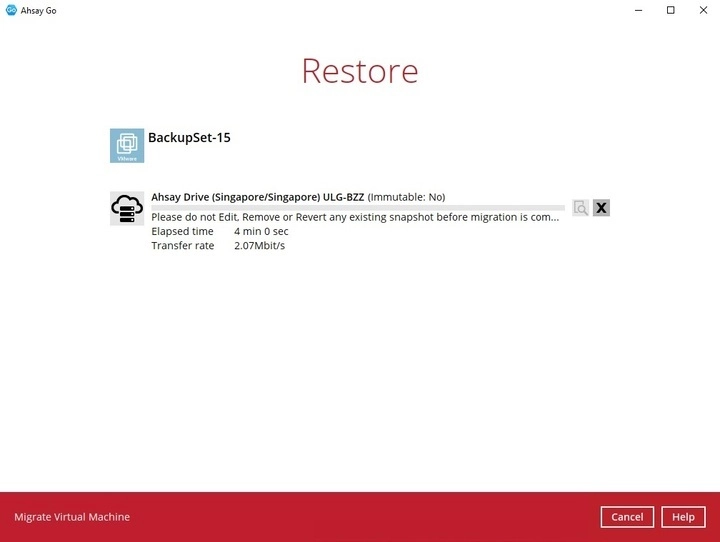
-
Select the virtual machine you would like to migrate and click Migrate Virtual Machine to start the migration process.
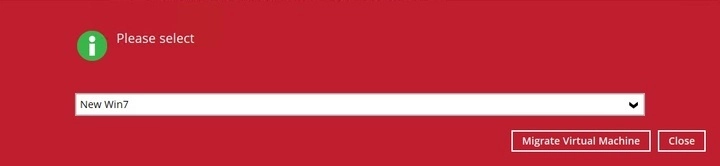
For VM on ESXi host, the VM may be suspended temporarily during the migration process. The downtime of the VM should be minimal.
Stop Run Direct Virtual Machine
To stop all virtual machines or individual virtual machine that is running with the Run Direct feature, you can stop running guest VMs started up using Run Direct by either:
-
Quitting AhsayOBM

-
Clicking Cancel
-
Click Cancel to stop the restore.
- Click Stop the restore to proceed.
-
- When the Auto Migrate option is selected, there will be no Migrate Virtual Machine option available. As once the auto migration is completed, the guest VM will have been fully restored to the VMware Host and will be running and managed under the VMware Host environment. Therefore, the Run Direct VM instance will no longer exist as a result.
- The "Migrate Virtual Machine" link is only present if you run a Run Direct restore without auto migrate selected.
Restore a Virtual Machine in VMDK Format
Restoring a VM in VMDK format is used to enable guest VMs that are backed up in VDDK mode to be restored in VMDK raw file format. This feature is useful if you wish to restore the backed up VM to another VMware host (ESXi server) even without using Ahsay Go.
-
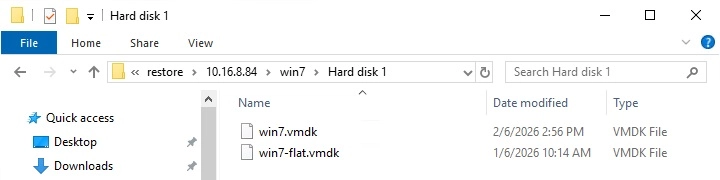
Open the folder where you have the VM restored to. Check whether the .vmdk file has been successfully restored.
-
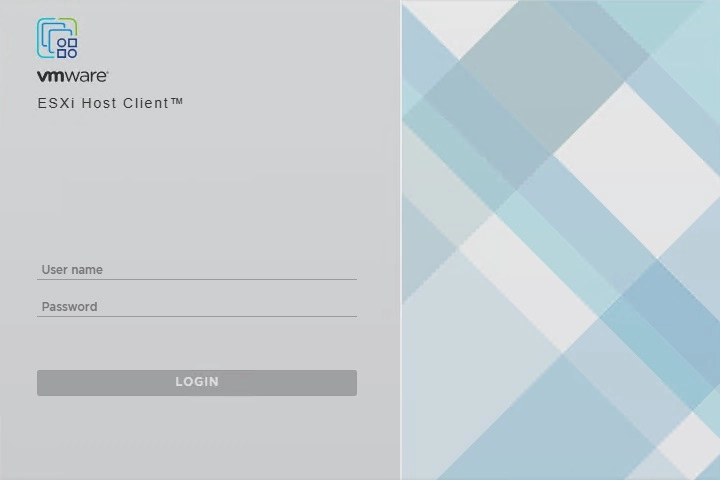
Open the VMware ESXi agent and log in to the ESXi server where you wish to restore the VM to.
-
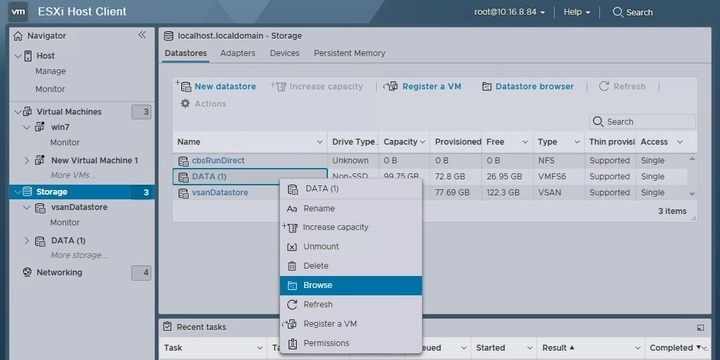
Right-click on the Datastore where you wish to deploy the restored VM to, then select Browse.
-
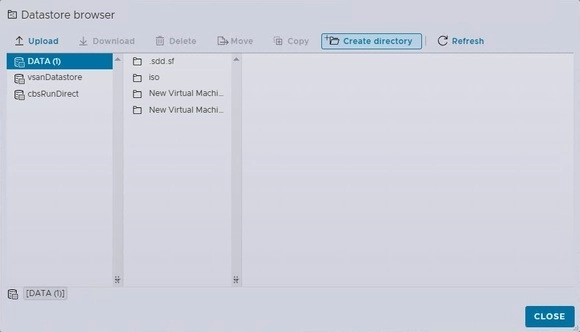
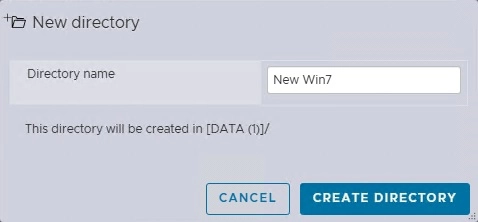
Create a new directory for the VM you are going to import.
-
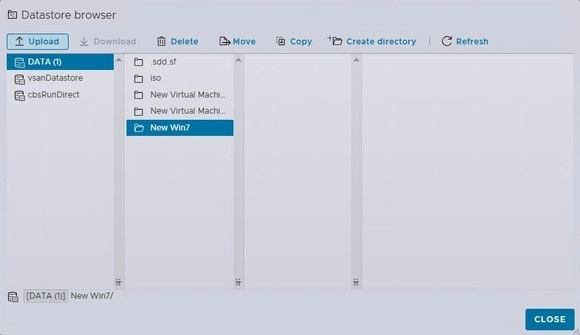
Open the newly created directory then select the Upload option at the top menu bar to select the VM you wish to restore.
-
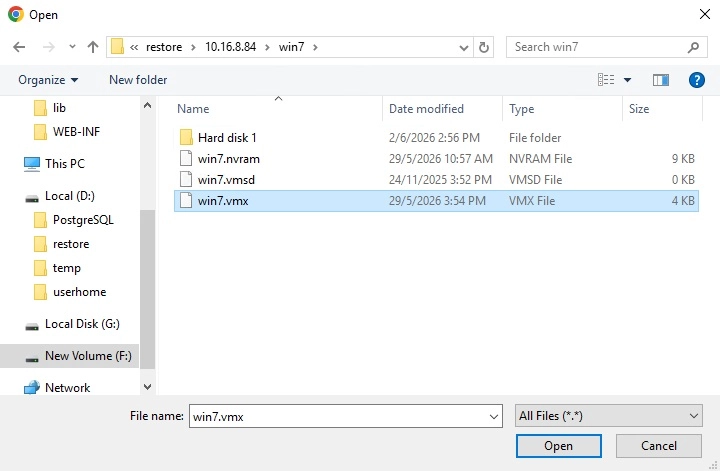
Upload the .vmx file from the folder where the VM is being uploaded.
-
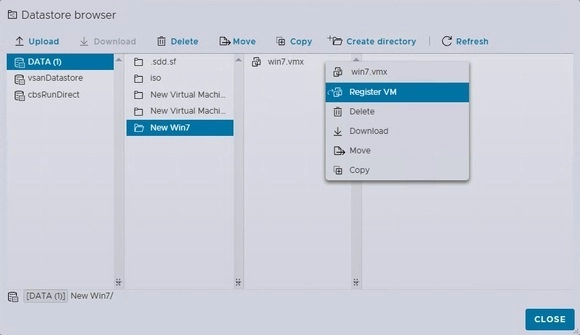
Right-click on the .vmx file, then select Register VM to register.
-
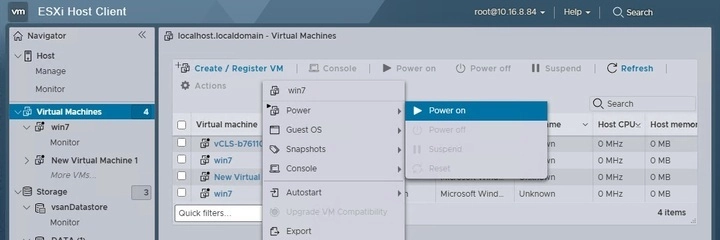
Right-click on the newly imported VM, then click Power > Power On to turn it on.
-
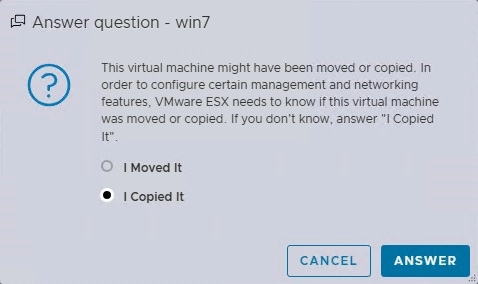
Select I Copied It, then click Answer to confirm if you see this screen.
Granular Restore
Before you proceed with the Granular Restore, make sure the following dependencies are fulfilled on the restore machine. Failure to do so may cause the Granular Restore to fail.
Requirements and Limitations
- Granular Restore does not support the mounting of virtual disks if the disk itself is encrypted, for example using Windows Bitlocker or other third-party security features.
- If any folders or files on a virtual disk are encrypted, these files/folders cannot be supported with Granular Restore. For example, if the “Encrypt contents to secure data” is selected in Advanced attributes.
- The mounting of Linux/Unix file systems from virtual disk file is currently not available due to limitations of the file system drivers.
- Granular Restore can only be performed on one guest VM at a time with no limitation on number of virtual disk that can be mounted on the guest VM, however, only files/ folders from one virtual disk can be retrieved at a time.
- Windows User Account Control (UAC) must be disabled to apply Granular Restore.
- Due to the removal of VDDK library from Granular Restore (OpenDirect), Granular Restore is now available ONLY on ESXi or vCenter VMware Backup Sets.
-
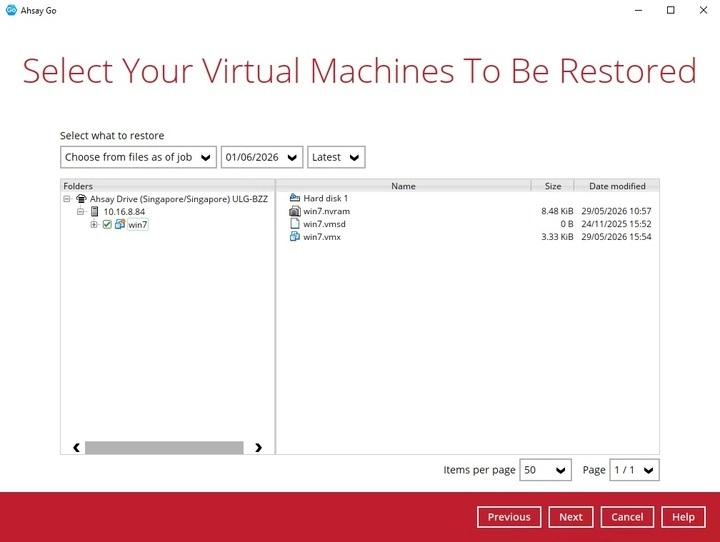
Select the VM to be restored.
-
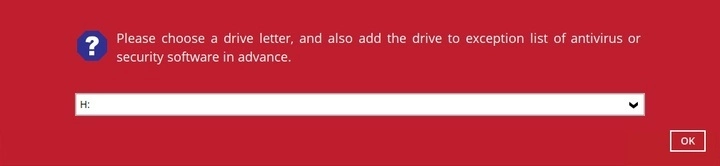
Select the drive where you wish the mounted image to be mapped on your machine, then click OK to proceed.
-
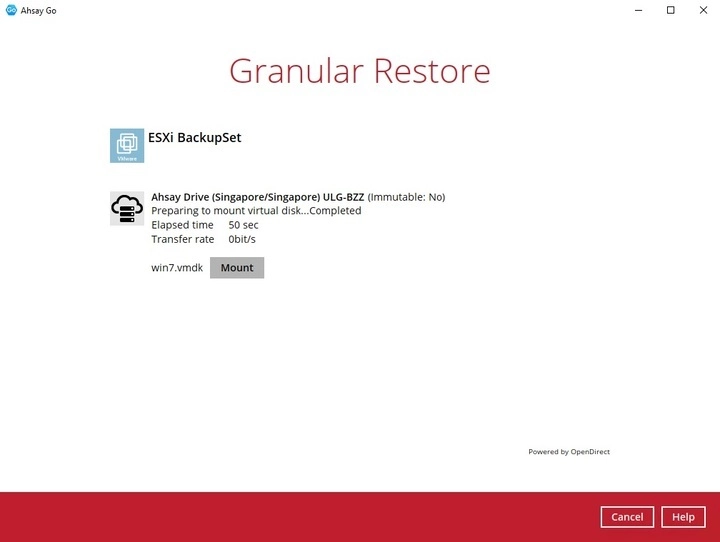
You will be presented with a list of disks that you may Mount or Unmount. Select a disk, then press the Mount button.
-
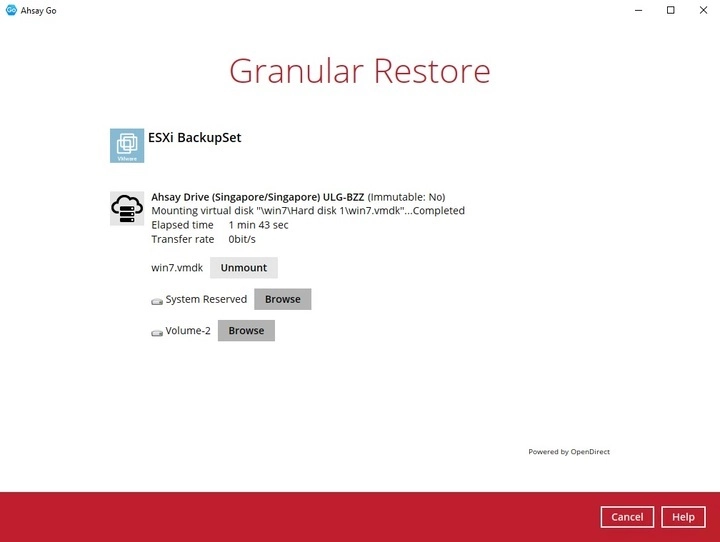
After mounting a disk, a list of available volumes will be presented beneath each mounted disk. You may browse these volumes and interact with the files contained within.
-
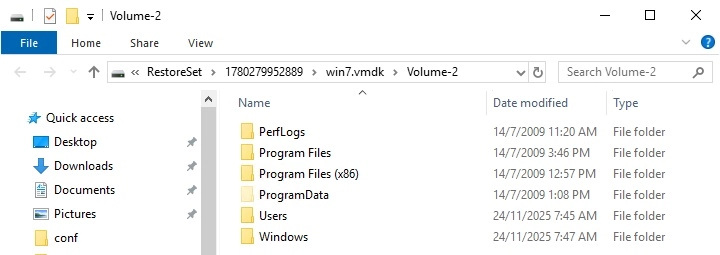
Select a volume and click the Browse button to view a list of files contained within. You can view, copy or delete the listed files.
-
Once done go back to Ahsay Go and click Cancel, then Stop the granular restore to conclude the restore process.

Due to the limitation of the virtual file system library, the mounted virtual disks will only be unmounted from your machine when you exit Ahsay Go.


