
 AhsayCBS
[v10] Administrative Access
The following shows the “Administrative Access” tab under System Settings > Basic.
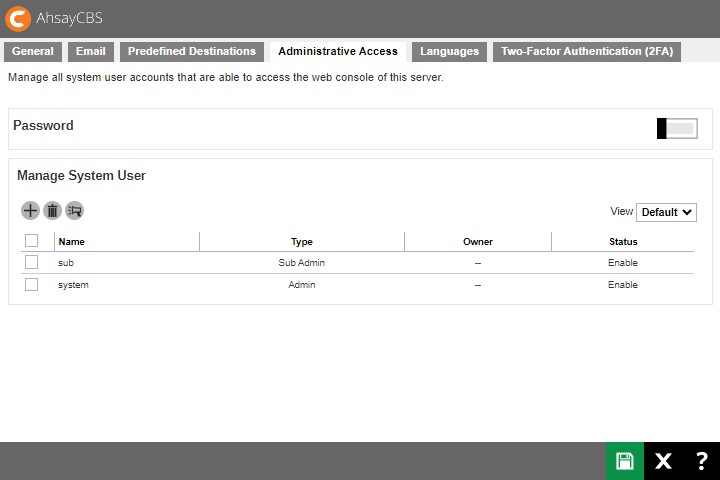
You can set the system password complexity and manage your system user accounts on this page.
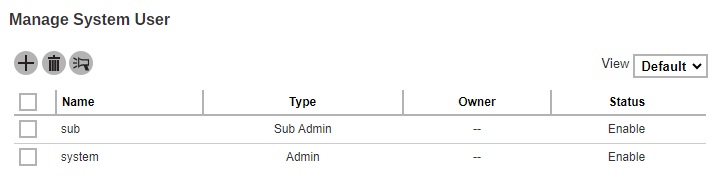
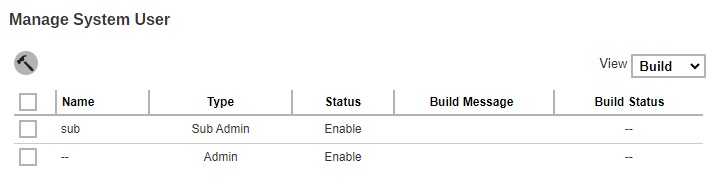
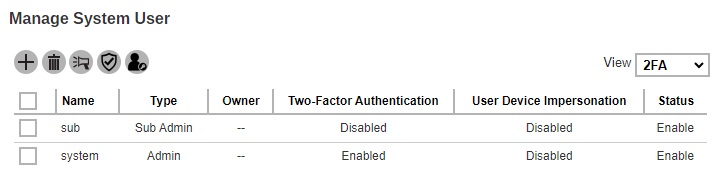
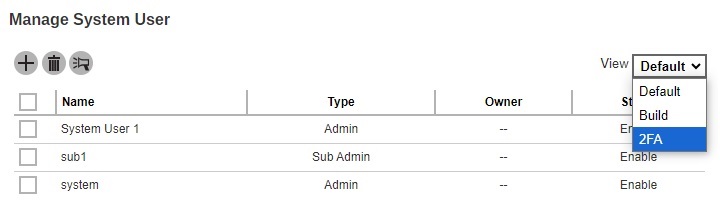
There will be three views available in this tab, Default, Build and 2FA.
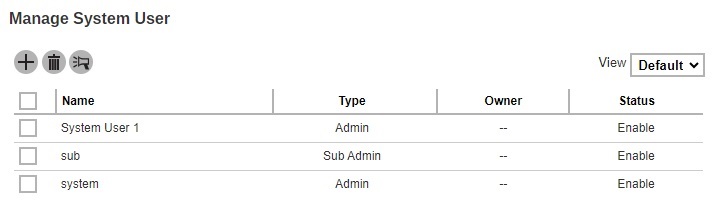
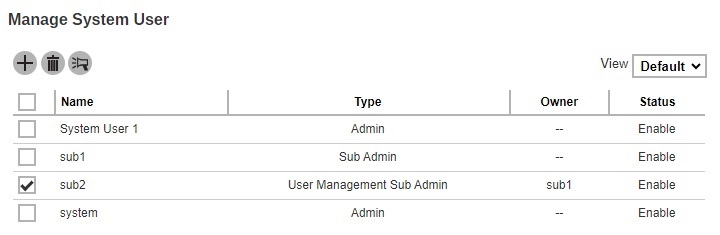
This is the Default view where it shows the “Name”, “Type”, “Owner” and “Status”.
This is the Build view where it shows the “Name”, “Type”, “Status”, “Build Message” and “Build Status”. The Build Branded Client button will only be displayed in this view.
Partners with multiple Sub Admins each with different branding can build AhsayOBM/AhsayACB installers by selecting the required Sub Admin(s) or all Sub Admins in one go.
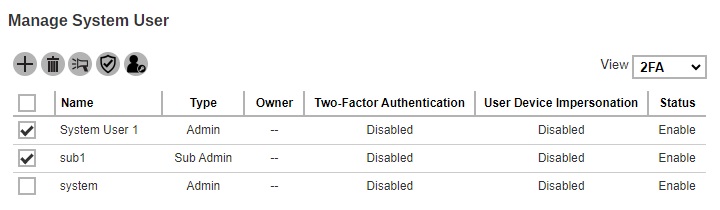
While the 2FA view will only be available if Two-Factor Authentication has been enabled and setup in System Settings > Basic > Two-Factor Authentication (2FA) tab. This view shows the “Name”, “Type”, “Owner”, “Two-Factor Authentication”, “User Device Impersonation” and “Status”. The Enable / Disable Two-Factor Authentication and Enable / Disable User Device Impersonation buttons will only be displayed in this view.
- Name - name of the system user.
- Type - role type of system user. There are five types: Admin, Read-only Admin, API User, Read-only API User and Sub Admin.
- Owner - ownership of the system user.
- Status - account status of the system user. There are three statuses: Enable, Suspended and Locked.
- Build Message - the progress of building the branded installers.
- Build Status - status of building the branded installers. There are two statuses: building and finished.
- Two-Factor Authentication - 2FA status of the system user. There are three statuses: Enabled, Disabled and Enforced.
- User Device Impersonation - user device impersonation status of the system user. There are two statuses: Enabled and Disabled.
Password
System users upon initial login will be required to change their password for enhanced security. Further access will not be allowed until the “system” user password has been changed. To set up the password complexity that the user has to follow, you can configure this in System Settings > Basic > Administrative Access.
Here are the following conditions where the system user needs to change the password:
- Logs in as default system user for the first time.
- Password of default system user was changed back to “system”. Refer to this article for more information on Recover AhsayCBS System Account Password.
- System user password has expired.
Set Up Password Complexity Requirement of System User
-
Switch on Password, by default it is switched off.
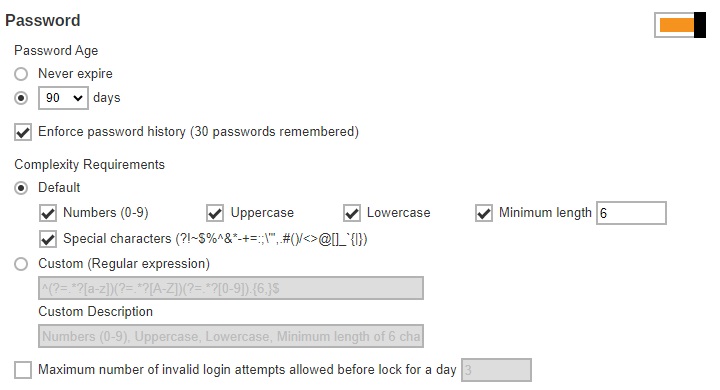
- Select the “Password Age”, this defines the period of time when the login password of a system user expires. By default, it is set to expire every 90 days. Once it expires, system user is required to change their password before they can continue using AhsayCBS.
- Also configure “Enforce password history”. By default it is set to remember the last 30 login passwords used by each system user which they cannot use again as a new password.
-
Select the “Complexity Requirements”. There are 2 choices:
- Default – this is selected by default. You can further customize this by specifying here what type of characters will be accepted for the new password. If the password will require numbers, uppercase letters, lowercase letters, the minimum length of the password and special characters that can be used.
- Custom – you can specify the regular expression and/or custom description that can be used for the new password.
- Click Save once done setting the password complexity requirement.
Manage System User
On daily operation, you may need to assign your operators or administrators to work on your AhsayCBS. You may have programmers to write API for your applications with the AhsayCBS. You may also want to hire some resellers so that you can expand your business. You will need to setup different system users with different role/privileges to work on AhsayCBS.
The following are the operations you can do with your system users:
- Add a new system user
- Configure settings of a system user
- Build branded installers for system user
- Export/Import system user
- Delete a system user
- Send a broadcast to system user
- Enable two-factor authentication of system user
- Enable user device impersonation of system user
Add a new System User
-
Click Create under “Manage System User” to add a new system user.
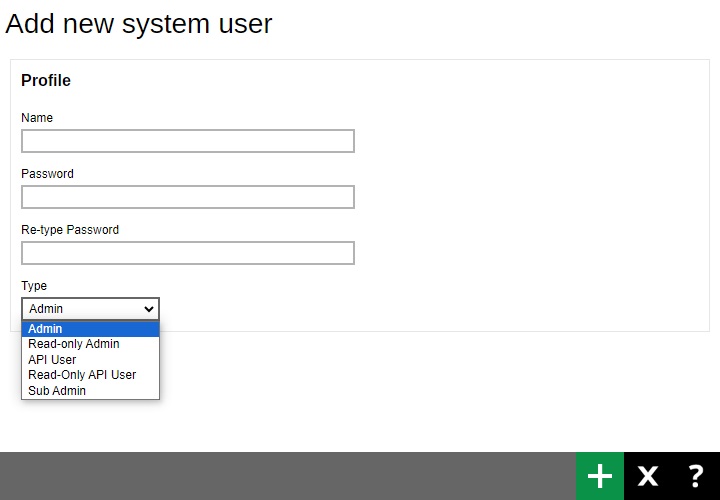
- Enter the “Name” of the system user.
- Enter the “Password” of the system user. Enter the same password again in the “Re-type Password” field.
-
Select the system user type from the “Type” dropdown box. There are five types of system users:
-
Admin
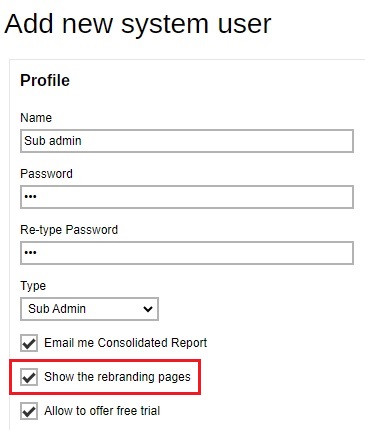
The Admin role has the same privilege as the built-in system account. For example, you can assign this account for your administrator(s) to configure or administer the AhsayCBS for you.
AhsayCBS allow Admin role user account to independently disable or enable Sub Admin user account access right to the branding pages.
-
Read-only Admin
The Read-only Admin role shares similar accessibility as its creator with Admin role, except with read permission only.
-
API User
The API role has full access right to the system; it has the same privilege as the built-in system account. This account is created for external application developers who can use this for API login authentication purposes.
-
Read-only API User
The Read-only API user role shares similar accessibility as the API role except with read permission only. This account is created for users who need to collect reports via API.
-
Sub Admin
The Sub Admin (Reseller) role has the full access right:
- to create AhsayOBM/AhsayACB backup users.
- to manage the backup and restore jobs or activities of AhsayOBM/AhsayACB backup users it has created.
- to create and manage Sub Admin, Read-only Sub Admin and User Management Sub Admin account.
For detailed steps on how to create the Sub Admin (Reseller) user please refer to Create a Sub Admin (Reseller) User discussion.
The following table provides a summary of the permissions of different system users in AhsayCBS.
Permission Admin Read-only Admin API User Read-only API User Sub Admin Read permission ✔ ✔ ✔* ✔ ✔ Write permission ✔ ✖ ✔* ✖ ✔ Log in AhsayCBS ✔ ✔ ✖ ✖ ✔ Create new system users ✔ ✖ ✔* ✖ ✔ Profile page ✔ ✔ ✖ ✖ ✔ Backup User Settings page ✔ ✖ ✖ ✖ ✔** Rebrand Web Console page ✔ ✖ ✖ ✖ ✔ Rebrand Client page ✔ ✖ ✖ ✖ ✔ Export/Import profile ✔ ✖ ✖ ✖ ✔ * API role has full access to the AhsayCBS which is similar as the Admin role through the API call, except log in to the AhsayCBS interface.
** Sub Admin role has full access to the settings (except the Backup User Settings page) and users under this sub admin user only.
-
-
Click Add to add. The newly-created system user, System User 1, appears on the page.
- Click Save to save.
Configure Settings of a System User
You can modify the setting of your system user by clicking the system user’s name.
You will see 4 tabs, which will be described below:
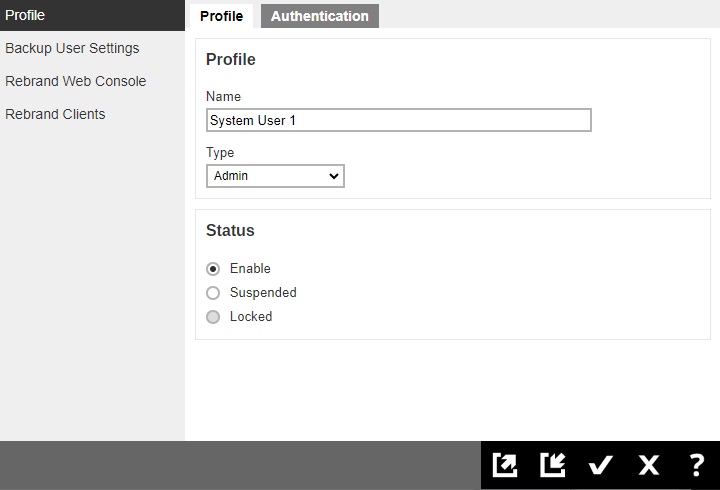
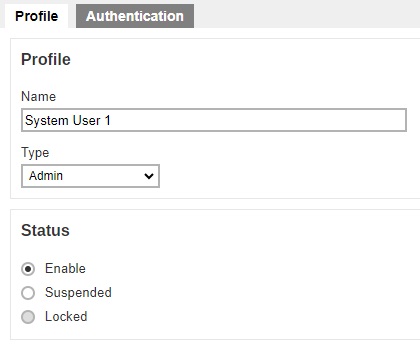
Profile
The Profile page is available to all Admin, Read-Only Admin, and Sub Admin users after they log in.
In the “Profile” page of our example, “System User 1”, the type of user is Admin. You can change the "Name", "Type" and "Status" of the user in this page.
The Profile page contains more settings for Sub Admin users. For more details on this please refer to Configure a Sub Admin (Reseller) User.
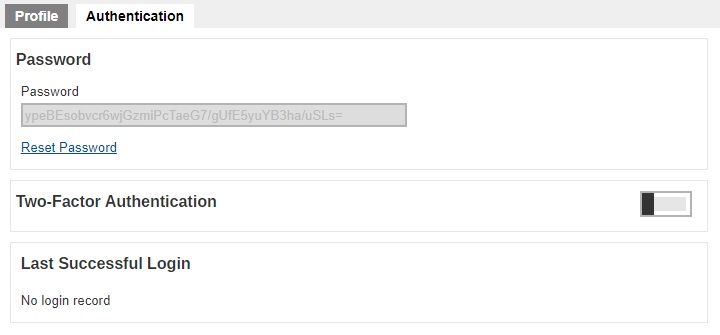
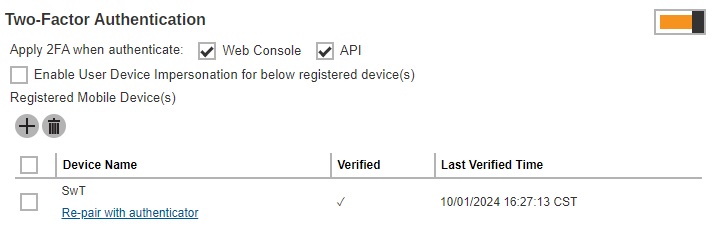
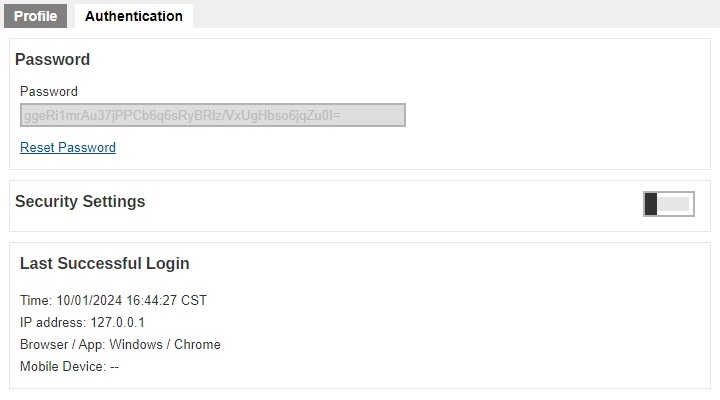
The Authentication page is available to all types of users. Password of system users may be reset here, and details of last successful login may be viewed here. However, Two-Factor Authentication of system users can be set up here only for Admin, Sub Admin and Read-only Admin users. By default it is not enabled, to enable it slide the switch to the right.
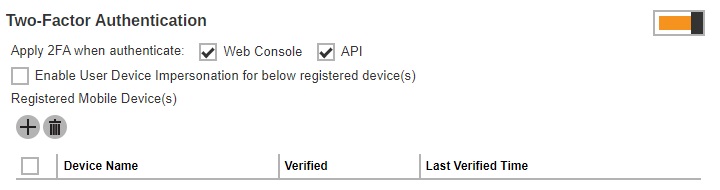
Both checkboxes for “Apply 2FA when authenticate” are enabled by default.
- Web Console – if ticked, this will require the system user to use 2FA upon log in to AhsayCBS. If unticked, the system user can log in to AhsayCBS without 2FA even if the “Two-Factor Authentication” is enabled.
- API – this will require the user to provide a passcode to authenticate API calls.
The User Device Impersonation will allow system users to login to the backup user account that they manage. This may be enabled by ticking the Enable User Device Impersonation for below registered device(s) checkbox. By default it is not enabled.
Once this is enabled, if the backup user has their Authentication enabled, these are the behaviors:
- Ahsay Mobile – both system user and backup user will simultaneously be notified. Everytime a backup user tries to login, the system user will also get the authentication request if Ahsay Mobile is used. The authentication request that will be received will not indicate which backup user is trying to login.
- Third-Party authenticator – a screen asking for the one-time passcode will be displayed. Use the passcode generated by the authenticator app to login.
- Both types – if both Ahsay Mobile and third-party authenticator are configured, an authentication request will be sent (default behavior) to Ahsay Mobile.
Only enable this feature if needed to avoid getting unnecessary authentication requests when backup users are trying to login using Ahsay Mobile.
Below is a table showing system users that can be enabled with this feature:
| System User | Feature Available |
|---|---|
| Admin | ✔ |
| Read-only Admin | ✔ |
| Sub Admin | ✔ |
| Read-only Sub Admin | ✔ |
| User Management Sub Admin | ✔ |
| API User | ✖ |
| Read-only API User | ✖ |
If the User Device Impersonation of a system user is enabled and there is a mobile device registered for that system user, then 2FA will be required to login. The backup user will be required to register a device for 2FA before the system user can login.
2FA will not be required if there is no registered mobile device for both the system user and end user even if the User Device Impersonation is enabled.
The feature “Re-pair with authenticator” will only be available if Ahsay Mobile app is used for 2FA. If the registered device used for 2FA was damaged, lost or missing; the backup content of the device can be migrated to the new device by using AhsayOBM/AhsayACB. For instructions on how to do this please refer to the Ahsay Mobile User Guide for Android and iOS. Once the migration is finished, the new device must be re-paired with the Ahsay Mobile app to enable log in using push notification and disable the one in the original device.
Reset the Password
- Click Reset Password to reset the password.
-
Enter the new password and confirm the password.
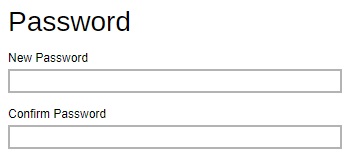
- Click Save to save.
Add a Device
-
Click Create to add a device.
-
The screen that will be displayed here will depend on the Authenticator App selected in the Mobile Authentication settings. The authenticator app that will be used as an example is the Ahsay Mobile app. Download the Ahsay Mobile app then scan the QR code to pair the device.
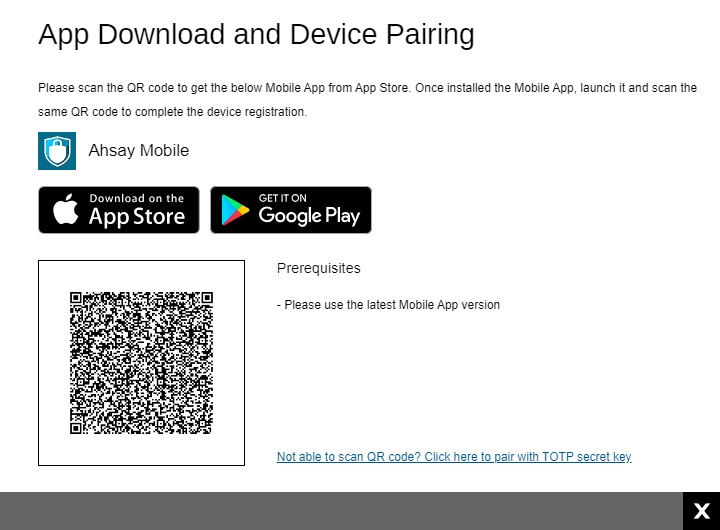
-
When pairing is completed, click OK then Save to save the changes.
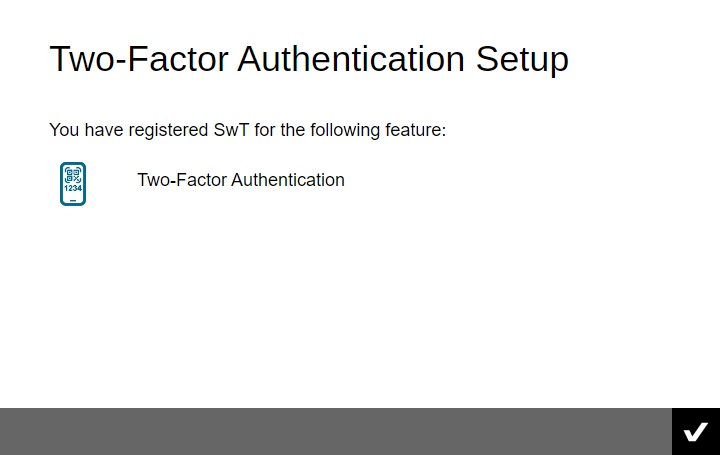
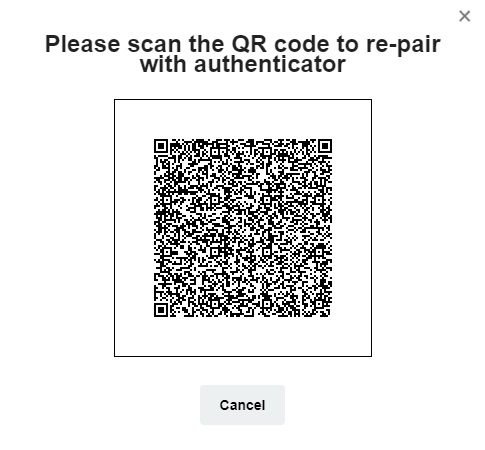
Re-pair a device with Ahsay Mobile
-
Click Re-pair with authenticator link.
-
Scan the QR code using authenticator app. Once pairing is finished system user will be added again in the authenticator app.
For old system user accounts with Twilio Credentials Verification enabled, this will be the screen displayed. By default the Security Settings is not enabled, to switch it on slide the switch to the right.
Click Create to add a phone number. Select the country code and enter the phone number of the user where the passcode will be sent and click OK.
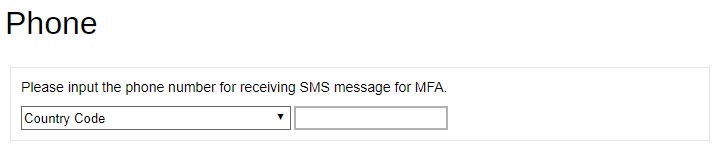
After doing the modifications, click OK then Save to save the changes.
Backup User Settings
The Backup User Settings tab is available to admin and sub admin users after they log in, although sub admin users will have read-only access.
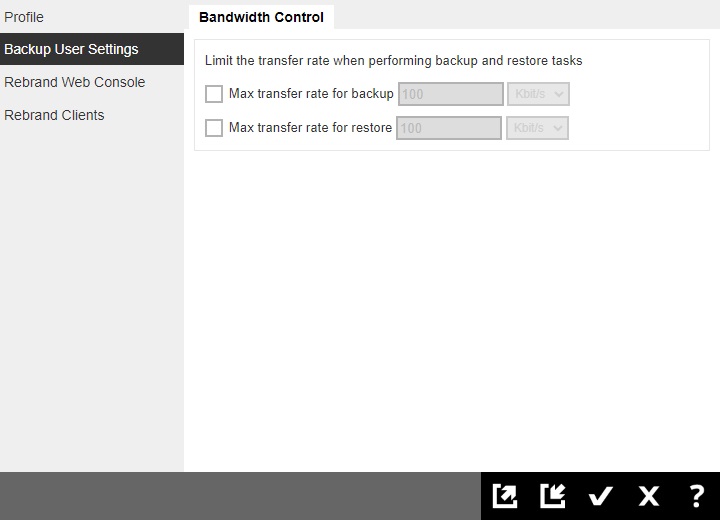
For admin users, only the Bandwidth Control page is available. The admin can limit the maximum transfer rate that will be used during backup and restore jobs.
- To limit the maximum transfer rate during backup, click the box in front of Max transfer rate for backup. Enter the value and select the unit of measurement either Kbit/s, Mbit/s or Gbit/s.
- To limit the maximum transfer rate during restore, click the box in front of Max transfer rate for restore. Enter the value and select the unit of measurement either Kbit/s, Mbit/s or Gbit/s.
There are more pages available for sub admin users, for more details about this please refer to Configure a Sub Admin (Reseller) User.
Rebrand Web Console
The Rebrand Web Console tab is available to admin and sub admin users after they log in. Both admin and sub admin user can use this feature to rebrand the images on the AhsayCBS web console when accessed by the sub admins hostname.
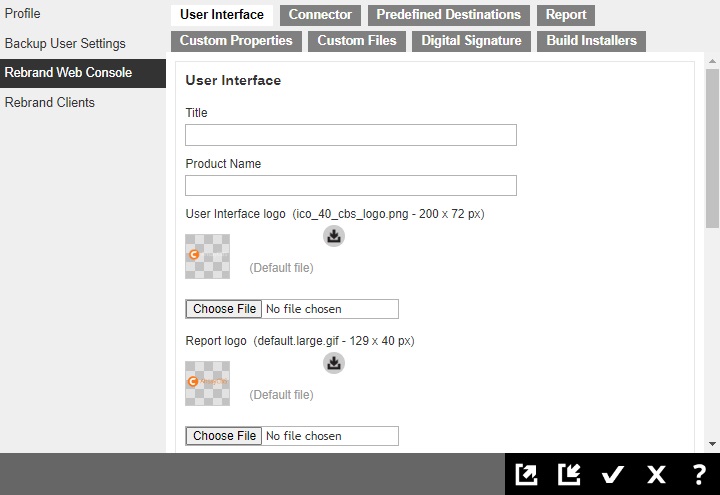
For more details on how to do the branding for AhsayCBS, please refer to the Branding section.
Rebrand Clients
The Rebrand Clients tab is available to admin and sub admin users after they log in. Both admin and sub admin user can use this feature to rebrand the AhsayOBM and AhsayACB.
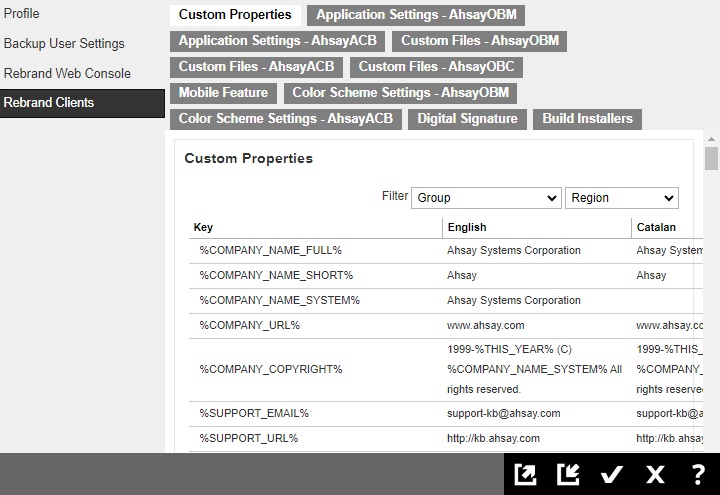
For more details on how to do the branding for AhsayOBM/AhsayACB, please refer to the Branding section.
Build branded installers for System User
The Build Branded Client feature can be used to build branded installers at one go, please refer to the Branding section for instructions on how to do this.
Export/Import System User
The export function can export the branded images, and branded properties that is set in the Rebrand Web Console and Rebrand Clients into a JSON format file. If you need to apply the branding to other Sub Admin users, you may import the branded JSON file back to the user.
The Import and Export buttons are available to Admin and Sub Admin users only. They are found at the bottom right corner of the screen.
Import button

Export button

Delete a System User
-
Check the box in front of the system user to be deleted.
- Click Delete, in the message prompt that will appear click OK to delete the system user.
- Click Save to save.
Send Broadcast to System User
-
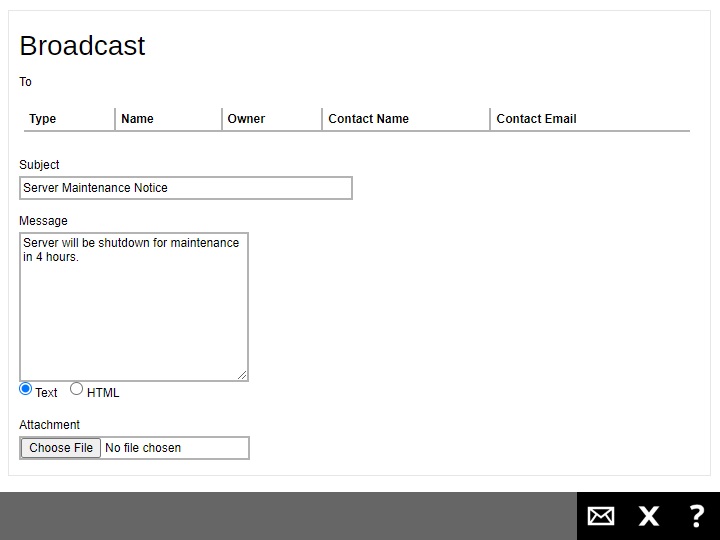
Select the system user(s) to whom you need to send the broadcast message. In our example, System User 1 is selected.

-
Click the Broadcast button.
-
Enter the “Subject” and “Message” for the broadcast message.
- You can select Text or HTML for the message body.
- If you want to include an attachment, click Choose File and browse to the desired location to select the file you want.
Click the Send button to send the broadcast message. Click Close to exit.
Enable Two-Factor Authentication of System User
-
Select 2FA in the “View” filter. This option is only available if Two-Factor Authentication has been enabled and setup in System Settings > Basic > Two-Factor Authentication (2FA) tab.
-
Select the system user you want to enable 2FA.
-
Click the Enable / Disable Two-Factor Authentication button.
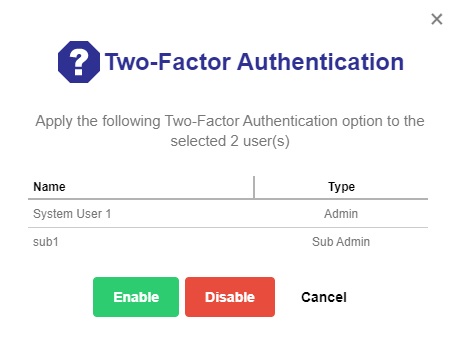
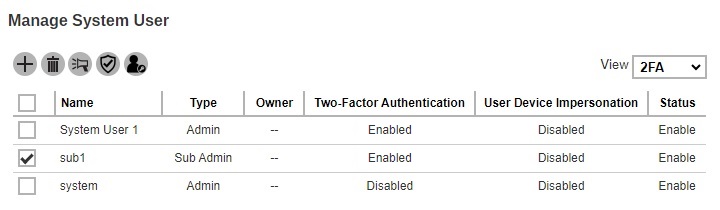
- Click the Enable button then the Save button to save the settings. Click Cancel to exit.
Enable User Device Impersonation of System User
-
Select 2FA in the “View” filter. This option is only available if Two-Factor Authentication has been enabled and setup in System Settings > Basic > Two-Factor Authentication (2FA) tab.
-
Select the system user you want to enable the User Device Impersonation.
-
Click the Enable / Disable User Device Impersonation button.

- Click the Enable button then the Save button to save the settings. Click Cancel to exit.