
 AhsayCBS
[v10] Deployment
There are three (3) major methods to deploy the replication service. All available deployment options, deployment combination and features comparison on different deployment methods will be discussed to help you decide which option to use.
Deployment Method
There are three (3) methods to deploy the replication service.
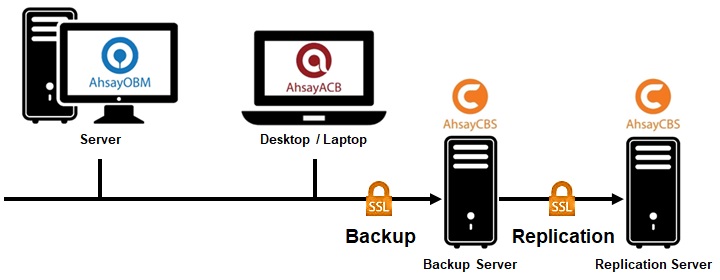
Method 1 (Recommended) - Deploy On A Single AhsayCBS Backup Server, Replicate On Another AhsayCBS Replication Server
Introduction
This is the typical deployment option, as well as the most recommended one, which features replication between a single AhsayCBS backup server and AhsayCBS replication server.
System Architecture
Requirement
Set up a new machine where you wish to host the replication server and install AhsayCBS on it. In other words, you will have two AhsayCBS services running. One on the backup server, and the other on the replication server where you would like to have the backup data replicated to.
Pros and Cons
Pros:
-
Speed of Replication and Restore
Multiple Threads Replication
Multiple threads replication is supported to improve the replication speed. The actual number of threads that are available for use depends on the CPU power of the backup server. The more CPU cores the backup server has, the more threads it will have for replication.
High Hardware Performance for High Replication Speed
A direct attached storage and SAN storage would provide good replicating speed.
-
Recovery
Fast Recovery in a Few Clicks
In case of a backup server outage, the replication server can be switched as the backup server in a short time to minimize the system down time and interruption to backup users.
For instructions to switch a replication server to backup server, refer to Method 3 - Start up Replication Server as Backup Server.
Cons:
-
Cost
Higher Cost
- Setup cost is higher.
- Cost for hardware storage expansion is relatively higher.
Although this option involves higher setup cost, consider the higher replication/restore speed and recovery switching, it may be worth the investment.
-
Storage Provisioning
Slower Storage Provisioning
Compared to cloud storage deployment, it takes more time and effort to assign the additional storage acquired when you need to expand the hardware storage.
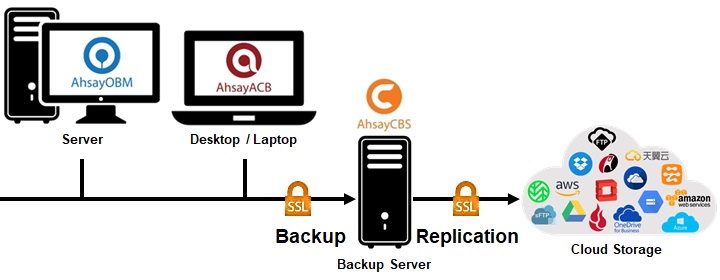
Method 2 - Deploy On A Single AhsayCBS Backup Server, Replicate To A Predefined Destination
Introduction
This deployment option allows you to replicate your backup data on the backup server to a cloud storage, local/mapped drive/removable storage, or FTP/SFTP server.
Refer to the list below for all the available predefined destination options.
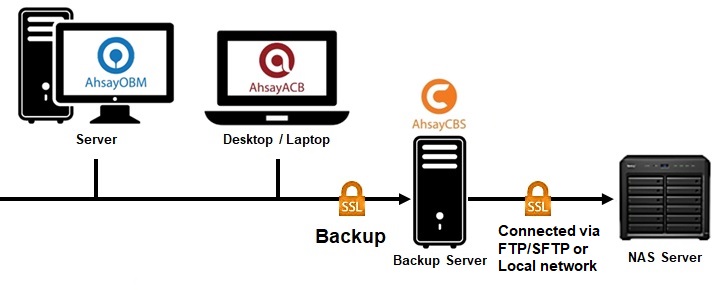
System Architecture
Cloud Storage as Replication Destination connected via Internet.
NAS Server as Replication Destination connected via FTP/SFTP or local network.
Requirement
First you need to have a cloud storage account, a local/network/removable drive, or a FTP/SFTP server in place. Then, the predefined destination must have been set under the System Settings > Predefined Destinations menu so it can be used for replication purposes.
Available Predefined Destinations
- Aliyun (阿里云)
- CTYun (中国电信天翼云 )
- Amazon S3
- AWS S3 Compatible Cloud Storage
- Wasabi
- Backblaze
- Google Cloud Storage
- Google Drive
- Microsoft Azure
- OneDrive
- OneDrive for Business
- Rackspace
- OpenStack
- Dropbox
- FTP
- SFTP
- Local / Mapped Drive / Network Drive / Removable Drive
Pros and Cons
Pros:
-
Multiple Threads Replication
Multiple threads replication is supported to improve the replication speed. The actual number of threads that are available for use depends on the CPU power of the backup server. The more CPU cores the backup server has, the more threads it will have for replication.
-
Cost
Low Cost
- Setup cost is low.
- Cost for storage expansion, especially on cloud storage, is relatively cheaper.
Cons:
-
Speed of Replication and Restore
Slower Upload Bandwidth
The replication and restore speed is subject to the connection speed to the predefined destination, and administrator may not always have control over the bandwidth.
-
Recovery
Longer Recovery Process
There is no quick way to restore the replicated data from the predefined destination to the backup server. To recover the replicated data on a predefined destination, you have to:
- Setup a new machine.
- Install AhsayCBS.
- Download the replicated files from the predefined destination back to the Backup Server.
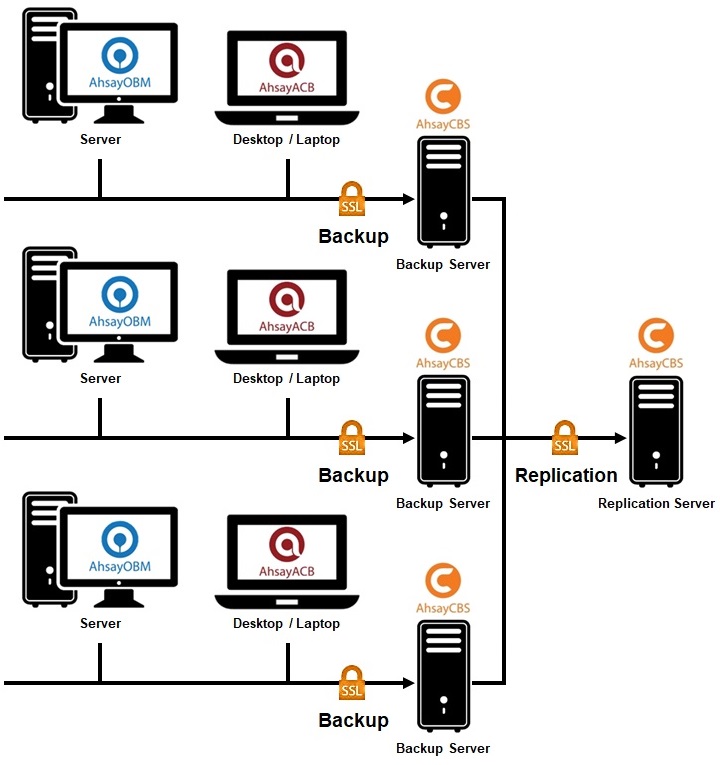
Method 3 - Deploy On Multiple AhsayCBS Backup Servers, Replicate To Another AhsayCBS Replication Server
Introduction
This deployment option allows you to replicate backup data from multiple AhsayCBS backup servers to an AhsayCBS Replication Server.
System Architecture
Requirement
Set up a new machine where you wish to host the replication server and install AhsayCBS on it.
In other words, you will have multiple AhsayCBS services running. Each backup server runs on its own license, while the replication server where you would like to have the backup data replicated to requires another license as well.
Pros and Cons
Pros:
-
Cost
Lower Setup Cost
You only require to have one replication server to accommodate replication from multiple backup servers, instead of one-to-one replication between backup server and replication server.
-
Single Replication Point Management
With only a single replication server, this deployment option allows you to centrally manage the replication settings and view replication status on the replication server web console, As opposed to the Method 1 deployment where you have to access multiple AhsayCBS web console pages for settings and management.
Cons:
-
Speed of Replication and Restore
Slower Upload Bandwidth
The replication and restore speed is subject to the connection speed to the predefined destination, and administrator may not always have control over the bandwidth.
-
Recovery
Longer Recovery Process
There is no quick way to restore the replicated data from the predefined destination to the backup server. To recover the replicated data on a predefined destination, you have to:
- Setup a new machine.
- Install AhsayCBS.
- Download the replicated files from the predefined destination back to the Backup Server.
Comparison Between Deployment On AhsayCBS and Cloud Storage
| Deploy on AhsayCBS Replication Server | Deploy on Cloud Storage | |
|---|---|---|
| Replication Retention | ✔ | x |
| The replication server creates snapshot of the replication data. Under the Replication Retention configurations, Restore Point Interval can be configured to define the number of days between each retention snapshot; Retention Customization Policy can be configured to define the number of days before an existing retention snapshot is removed from the replication server. | ||
| Startup Replication Server as Backup Server | ✔ | x |
| This feature allows you to quickly convert your AhsayCBS replication server into AhsayCBS backup server in the event of a backup server down, so that you can keep serving the backup users with minimal impact to your business. Refer to Method 3 - Startup Replication Server as Backup Server for detailed steps to perform this recovery. | ||
| Replicate Multiple Backup Servers | ✔ | ✔ |
| It is possible to replicate backup data from multiple AhsayCBS backup servers to another AhsayCBS replication server or cloud storage. This gives you the convenience of hosting backup data of multiple backup servers in one single replication server for the purposes of cost saving and easier management. | ||
| Support v6 Backup Set Replication | ✔ | x |
| This feature gives you the flexibility to back up not only v8 format backup sets, but also the v6 ones to the replication server, before the v6 format backup sets undergo the data migration process. | ||
| Quick Storage Provisioning | x | ✔ |
| As time goes by, your replication data may fill up the capacity on your AhsayCBS replication server or cloud storage and you will have to expand the storage capacity to accommodate the replication data. Comparing to AhsayCBS deployment, cloud deployment allows a hassle-free storage upgrade where you only have to pay your cloud storage service provider to get the upgrade done. | ||
| Upfront Hardware Investment | ✔ | x |
| Depending on your organization’s budget on deploying the replication service, it is generally more cost saving to deploy the replication service on cloud storage instead of the AhsayCBS as you do not need to invest on hardware and hosting upfront. | ||
Deployment Combinations Of Backup and Replication Servers
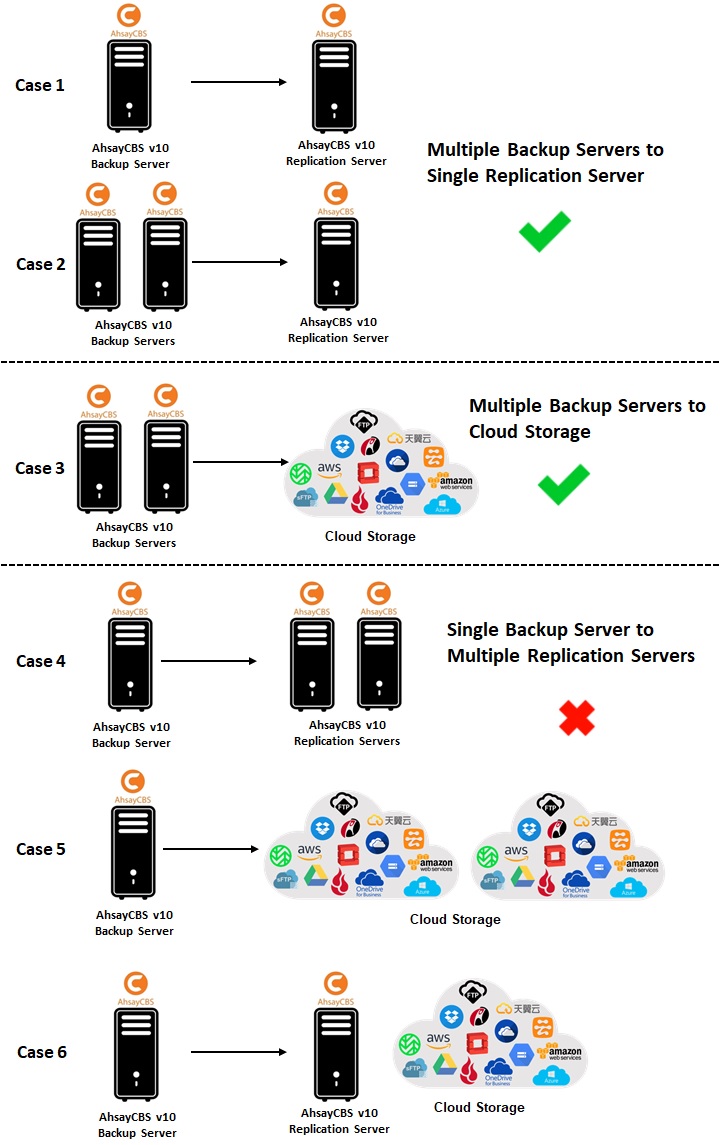
It is only possible for a single replication server or cloud storage to host replication data from multiple backup servers, but not the other way around, i.e. a single backup server replicating to multiple replication servers or cloud storage destinations. Refer to the illustration below for details on the possible deployment combinations.
Steps To Deploy A Replication Service
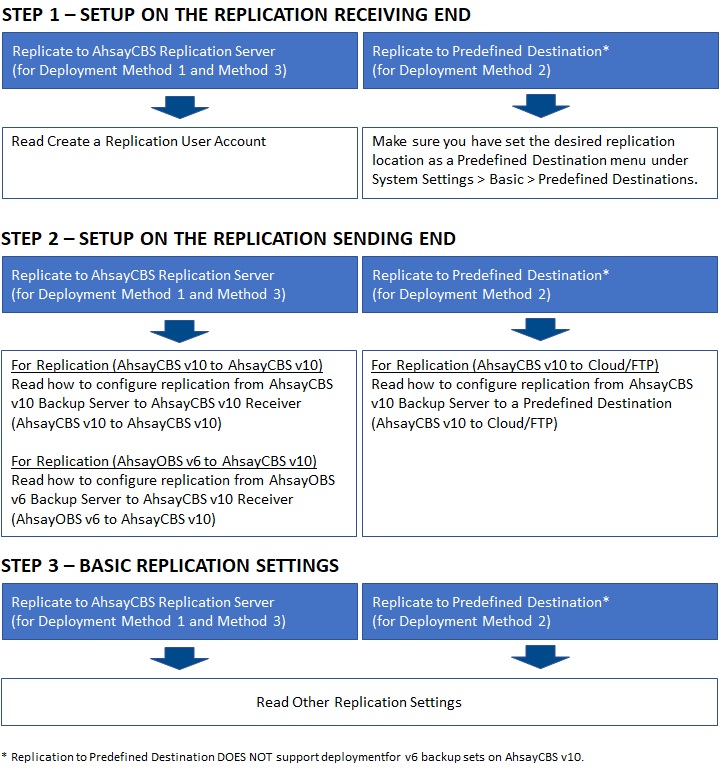
Configuration on the Replication Receiving End
Create a Replication User Account
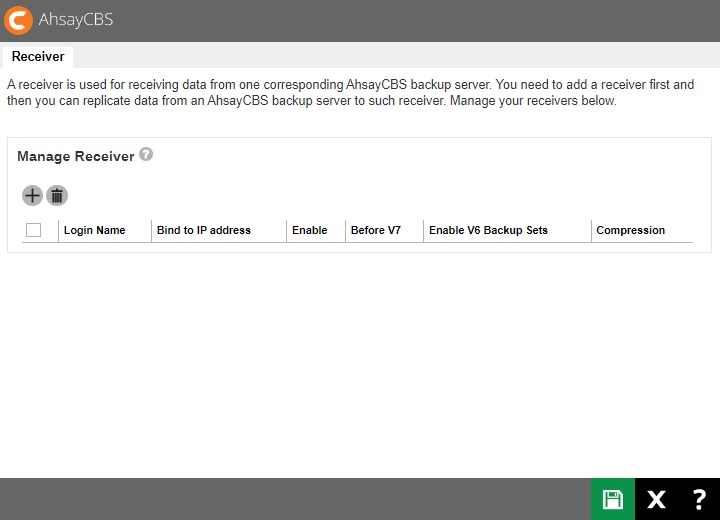
Before an AhsayCBS/AhsayOBS backup server can replicate backup data to another AhsayCBS replication server, a receiver user account must be created on the AhsayCBS replication server first. Follow the steps below to create a replication receiver account.
-
Go to Replication > Accepting Data.
-
Click the Create button in the "Manage Receiver" section.
-
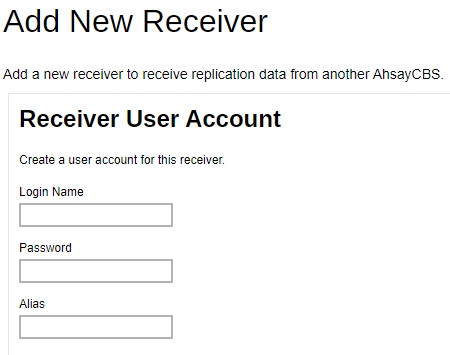
Set the login name, password and alias of the receiver account.
-
Configure the source backup server host settings, including the http/https protocol, source backup server host name and port number.
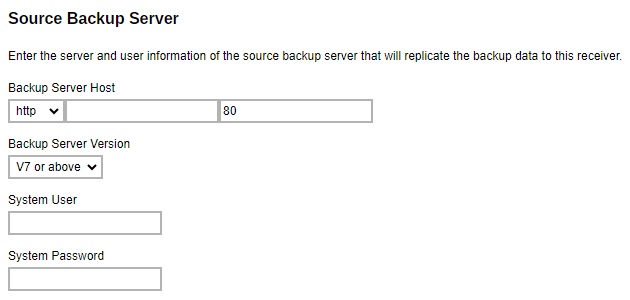
- Backup Server Host - IP address / host name of the backup server.
-
Backup Server Version - source backup server version.
-
If you select V7 or above, it means the source backup server is an AhsayCBS version 9 backup server.
If you have upgraded your backup server to v10 from v6, and still wish to replicate backup sets in v6 format before they are migrated to v10 format, make sure you select V7 or above in this menu.
- System User – the system user login of the source backup server.
- System Password – the system user password of the source backup server.
-
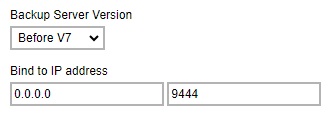
If you select Before V7 as the backup server version, enter the bind to IP address and the replication port. “0.0.0.0” and “9444” are the default values, you can assign a specific IP if you have multiple network cards. For multiple backup servers’ replication, a unique replication port number is required to set, such as “9444”.
-
-
Switch the “Enable V6 Backup Sets Replication” on if you will replicate v6 backup sets to the replication server.

-
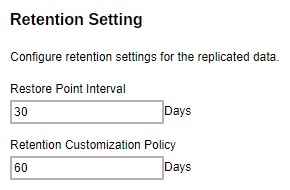
Configure the retention settings for the replicated data.
-
Restore Point Interval – defines the number of days before new snapshot of the replicated data will be taken and stored in the retention area. A retention snapshot will be taken only when the following two conditions are met:
- There is data received from the backup server.
- Restore Point Interval is reached.
No retention snapshot will be taken if there is no data received, even when the Restore Point Interval is reached.
- Retention Customization Policy – defines the number of days the old snapshot copies will be retained in the retention area.
-
- Click Next to proceed when you are done with the settings.
-
Set the default home directory for this replication and set up the path to store the user homes.
The following is an example of a v10 receiver setup. In v10 receiver setup, you will be able to configure the default home directory, as well as replication home directory for individual backup server user home.
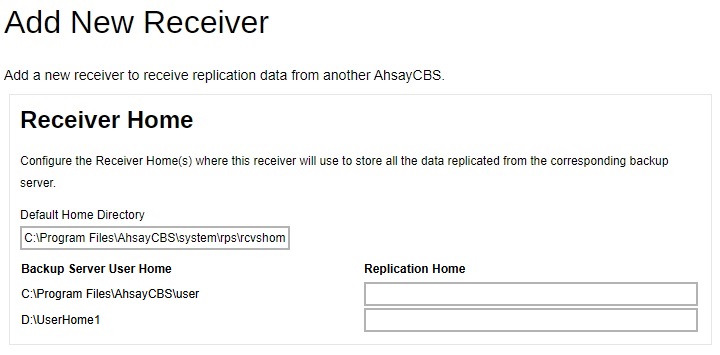 If AhsayCBS is receiving multiple backup servers, please use unique path for each receiver’s “Replication Home”.
In v6 receiver, you can only set up the default home directory.
It is recommended to configure the default home directory to a non-system drive (i.e. not C:\ drive), especially when there are v6 backup sets, as the replication transaction log files may fill up the disk space and cause the operating system to become unstable. - Click OK to confirm the configuration.
-
Although the receiver has been created, it is still disabled.

-
Click on the receiver you created then tick the Enable Replication checkbox. Click OK to confirm the configuration.
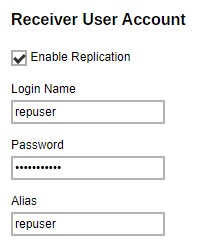
-
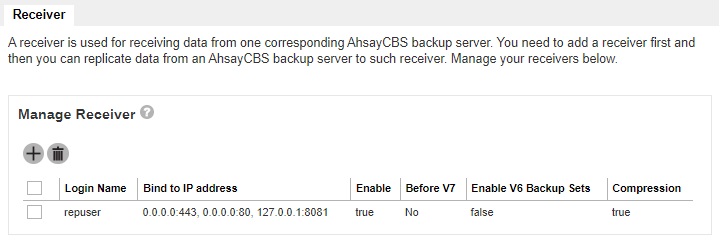
The receiver is now enabled as you can see from the screenshot below. Click Save to save the settings.

Edit Replication Receiver
You can edit the configurations of the replication receiver after it has been set up.
- Go to Replication > Accepting Data on the AhsayCBS web console on the replication receiver side.
- Click on the replication receiver account under the “Manage Receiver” section which you wish to edit configurations for.
- Revise the desired replication receiver item, then click OK and Save to confirm the changes.
Configuration On The Replication Sending End
Enable and configure the replication feature on the backup server side by following the corresponding sub-chapter below depending on the backup server version or replication destination.
AhsayCBS v10 Backup Server to AhsayCBS v10 Receiver
The following example is a v10 (backup server) to v10 (replication server) replication setup. For earlier version setup, please refer to AhsayOBS v6 Backup Server to AhsayCBS v10 Receiver (AhsayOBS v6 to AhsayCBS v10) for details.
- Make sure you have created a replication receiver account on the receiving end of the AhsayCBS server first. Refer to Create a Replication User Account for detailed instructions.
-
Click on the Sending Data icon under the Replication section on the AhsayCBS web console of the backup server.

-
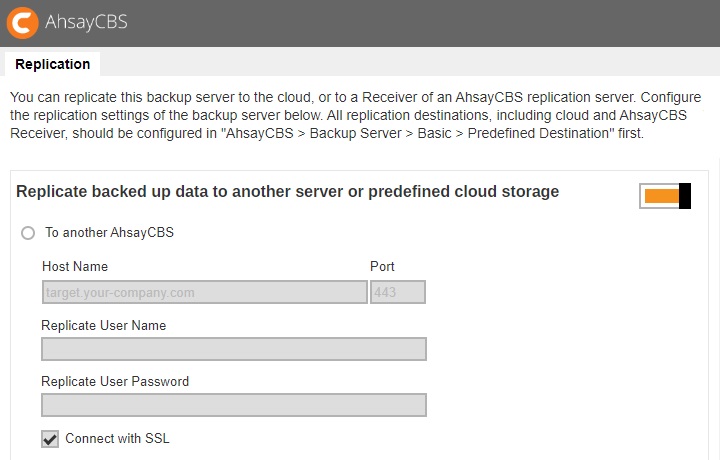
Switch on "Replicate backed up data to another server or predefined cloud storage".
-
Select the To another AhsayCBS option, and then enter the “Host Name”, “Port”, “Replicate User Name”, “Replicate User Password” of the replication receiver. Tick the “Connect with SSL” if needed.

- Host Name – IP address or host name of the replication server with AhsayCBS installed.
- Replicate User Name – the username of the receiver created on the AhsayCBS replication server.
- Replicate User Password – the password to log in to the receiver created on the AhsayCBS replication server.
- Connect with SSL – connect to the replication server with SSL.
-
If proxy is required to access the replication server, tick the “Use proxy” checkbox.

-
If there are backup sets in v6 format to be replicated to the replication server, make sure you switch on “Replicate v6 backup sets to v7 or above server”. The default port is set as “9444”.

-
If you wish to configure the following replication settings, refer to Other Replication Settings.
- Traffic limit for replication – which limits the amount of bandwidth used by replication.
- Selectable backup set for replication – which allows you to choose individual backup set from selected users for replication.
- Concurrent backup set for replication – which allows you to configure the maximum number of backup set allowed for replication at the same time.
- Cyclic Redundancy Check (CRC) Checking – which allows you to enable this checking to run automatically for verifying the integrity of the replicated data.
- Click Save to save the configuration.
AhsayOBS v6 Backup Server to AhsayCBS v10 Receiver
It is suggested to upgrade your v6 backup server to v10 so that you can enjoy the latest features provided by AhsayCBS. If you still wish to continue using the v6 backup server to replicate to a v10 receiver, follow the steps below for configuration of the v6 backup server.
- Make sure you have created a replication receiver account on the receiving end of the AhsayCBS server first. Refer to Create a Replication User Account for detailed instructions.
-
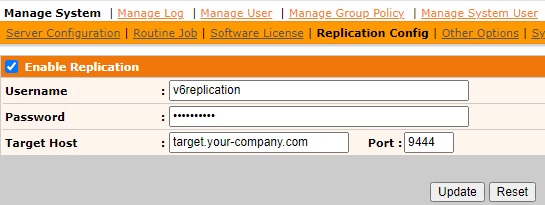
In your backup server, go to Manage System > Replication Config, then enter the username, password, target host and connecting port.
-
Click Update to confirm the settings.
The index files stored in the v6 backup server will not be replicated to the AhsayCBS (Replication Server) nor any cloud storage.
There is no multiple threads replication.
The AhsayCBS replication server cannot be started as a v6 backup server.
AhsayCBS v10 Backup Server to a Predefined Destination
- Make sure you have created a predefined destination first in System Settings > Basic > Predefined Destinations.
-
Click on the Sending Data icon under the Replication section on the AhsayCBS web console of the backup server.
-
Switch on “Replicate backed up data to another server or predefined cloud storage”.
-
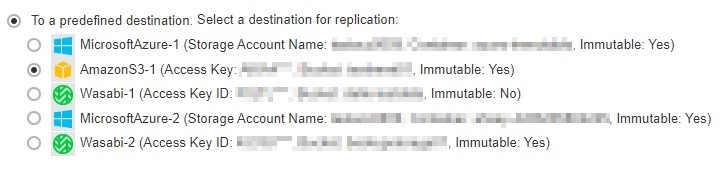
Select the To a predefined destination option. You will then see a list of predefined destination you have set under the System Settings > Basic > Predefined Destinations menu.
-
You can configure the folder name in the selected predefined destination to store the replication data.

-
If proxy is required to access the replication server, tick the “Use proxy” checkbox.
-
If you wish to configure the following replication settings, refer to Other Replication Settings.
- Traffic limit for replication – which limits the amount of bandwidth used by replication.
- Selectable backup set for replication – which allows you to choose individual backup set from selected users for replication.
- Concurrent backup set for replication – which allows you to configure the maximum number of backup set allowed for replication at the same time.
- Cyclic Redundancy Check (CRC) Checking – which allows you to enable this checking to run automatically for verifying the integrity of the replicated data.
- Click Save to save the configuration.
Other Replication Settings
The following replication settings can only be set when the replication feature has been enabled on the AhsayCBS backup server.
Traffic Limit
This is an optional setting that allows you to limit the amount of bandwidth used by replication traffic between a specified period of your choice.
-
Click on the Sending Data icon under the Replication section on the AhsayCBS web console of the backup server
-
Slide the switch to the right to turn on “Set traffic limit”.

-
Click Create to configure.
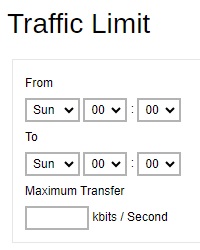
- From – set the start time to apply the traffic limit by selecting a day of the week and time in hh:mm (24-hr format).
- To – set the end time to apply the traffic limit by selecting a day of the week and time in hh:mm (24-hr format).
- Maximum Transfer – set the maximum bandwidth allowed for data transfer in the format of kbits /second.
- Click OK then Save to save the changes.
Replicate Individual Backup Sets
By default, all backup sets of all users on all user homes will be replicated to the replication location (either another AhsayCBS or a predefined destination). However, it is possible to select specific backup users and their specific backup sets for replication.
-
Click on the Sending Data icon under the Replication section on the AhsayCBS web console of the backup server
-
Slide the switch to the right to turn on “Replicate individual backup sets”.
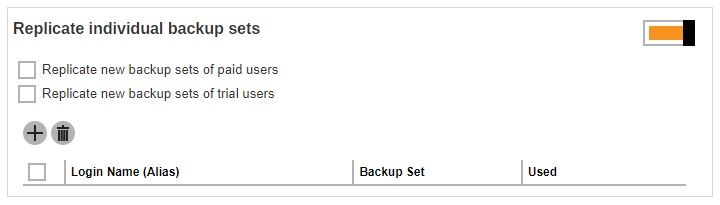
-
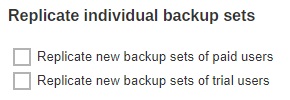
First, select to replicate the backup data of either the paid users or trial users, or both by checking the corresponding checkbox(es).
-
Then start selecting specific backup sets(s) to replicate. Click Create to select the desired backup users first. Multiple selection is possible. Click Next to proceed when you are done with the selection.
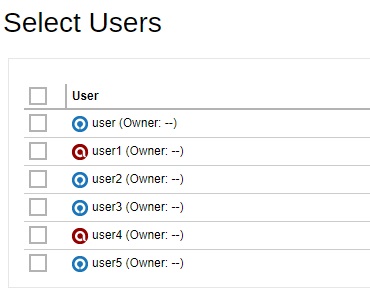
-
A page listing all the backup sets of the backup user(s) you have selected from the previous step will be displayed. Each individual row shows the name of the backup user, the name of the backup set, and the backup set type in corresponding icon. Select the desired backup sets by clicking the corresponding checkbox, then click Add to confirm the selection.

-
The selected backup sets will be added to the “Replicate individual backup sets” section. Each row of the entry shows the corresponding backup username, backup set name and the size of the backup set.

- Click Save to save the changes.
Set the number of backup sets to replicate concurrently
The number of backup sets to replicate concurrently may be changed on the AhsayCBS backup server web console under Replication > Sending Data.
Under the “Replicate backed up data to another server or predefined cloud storage” section, there is a drop-down menu for the “No. of backup sets to replicate concurrently” setting. The minimum number of backup sets that can be configured to replicate concurrently is 1 while the maximum is 16.
The default value is Auto, with this setting the number of backup sets to replicate concurrently is automatically computed. The way this value will be computed depends on the setting of the maximum threads for replication option which can be added in the %CBS_INSTALL_PATH%\conf\cbs.opt file.
Here are the two ways that the Auto value will be computed:
-
If the maximum allowed number of replication threads is enabled "com.ahsay.cbs.obs.config.Index.RepMaxThreads=true"
The default (Auto) number of concurrent backup sets = the number of CPU cores
For example, if the AhsayCBS server has a total of 8 CPU cores, then the number of concurrent backup set to replicate is 8.
There is no maximum value for the default (Auto) value, so if the AhsayCBS server has a total of 64 CPU cores then the Auto value will be 64. -
If the maximum allowed number of replication threads is disabled (default) "com.ahsay.cbs.obs.config.Index.RepMaxThreads=false"
The default (Auto) number of concurrent backup sets = Total number of CPU cores / 8
For example, if the AhsayCBS server has a total of 8 CPU cores, then the number of concurrent backup set to replicate is 1.
Another example, if the AhsayCBS server has a total of 16 CPU cores, then the number of concurrent backup set to replicate is 2.
There is a minimum value for the default (Auto) value which is 1. While the maximum number for the default (Auto) value is 4.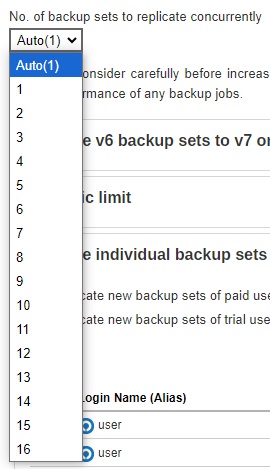
You may adjust the concurrent backup set value from the drop-down menu as highlighted above. In case you find the default setting is too low, the value can be increased to a larger value. Or if the large value is causing performance issues such as hard disk I/O or high network bandwidth utilization, it can be decreased to a lower value.
For more information regarding replication threads please refer to this article: Increase Replication Threads on AhsayCBS
Cyclic Redundancy Check (CRC) Checking
The Cyclic Redundancy Check (CRC) job will check all new files replicated to the AhsayCBS receiver since the last CRC job. This checking can be run automatically for verifying the integrity of the replicated data.
A replication receiver must have been set before you can enable the Cyclic Redundancy Check (CRC) Checking.
-
Click on the Accepting Data icon under the Replication section on the AhsayCBS web console of the replication server.
-
Click on the receiver which you wish to enable the CRC checking feature.
-
Scroll to the “Cyclic Redundancy Check (CRC) Checking” section and turn on the feature by sliding the switch to the right.

- The CRC checking is set to run on the second and fourth Saturdays of every month by default. You can configure the time for the checking to run on the specified dates.
- Click OK then Save to save the changes.
The Cyclic Redundancy Check (CRC) Checking feature option is only available for backwards compatibility: AhsayOBS v6 to AhsayCBS v10.
It is not supported in replication setups for:
- AhsayCBS v10 to AhsayCBS v10
- AhsayCBS v7 to AhsayCBS v10
Clean Up
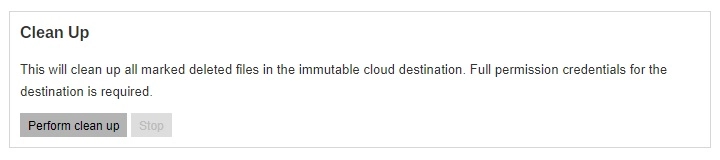
The cleanup function is available to manage storage efficiency. This will require full permission credentials to delete files from the immutable cloud storage. It will delete all folders except for the folder with the latest timestamp to ensure that the most recent data is available for recovery.
This will only be available for immutable cloud storage destination.
-
Click on Sending Data icon under the Replication section on the AhsayCBS web console of the backup server
-
Click the Perform clean up button.
-
Provide the access credentials for the immutable storage destination. Click OK to start the clean up.
