
 AhsayCBS
Install AhsayPRD
Follow the steps in this section to install the AhsayPRD, prepare a wild card certificate for AhsayPRD, prepare the AhsayCBS template for your resellers, setup each dedicated Ahsay instance and remove an Ahsay instance.
Install the Ahsay Proxy Redirector
- Download the Ahsay Proxy Redirector from the Ahsay website.
- Unzip the Ahsay Proxy Redirector and put it in D:\Applications.
Modify the httpd.conf file in D:\Applications\Ahsay Proxy Redirector\conf.
# Define the top directory of AhsayPRD here
Define SRVROOT "C:/Program Files/AhsayPRD"
Define ADMIN_EMAIL "bsadmin@ahsay.com"
ServerRoot "${SRVROOT}"

# Define the port to listen
Listen 80
Listen 443

# Define the admin email
ServerAdmin "${ADMIN_EMAIL}"

# include basic configuration files
Include conf/httpd-basic.conf

# Define VirtualHost settings for company1.ahsay.com
# Need to add this connector to tomcat server.xml to use mod_jk
#  <Connector address="127.0.0.1" port="60001" protocol="AJP/1.3" redirectPort="443" />
#

#Use VHOST company1.ahsay.com
123.123.123.123 admin@ahsay.com 60001 "D:\Applications\Company1\webapps" conf/wildcard.NOT_SECURE.com.crt.signed-by-ahsayca2
conf/wildcard.NOT_SECURE.com.key.signed-by-ahsayca2
conf/ca.crt
Modify the variables, SRVROOT and ADMIN_EMAIL, according to your environment settings.
The server root, SRVROOT, refers to the path of the Ahsay Proxy Redirector folder. The ADMIN_EMAIL refers to the email address of your administrator.The IP address for VHOST settings must be the IP address bind to NIC instead of the public IP address.
It is better to use backslash (/) instead of forward slash (\) in Apache configuration.
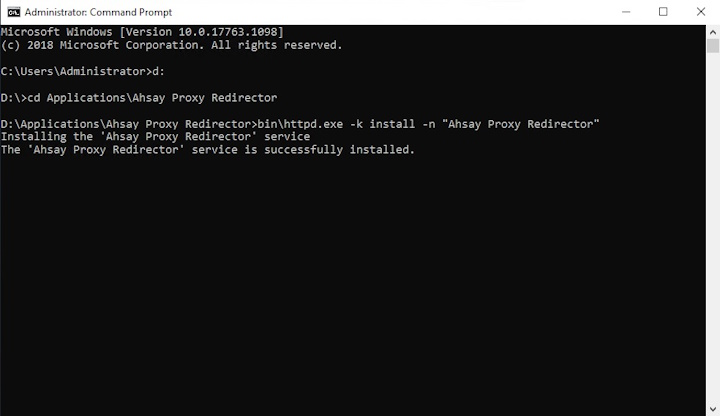
Run the install-service.bat batch file under the D:\Applications\Ahsay Proxy Redirector folder.
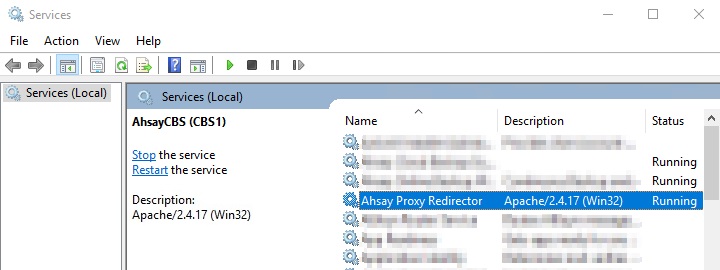
Click the installed service Ahsay Proxy Redirector.
Prepare a Wild Card Certificated for AhsayPRD
Default installation of AhsayPRD enables SSL (Secure Socket Layer) support using a wild card dummy certificate. For your own security, you are advised to replace the pre-installed dummy SSL cert with a secure SSL certificate from a trusted CA (Certificate Authority). The generation of a wild card cert is required because, all your AhsayCBS instances may share the SSL cert under the same domain name, for example, cbs1.ahsay.com and cbs2.ahsay.com. If you are hosting different domains with the same AhsayPRD, then you need to have another wild card cert.
Requirements
You need to install the third party software OpenSSL first, please refer to the following download link: OpenSSL.
Steps
To replace the non-secure dummy wild card SSL certificate with a secure SSL certificate, do the following:
Identify the location of the cert files.
The wildcard.NOT_SECURE.com.crt, wildcard.NOT_SECURE.com.key, and ca.crt cert files are located in D:\Applications\Ahsay Proxy Redirector\conf.
Key Description Wild card public key This is a wild card public key file. Wild card private key This is a wild card private key file. CA root cert The CA root cert file. If you use your own wild card certificate, make sure the certificate is chained properly. You can use a text editor such as Notepad in Windows to embed the intermediate/root into the wild card SSL certificate file.
Since the format of the certificate issued by CA may be different, please check with your CA for the correct instruction. Alternatively, you can try with the examples below.
- The length of the certificate is shortened and modified to fit into this section.
- No line feed is required between certificates.
- Make sure there are no invisible characters at the end of each line.
Example SSL certificate file
-----BEGIN CERTIFICATE-----
MIIDxTCCAq2gAwIBAgIBADANBgkqhkiG9w0BAQsFAA1UEBhMCVVMx
EDAOBgNVBAgTB0FyaXpvbmExEzARBgNVBAcTClNjbGjAYBgNVBAoT
EUdvRGFkZHkuY29tLCBJbmMuMTEwLwYDVQQDEyhHbb290IENlcnRp
:
:
(A sample root certificate)
:
:
2GTzLH4U/ALqn83/B2gX2yKQOC16jdFU8WnjXf1855eJ1usV2GDPO
LPAvTK33sefOT6jEm0pUBsV/fdUID+Ic/n4XuDE32p2u0mYRlynqI
4uJEvlz36hz1
-----END CERTIFICATE-----
-----BEGIN CERTIFICATE-----
MIIE0DCCA7igAwIBAgIBBzANBgkqhkiG9w0BAQsFADCBgzELMAkGA
EDAOBgNVBAgTB0FyaXpvbmExEzARBgNVBAcTClNjb3R0c2RhbGUxG
EUdvRGFkZHkuY29tLCBJbmMuMTEwLwYDVQQDEyhHbyBEYWRkeSBSb
:
:
(A sample intermediate certificate)
:
:
DsoXiWJYRBuriSUBAA/NxBti21G00w9RKpv0vHP8ds42pM3Z2Czqr
GIo/ikGQI31bS/6kA1ibRrLDYGCD+H1QQc7CoZDDu+8CL9IVVO5EF
LXY2JtwE65/3YR8V3Idv7kaWKK2hJKCavPi8BDAB
-----END CERTIFICATE-----
-----BEGIN CERTIFICATE-----
MIIE9jCCA96gAwIBAgIQMwS6s6pu/WuP4wFEkixiDDANBgkqhkiG9
MQswCQYDVQQGEwJVUzEVMBMGA1UEChMMVGhhd3RlLCBJbmMuMR0wG
b21haW4gVmFsaWRhdGVkIFNTTDEZMBcGA1UEAxMQVGhhd3RlIERWI
GIo/ikGQI31bS/6kA1ibRrLDYGCD+H1QQc7CoZDDu+8CL9IVVO5EF
:
:
(A sample SSL certificate)
:
:
+5E93hMqykOD9Eq6UhA0U13BQ0vAeIINVrmZaKDtTrig/aikLYsxK
yBl50evH8MLjQLpC8GUaVizT+0Z29dqhKwSx3810mQ242QADR6qXl
aGvmAm6p0dQA7aru7ZalUNX8Ebbp6/KQHEIH2pgIinwcxc6hy8JTy
LPEyeRKx02UzxApLkOpO6x9gaFaAjSI=
-----END CERTIFICATE-----
Generate the Certificate Signing Request. In our example, we assume that your OpenSSL is installed in C:\OpenSSL.
Use the following commands to generate a pair of private key and public Certificate Signing Request (CSR) for AhsayPRD:
set OPENSSL_CONF=C:\OpenSSL\bin\openssl.cfg
openssl req -new -nodes -keyout myserver.key -out
server.csr -newkey rsa:2048
After you replied to the questions asked by OpenSSL. It creates two files. The file myserver.key contains a private key; do not disclose this file to anyone. Carefully protect the private key.
You will now be asked to enter details to be entered into your CSR. For some fields, there will be a default value; if you enter ‘.’ the field will be left blank. Use the wild card cert name such as *.mycompany.com as Common Name (CN).
Full Example
C:\OpenSSL\bin>set OPENSSL_CONF=C:\OpenSSL\bin\openssl.cfg

C:\OpenSSL\bin>openssl req -new -nodes -keyout myserver.key -out server.csr -newkey rsa:2048
Loading 'screen' into random state - done
Generating a 2048 bit RSA private key
.............+++
..............................+++
writing new private key to 'myserver.key'
-----
You are about to be asked to enter information that will
be incorporated into your certificate request.
What you are about to enter is what is called a Distinguished Name or a DN.
There are quite a few fields but you can leave some blank
For some fields there will be a default value,
If you enter '.', the field will be left blank.
-----
Country Name (2 letter code) [AU]:US
State or Province Name (full name) [Some-State]:Texas
Locality Name (eg, city) []:Houston
Organization Name (eg, company) [Internet Widgits Pty
Ltd]:My Company Inc
Organizational Unit Name (eg, section) []:IT Division
Common Name (eg, YOUR name) []:*.mycompany.com
Email Address []:admin@mycompany.com

Please enter the following 'extra' attributes
to be sent with your certificate request
A challenge password []:xxxxxx
An optional company name []:

C:\OpenSSL\bin>
CA accepts a 2048-bit RSA private key only, as breaking a 1024-bit private key algorithm is now possible.- Apply the wild card cert from your CA with the CSR file (server.csr) generated in the last step.
- When your CA signed the wild card SSL cert, you can put the wild card public key, private key and the CA root cert files to the conf folder. The CA root cert can be obtained from your CA website.
When a new AhsayCBS instance is created, rename the definition in the httpd.conf configuration file.
:
:
:
Use VHOST cbs1.ahsay.com 123.123.123.123 admin@ahsay.com
60001 "D:/Applications/CBS1/webapps"
conf/wildcard.mycompany.crt conf/myserver.key conf/ca.crt
:
:
:
If a new AhsayCBS instance is setup, you may use the same private key, public key and root CA definition in the httpd.conf (for example, cbs2.ahsay.com). If a different domain name is setup (for example, backup.backupvault.com), you 8may apply another set of private key, public key and root CA definition in the httpd.conf configuration file.
:
:
:
Use VHOST cbs1.ahsay.com 123.123.123.123 admin@ahsay.com
60001 "D:/Applications/CBS1/webapps"
conf/wildcard.mycompany.crt conf/myserver.key
conf/ca.crt
Use VHOST cbs2.hsay.com 123.123.123.123 admin@ahsay.com
60003 "D:/Applications/CBS2/webapps"
conf/wildcard.mycompany.crt conf/myserver.key
conf/ca.crt
Use VHOST backup.backupvault.com 123.123.123.123
admin@ahsay.com 60005 "D:/Applications/backup/webapps"
conf/wildcard.backupvault.crt conf/mybackupserver.key
conf/ca_root.crt
:
:
:
Once you setup the SSL cert in the AhsayPRD, you are not required to install any other SSL cert in the keystore file in the AhsayCBS.The IP address for VHOST settings must be the IP address bind to NIC instead of the public IP address.
It is better to use backslash (/) instead of forward slash (\) in Apache configuration.
Prepare the AhsayCBS Template for your Resellers
The following steps show you how to prepare each AhsayCBS from a template. For each reseller’s AhsayCBS, you are required to copy the template folder to create a new AhsayCBS instance.
- Download AhsayCBS for Windows “Upgrade Existing Installation” release (cbs-win.zip) from Ahsay website, do not the use “New Installation”. This is because AhsayCBS installation is not required.
Expand the cbs-win.zip to a directory called template inside D:\Applications.
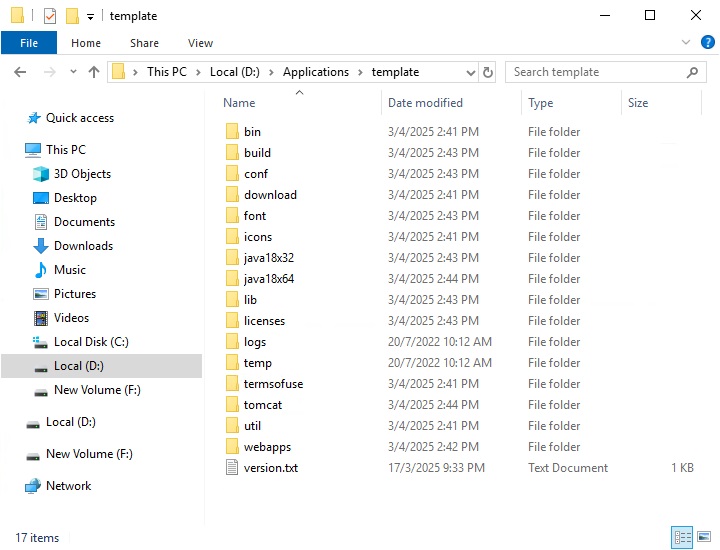
Keep necessary directories and files for the template. Some of the expanded folders are not required for the template. Look at the following tables to decide if you need to keep these folders.
The following table shows the required folders:
Folder Description bin Contains the startup and shutdown binaries of the AhsayCBS service. build Contains properties for OBC installer generation. download OBC download. font Font for generating PDF bill. java18x64 64-bit Java run-time library. It is required for a 64-bit Windows OS. lib AhsayCBS program binary files. tomcat Tomcat library and setup files. webapps It contains properties files, jsp files, application defination files etc. util Utility for service installation etc. version.txt Contains the version of the AhsayCBS for reference. The following table shows the folders that are not required:
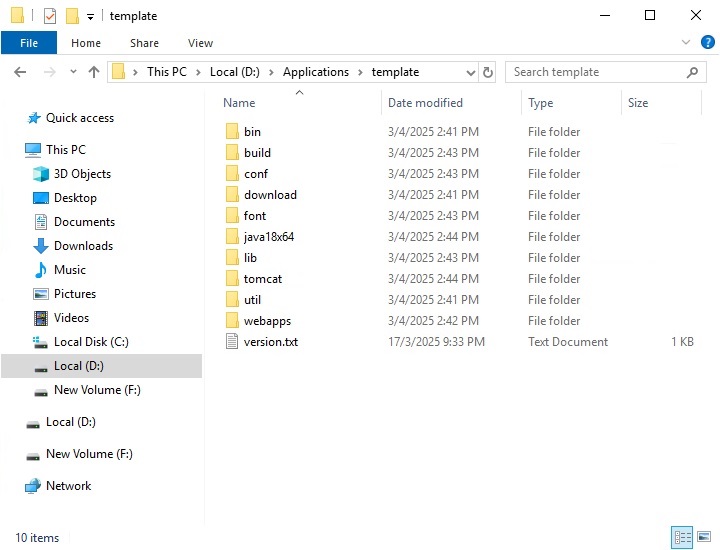
Folder Description icons Contains the AhsayCBS installation icons, such as desktop icon files, which is not required in this setup. java18x32 Contains the Jave 32-bit library which is not required. licenses Java, Tomcat, Apache terms of use, after you read them, you can remove this folder. logs Folder for your AhsayCBS log files, such as access logs, Catalina logs, etc. temp The temporary folder. termsofuse Terms of use of the AhsayCBS. After you have removed the folders, the directory should look like the following:
- Rename the folder java18x64 to java.
The bin\startup.bat defined the home location of Tomcat and CBS when AhsayCBS startup. In a standard installation, the home location of the Tomcat and CBS are located in the same directory. In case you want Tomcat to write logs in another drive, for example, E:\ drive, you need to modify the bin\startup.bat and bin\shutdown.bat batch files.
Modify bin\startup.bat
Define the TC_HOME at the top of the bin\startup.bat. Since this is a template, the actual location will be defined when you set up a new AhsayCBS instance.
@echo off

SET "TC_HOME="

@REM ************** Please leave JAVA_HOME empty as it is
SET "JAVA_HOME="

:
:
In bin\startup.bat, remark the line IF "%TC_HOME%"=="" SET "TC_HOME=%CBS_HOME%" so that the value of the CBS_HOME value is not the same as the value of the TC_HOME.
:
:

@REM IF "%TC_HOME%"=="" SET "TC_HOME=%CBS_HOME%"

:
:
Locate the following path definitions in bin\startup.bat.
:
:

SET "TC_OBS_CONF_PATH=%TC_HOME%\conf"
SET "TC_RPS_CONF_PATH=%TC_HOME%\conf"
SET "TC_RDR_CONF_PATH=%TC_HOME%\conf"

:
:
Change the path definitions in bin\startup.bat as follows:
:
:

SET "TC_OBS_CONF_PATH=%CBS_HOME%\conf"
SET "TC_RPS_CONF_PATH=%CBS_HOME%\conf"
SET "TC_RDR_CONF_PATH=%CBS_HOME%\conf"

:
:
Since the CBS_HOME was defined in the current directory of the AhsayCBS application, when you define a new path for TC_HOME, the log files, temp files, and the work files will all be stored in a new path.
Modify bin\shutdown.bat
You need to modify the bin\shutdown.bat file in the same way that you modified the bin\startup.bat file.
@echo off

SET "TC_HOME="

@REM ************** Please leave JAVA_HOME empty as it is
SET "JAVA_HOME="

:
:

@REM IF "%TC_HOME%"=="" SET "TC_HOME=%CBS_HOME%"

:
:

SET "TC_OBS_CONF_PATH=%CBS_HOME%\conf"
SET "TC_RPS_CONF_PATH=%CBS_HOME%\conf"
SET "TC_RDR_CONF_PATH=%CBS_HOME%\conf"

:
:
Rename the bin\startup.bat.bak to startup.bat; shutdown.bat.bak to shutdown.bat, respectively. This is to avoid starting the service automatically when you setup the AhsayCBS service.
n our example, we put the template folder in the D:\Applications\Template, you can change the location if you like.Copy the below xml definition and replace the file in the D:\Applications\Template\conf\server.xml folder.
<Server port="60002" shutdown="SHUTDOWN">

<Listener className="org.apache.catalina.core.AprLifecycleListener" SSLEngine="on" />

<Listener className="org.apache.catalina.core.JasperListener" />

<Listener className="org.apache.catalina.core.JreMemoryLeakPreventionListener" />

<Listener className="org.apache.catalina.mbeans.GlobalResourcesLifecycleListener" />

<Listener className="org.apache.catalina.core.ThreadLocalLeakPreventionListener" />

<Service name="Catalina">

<Connector address="0.0.0.0" port="60001"
	protocol="AJP/1.3"
	maxHttpHeaderSize="8192"
	socketBuffer="16384"
	maxThreads="2000"
	minSpareThreads="50"
	maxKeepAliveRequests="1000"
	enableLookups="false"
	redirectPort="443"
	acceptCount="200"
	connectionTimeout="120000"
	disableUploadTimeout="true"
	URIEncoding="utf-8"/>

<Engine name="Catalina" defaultHost="localhost">

<Host className="com.ahsay.OrderedContextHost"
	name="localhost"
	appBase="webapps"
	autoDeploy="false"
	copyXML="false"
	workDir="${tc.work.path}">

<Context privileged="true"
	path=""
	cookies="true"
	reloadable="true"
	crossContext="false"
	workDir="${tc.work.path}/ROOT">

<Valve className="org.apache.catalina.valves.AccessLogValve"
	directory="${tc.log.path}"
	prefix="ROOT_access_"
	suffix=".log"
	pattern="common"/>

</Context>

<Context privileged="true"
	path="/obs"
	cookies="true"
	reloadable="false"
	crossContext="false"
	workDir="${tc.work.path}/obs">

<Valve className="org.apache.catalina.valves.AccessLogValve"
	directory="${tc.log.path}"
	prefix="obs_access_"
	suffix=".log" pattern="common"/>

</Context>

<Context privileged="true"
	path="/rps"
	cookies="true"
	reloadable="false"
	crossContext="false"
	workDir="${tc.work.path}/rps">

<Valve className="org.apache.catalina.valves.AccessLogValve"
	directory="${tc.log.path}"
	prefix="rps_access_"
	suffix=".log" pattern="common"/>

</Context>

<Context privileged="true"
	path="/rdr"
	cookies="true"
	reloadable="false"
	crossContext="false"
	workDir="${tc.work.path}/rdr">

<Valve className="org.apache.catalina.valves.AccessLogValve"
	directory="${tc.log.path}"
	prefix="rdr_access_"
	suffix=".log"
	pattern="common"/>

</Context>

<Context privileged="true"
	path="/cbs"
	cookies="true"
	reloadable="false"
	crossContext="true"
	workDir="${tc.work.path}/cbs">>

<Valve className="org.apache.catalina.valves.AccessLogValve"
	directory="${tc.log.path}"
	prefix="cbs_access_"
	suffix=".log"
	pattern="common"/>

</Context>

</Host>

</Engine>

</Service>

</Server>
Set up Dedicated AhsayCBS Instance
Create a local Windows user <Standard User> for this AhsayCBS and assign a password for this user. In our example, the local user created is called CBS1.
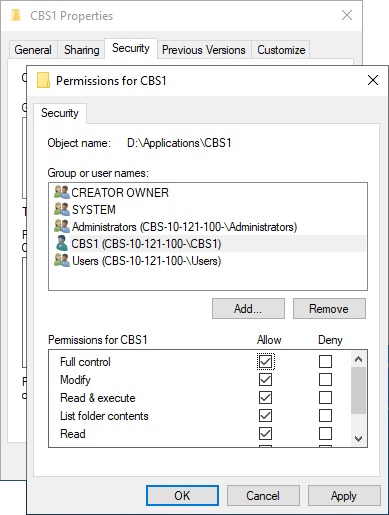
It is not compulsory to setup a local Windows user to run this service, but it is highly recommended that you should create a separate local Windows account for each AhsayCBS instance for maintenance purposes. Please also create a password for this Windows user.Make a copy of D:\Applications\Template as D:\Applications\CBS1. It is recommended that you give full folder permission for D:\Applications\CBS1 to the Windows user CBS1 for administration purpose.
 If you are going to assign a dedicated drive (for example, drive E:\) for the user home of CBS1, please also assign the same permission to the drive.
Run the following command from the command prompt to install the AhsayCBS service as a startup service for your reseller.
D:\Applications\CBS1\util\bin\service -i
"AhsayCBS (CBS1)"
"AhsayCBS (CBS1)"
"D:\Applications\CBS1\bin\cbssvcX64.exe"
"AhsayCBS (CBS1)”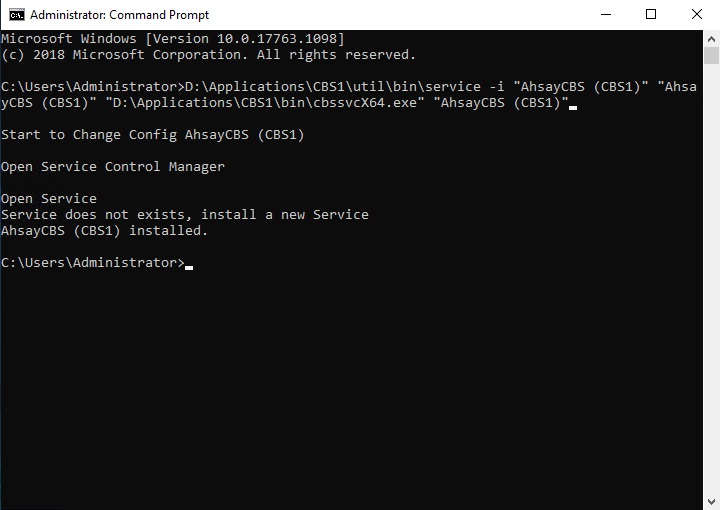
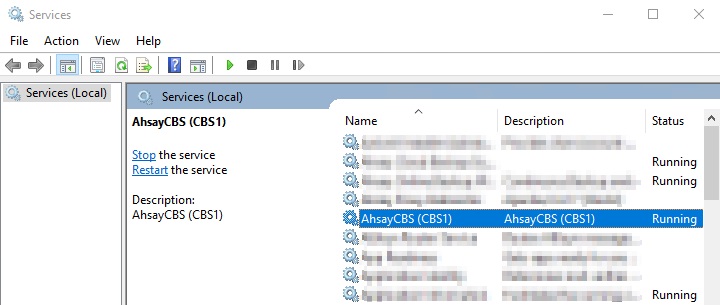
After you installed the AhsayCBS service, the service is started by default. You can stop the service under Control Panel > Administrative Tools > Services.
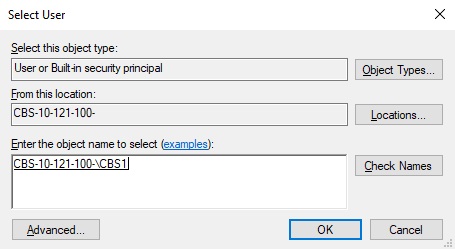
Right click the properties of the created service, go to the Log On tab. Change the logon of the service in the This account textbox by clicking Browse.
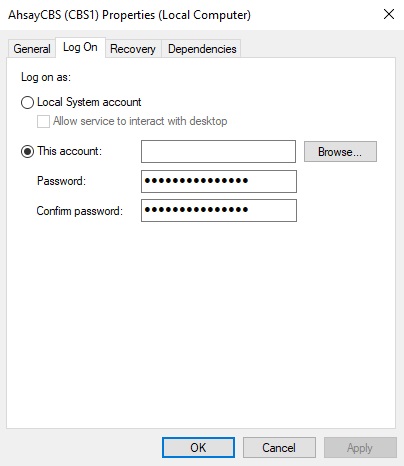
Change the logon to CBS1. You need to apply a password after you click OK.
Open D:\Applications\CBS1\bin\startup.bat.bak and change the TC_HOME environment variable to E:\CBS1 where E is the drive letter of drive to be used exclusively for this AhsayCBS instance.
@echo off

SET "TC_HOME=E:\CBS1 "

@REM ************** Please leave JAVA_HOME empty as it is
SET "JAVA_HOME="

@REM ************** Please set the correct values for CBS_HOME,

:
:
:
Open D:\Applications\CBS1\bin\shutdown.bat.bak and change the TC_HOME environment variable to E:\CBS1 where E is the drive letter of drive to be used exclusively for this AhsayCBS instance.
@echo off

SET "TC_HOME=E:\CBS1 "

@REM ************** Please leave JAVA_HOME empty as it is
SET JAVA_HOME=

@REM ************** Please set the correct values for CBS_HOME,

:
:
:
Open D:\Applications\CBS1\conf\server.xml and change the Tomcat management interface port to a free TCP port (for example, 60008) and the AhsayCBS server port to a free TCP port (for example, 60007) which is used for this AhsayCBS instance exclusively.
<Server port="60008" shutdown="SHUTDOWN">

<Listener className="org.apache.catalina.core.AprLifecycleListener" SSLEngine="on" />

<Listener className="org.apache.catalina.core.JasperListener" />

<Listener className="org.apache.catalina.core.JreMemoryLeakPreventionListener" />

<Listener className="org.apache.catalina.mbeans.GlobalResourcesLifecycleListener" />

<Listener className="org.apache.catalina.core.ThreadLocalLeakPreventionListener" />

<Service name="Catalina">

<Connector address="0.0.0.0"
	port="60007"
	protocol="AJP/1.3"
	maxHttpHeaderSize="8192"
	socketBuffer="16384"
	maxThreads="2000"
	minSpareThreads="50"
	maxKeepAliveRequests="1000"
	enableLookups="false"
	redirectPort="443"
	acceptCount="200"
	connectionTimeout="120000"
	disableUploadTimeout="true"
	URIEncoding="utf-8"/>

:
:
:
For easy management, please assign a pair of free ports for each AhsayCBS instance. For example, “60007 and 60008”, “60009 and 60010”, etc.Open D:\Applications\CBS1\conf\autoDiscovery.xml and change the Auto Discovery server port to a free TCP port (for example, 10011) and the client port to a free TCP port (for example, 10012).
<Root><AutoDiscovery server-port="10011" client-port="10012"/></Root>For easy management, please assign a pair of free ports for each AhsayCBS instance. For example, “10011 and 10012”, “10013 and 10014”, etc.Open D:\Applications\Ahsay Proxy Redirector\conf\httpd.conf and change the VHOST settings.
# Define the top directory of AhsayPRD here Define SRVROOT "D:/Applications/Ahsay Proxy Redirector" Define ADMIN_EMAIL "bsadmin@ahsay.com" ServerRoot "${SRVROOT}" # Define the port to listen Listen 80 Listen 443 # Define the admin email ServerAdmin "${ADMIN_EMAIL}" # include basic configuration files Include conf/httpd-basic.conf # Define VirtualHost settings for company1.ahsay.com # Need to add this connector to tomcat server.xml to use mod_jk ## #Use VHOST company1.ahsay.com 123.123.123.123 admin@ahsay.com 60001 "D:/Applications/Company1/webapps" conf/wildcard.NOT_SECURE.com.crt.signed-by-ahsayca2 conf/wildcard.NOT_SECURE.com.key.signed-by-ahsayca2 conf/ca.crt Use VHOST cbs1.ahsay.com 123.123.123.123 admin@ahsay.com 60007 "D:/Applications/CBS1/webapps" conf/wildcard.NOT_SECURE.com.crt.signed-by-ahsayca2 conf/wildcard.NOT_SECURE.com.key.signed-by-ahsayca2 conf/ca.crt Syntax of the VHOST setting
The following is the syntax of VHOST setting:
Use VHOST <Hostname> <IP address> <Admin email> <AhsayCBS port number> <Path to AhsayCBS webapps folder><Wild card public key> <Wild card private key> <CA Root cert>The following talbe describes each argument of the VHOST setting in more detail:
Key Description Hostname This is the host name registered with your ISP for the AhsayCBS instance. IP address This is the IP address used for the hosting. It is the IP address bind to NIC. Admin email Email contact of your administrator AhsayCBS port number This is the AhsayCBS connector port defined in step 9. Path to the AhsayCBS webapps folder This is the path to your AhsayCBS webapps folder. For example, D:\Applications\CBS1\webapps. Wild card public key This is a wild card public key file. For example, conf/ wildcard.NOT_SECURE.com.crt.signed-by-ahsayca Wild card private key This is a wild card private key file. For example, conf/ wildcard.NOT_SECURE.com.key.signed-by-ahsayca2 CA root cert The CA root cert file. For example, conf/ca.crt Restart Ahsay Proxy Redirector service in Control Panel > Administrative Tools > Services.
- When your ISP notifies you that the domain name CBS1.ahsay.com is ready, you can then rename the bin\startup.bat.bak to startup.bat; shutdown.bat.bak to shutdown.bat, respectively.
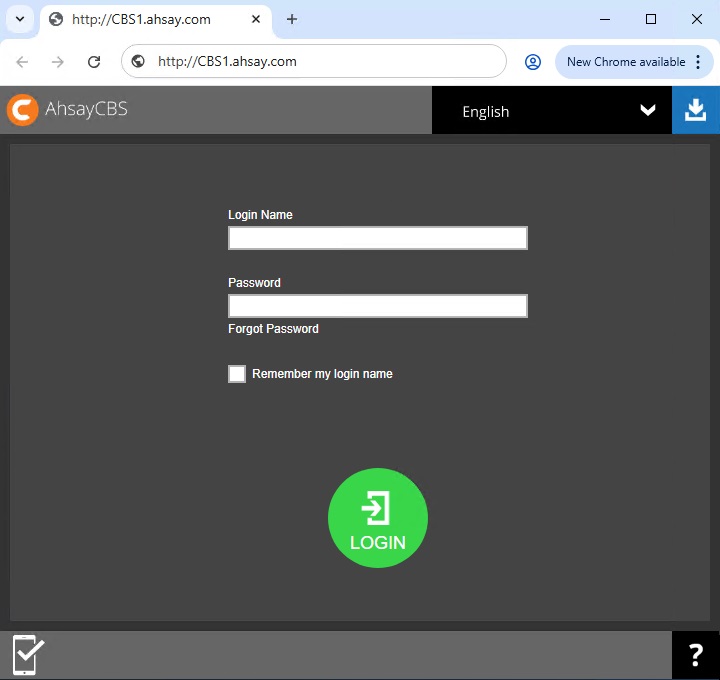
Start up the AhsayCBS service, i.e. CBS1.
Open the browser on your desktop and type in http://CBS1.ahsay.com , you should be able to see a new AhsayCBS instance. Login with the default username and password, as follows:
Username: system
Password: system
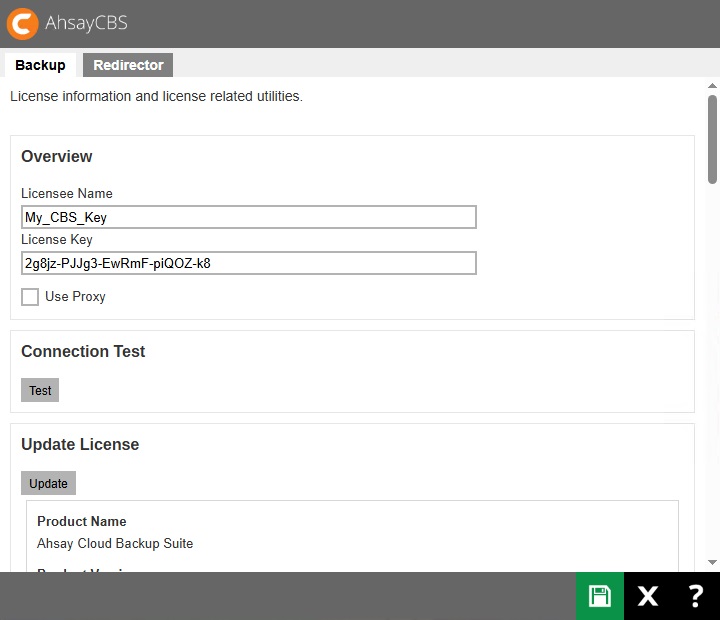
Apply your license key to the AhsayCBS management console System Settings > License > Backup page to activate the license.
The best way to handle the license for your resellers should be purchasing a poolable license from us. You can logon to our Ahsay License Management Portal to re-distribute the license CAL into a pool of license key for your resellers. You can manage the number of CALs easily with the Ahsay License Management Portal.
For more information about the poolable license or pool key, you can visit our FAQ: Ahsay License Management Portal Overview (2305) for reference.
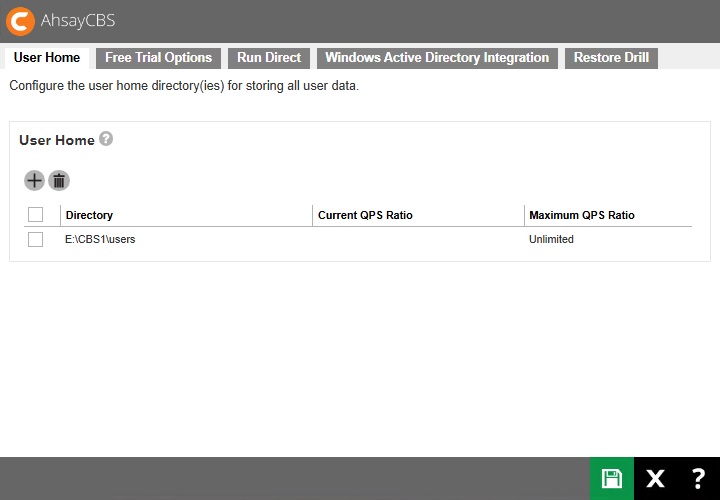
If you are using a dedicated drive for the user home of the CBS1 service, you can assign the user home in your CBS management console Backup / Restore > Basic > User Home. Please remove any default user home settings on the page.
If you are adding a new AhsayCBS instance in the future, you can simply follow the above steps to create a new AhsayCBS instance.
In the future, if you define any resellers or subadmin in your AhsayCBS, please make sure to add the VHOST definition in D:\Applications\Ahsay Proxy Redirector\conf\httpd.confThe following table shows the VHOST setting in the httpd.conf configuration file:
:
:
:

Use VHOST reseller.backup.com 123.123.123.123
reseller@backup.com 60009 "D:/Applications/Reseller/webapps"
conf/backup.com.crt conf/backup.com.key conf/ca1.crt
Remove an AhsayCBS Instance
Open D:\Applications\Ahsay Proxy Redirector\conf\httpd.conf and remove the VHOST settings.
# Define the top directory of AhsayPRD here
Define SRVROOT "D:/Applications/Ahsay Proxy Redirector"
Define ADMIN_EMAIL "bsadmin@ahsay.com"
ServerRoot "${SRVROOT}"

# Define the port to listen
Listen 80
Listen 443

# Define the admin email
ServerAdmin "${ADMIN_EMAIL}"

# include basic configuration files
Include conf/httpd-basic.conf

# Define VirtualHost settings for company1.ahsay.com
# Need to add this connector to tomcat server.xml to use mod_jk
# <Connector address="127.0.0.1" port="60001"
protocol="AJP/1.3" redirectPort="443" />
#

#Use VHOST company1.ahsay.com 123.123.123.123 admin@ahsay.com
60001 "D:/Applications/Company1/webapps"
conf/wildcard.NOT_SECURE.com.crt.signed-by-ahsayca2
conf/wildcard.NOT_SECURE.com.key.signed-by-ahsayca2
conf/ca.crt

Use VHOST cbs1.ahsay.com 123.123.123.123 admin@ahsay.com
60007 "D:/Applications/CBS1/webapps"
conf/wildcard.NOT_SECURE.com.crt.signed-by-ahsayca2
conf/wildcard.NOT_SECURE.com.key.signed-by-ahsayca2
conf/ca.crt
Restart Ahsay Proxy Redirector service in Control Panel > Administrative Tools > Services.
Run the following command from the command prompt to remove the AhsayCBS instance from startup service.
D:\Applications\CBS1\util\bin\service.exe -r "AhsayCBS (CBS1)"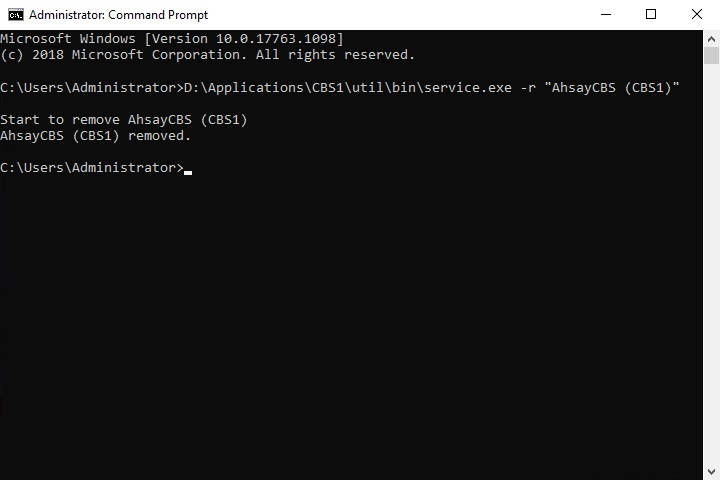
- Remove the AhsayCBS instance directory, for example, D:\Application\CBS1\.
- If you have created a storage in the previous steps, you need to check if you need to remove the storage, the Windows user account, or the DNS entry.