AhsayCBS
[v10] Manage Backup User
After you have created a backup user, you can perform the following operation for your users such as:
- Customize backup users profile settings
- Customize subscribed modules
- Create backup sets
- View backup/restore reports
- View usage statistics
- Manage the policies applied to a user
- Update client software via the auto update agent
- Send broadcast message to users
- Export usage to a CSV file
- Export users
- Rebuild storage statistics (applicable only for v6 backup sets)
- Enable two-factor authentication
Access the Backup User
Click the login name of the backup user account you want to manage from the “Backup User” tab.
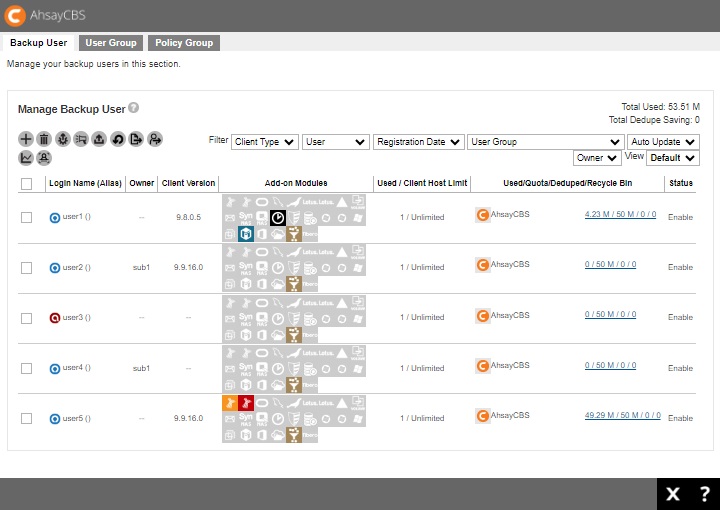
The backup user account opens. You will see seven (7) categories, each of which is described in detail below.
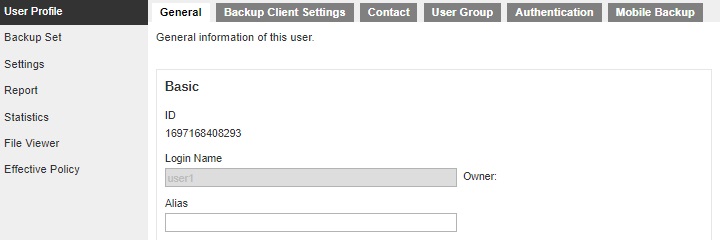
User Profile
The User Profile tab contains user backup account settings information, subscribed modules, backup quota, subscription type, contact information, user group information and security settings. It is located under Users, Groups & Policies > Backup User. It is sub divided into six (6) tabs, as described below.
General
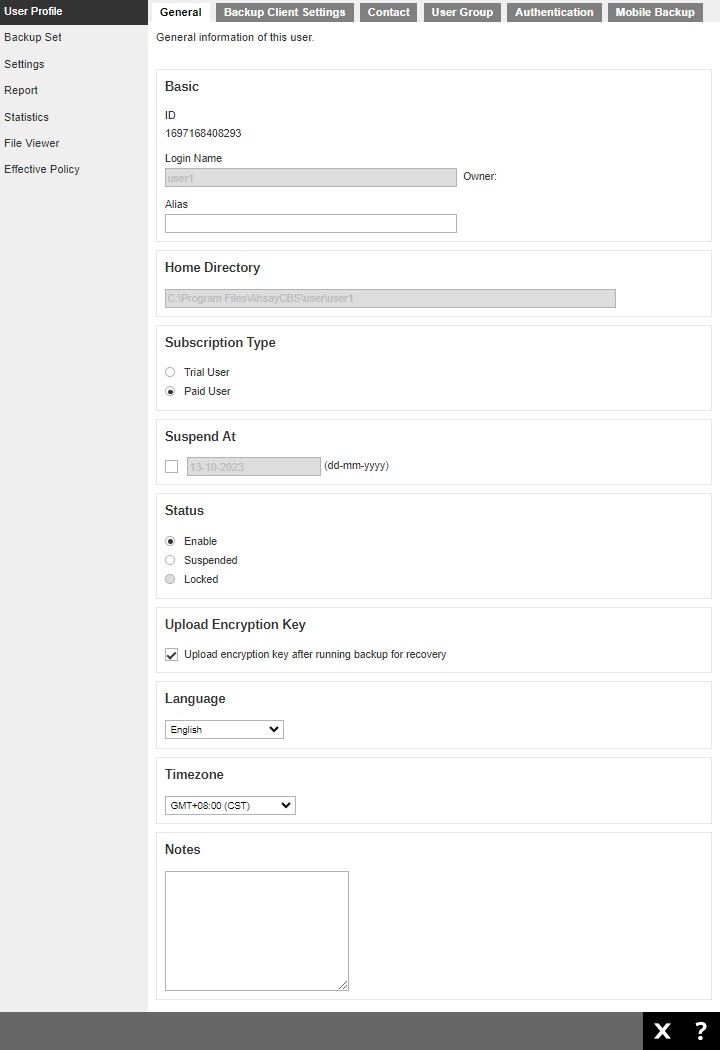
- ID - machine generated numerical ID of the backup user.
- Login Name - name of the user used for logging in, cannot be modified.
- Owner - the owner of the backup user, cannot be modified from here. To change the owner, please refer to Move / Import / Export Users for more information.
- Alias - another name for the user.
- Home Directory - path where user backup setting, reports and uploaded AhsayOBM/AhsayACB client logs are stored, cannot be modified.
- Subscription Type - type can be changed from Trial User to a Paid User, for example after a user subscribes to backup service after a trial.
- Suspend At -scheduled date to suspend the user account.
- Status - suspend or enable locked accounts.
- Upload Encryption Key - enable or disable the "Upload Encryption Key" feature.
- Language - preferred language for all email reports of the backup user.
- Timezone - time zone of the backup user.
- Notes - additional note about the user.
Backup Client Settings
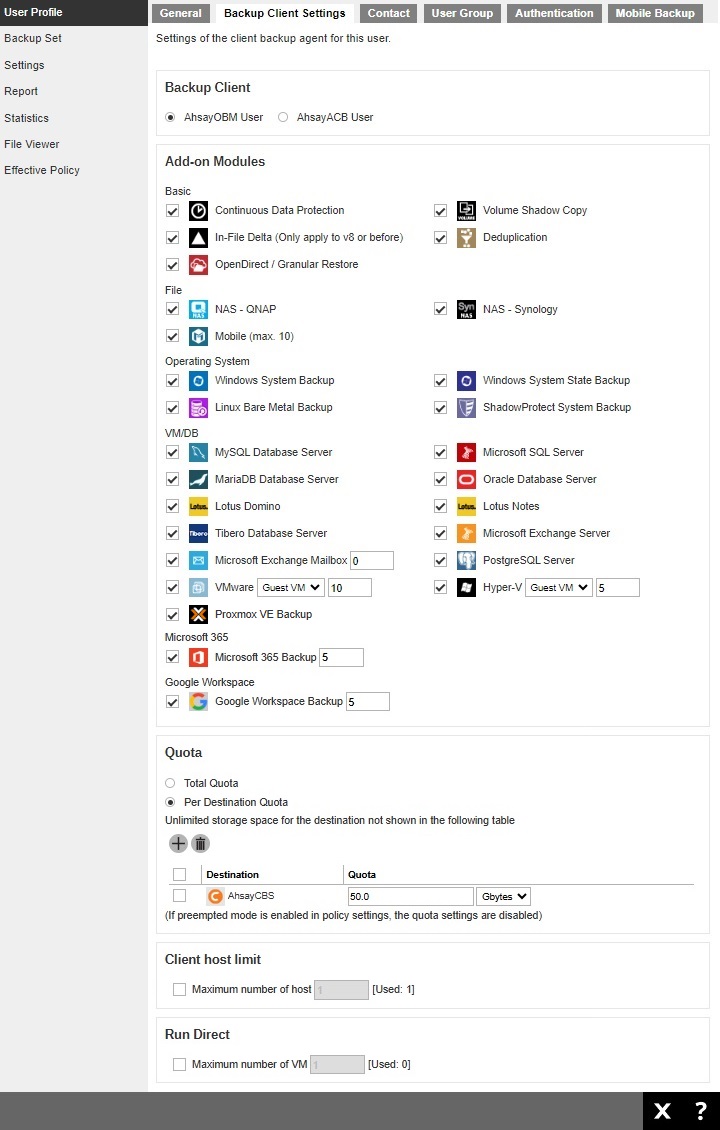
- Backup Client - type of backup user account, AhsayOBM or AhsayACB. In case you need to change the backup client type, it is better to check if there are existing backup sets in the backup account. For example, if you have an AhsayOBM user account with Exchange backup set and you change the account type to AhsayACB, the Exchange backup set will not be run due to the backup client type does not match.
-
Add-on Modules - type of module that user may back up and restore.
For IBM Lotus Domino/Notes, and StorageCraft ShadowProtect modules, starting from version v8, software development work related to these modules will be discontinued.
There will be no further enhancements or bug fixes for these modules. However, to allow existing users to continue using them after upgrading to version v9, these modules will still be available in AhsayOBM’s backup set type option list. Ahsay support team will continue to provide best effort support for these modules until further notice.
-
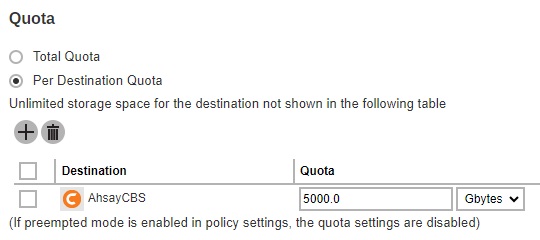
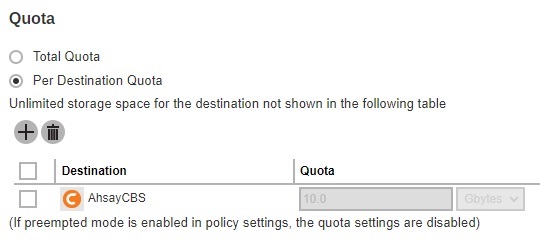
Quota - the total quota storage or list all the predefined destinations and AhsayCBS associated with the user account and the backup quota of each destination for the user account.
Quota management for individual predefined destination is available for AhsayCBS. For previous version, only a total quota storage can be set and you cannot configure individual quota for predefined destination, which is shown as following.
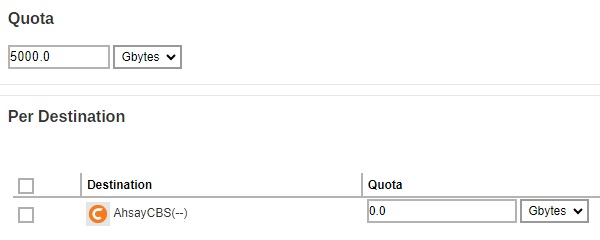
If your AhsayCBS was upgraded from a previous version to 9.1.0.0 or above, for users with pre-existing predefined destinations and AhsayCBS, the quota settings for each predefined destination and AhsayCBS will be set according to different situation.
Example
Situation 1: The previous total quota setting is 5000Gbytes, and the quota storage setting for AhsayCBS was default setting.
After the upgrade, the new quota setting for AhsayCBS will bee 5000 Gbytes.
Situation 2: The previous total quota setting is 5000 Gbytes, and the quota storage setting for AhsayCBS was 100 Gbytes.
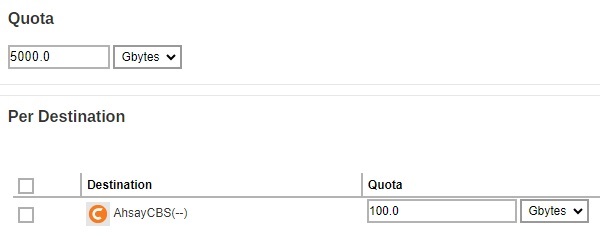
After the upgrade, the quota setting for AhsayCBS will remain to be 100 Gbytes.

For the destination not shown in the Quota table, the storage space is unlimited. If you want to limit storage space according to destination, please ensure to add the destination here and assign the quota appropriately.
Only the destinations already defined by the backup sets can be shown and added to be the backup destination for the backup user.If preempted mode is enabled in Backup/ Restore > Users, Groups & Policies > Policy Group > %policygroup% > User Settings > User Quota, the quota settings here will be disabled and cannot be modified.
 The backup quota of a VMware VDDK backup set should be set to a value that is higher than the provision size. Even if the backup only upload the actual usage, if the quota is smaller than the provision size, the backup would fail with quota exceeded.
 - Client Host Limit - the maximum number of host machine or devices the backup user can install AhsayOBM/AhsayACB on.
- Run Direct - the maximum number of VMs for VM Run Direct restore on AhsayCBS for the user.
Contact
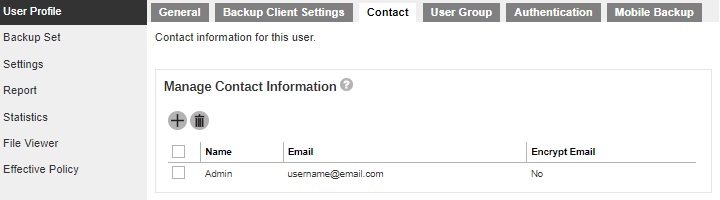
You can configure the client contact here for them to receive backup and restore reports.
User Group
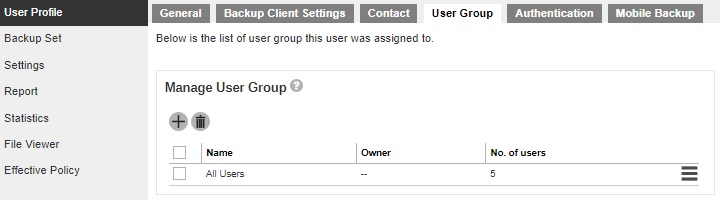
You can assign the user to an existing/assigned user group. When you drag the user group with the side button, it will affect the sequence of the policy rules that will apply to the user.
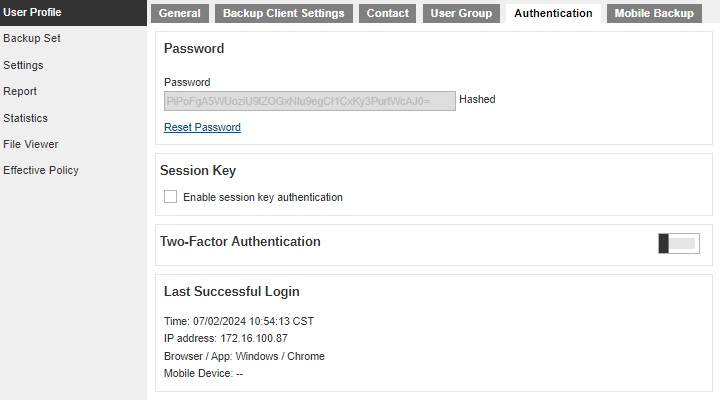
Authentication
-
Password - shows the password of the user in hashed format. The password can also be reset here in case the user forgot the current password.
- Click Reset Password to reset the password.
-
Enter the new password and confirm the password.
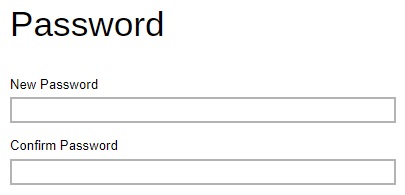
- Click Save to save.
-
Session Key - uses session key to make API requests on profile changes and server side file updates on behalf of the user.
Tick the "Enable session key authentication" checkbox to enable.

-
Two-Factor Authentication - add another layer of security for the account by enabling the two-factor authentication here for the user. Aside from the password, they will be required to approve the login request in the Ahsay Mobile app or enter the one-time passcode that is generated in the third-party TOTP Authenticator app.
Slide the switch to the right to enable Two-Factor Authentication. Then click Save to save.
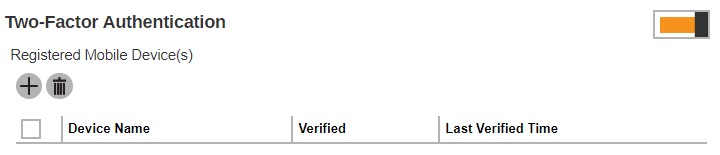
The backup user will be required to register a device for 2FA on their next log in. For more information on how to register a device please refer to Register Device.
The Two-Factor Authentication settings will only be available if the Two-Factor Authentication feature is switched on in System Settings > Basic > Two-Factor Authentication (2FA). Adding the device will be done by the backup user, it will be automatically added once the user’s device has been paired with the backup user account upon log in. For more details please read Two-Factor Authentication. - Last Successful Login - shows the date and time the user last logged in. Also shows the IP address, browser or application used during log in and mobile device used in 2FA (if enabled). This changes everytime the user logs in.
For old backup accounts using Twilio, this will be the screen displayed.
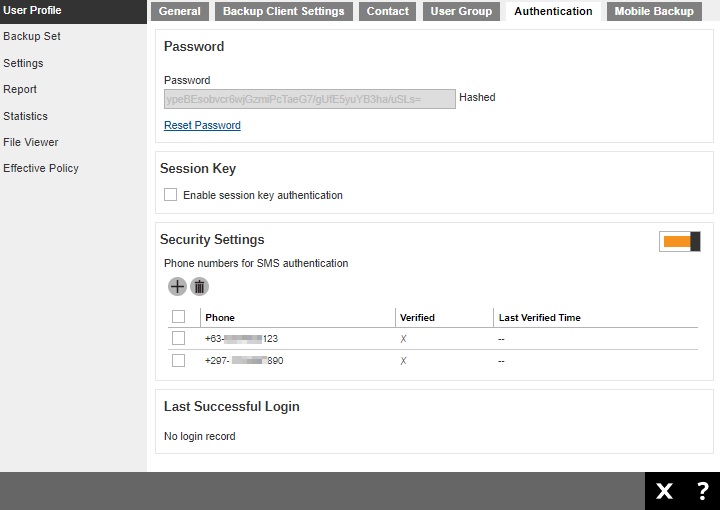
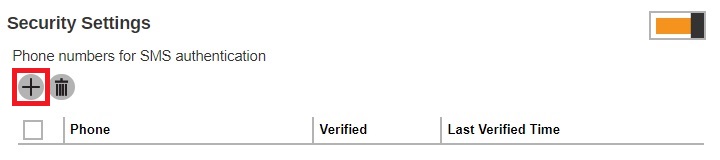
Security Settings - they will be required to enter a passcode that will be sent to them through SMS.
-
Click Add to add a phone number where the passcode will be sent.
-
Select the "Country Code" and enter the phone number.
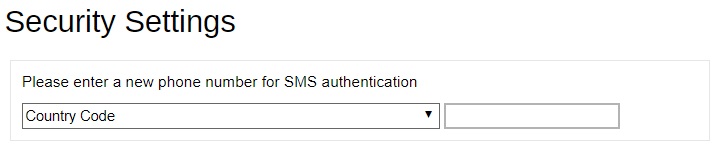
- Click OK to save.
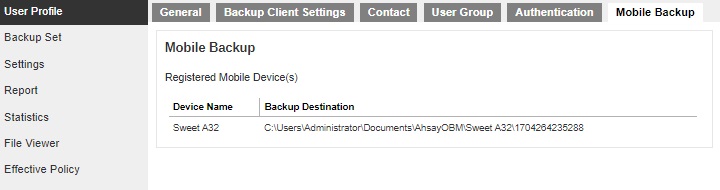
Mobile Backup
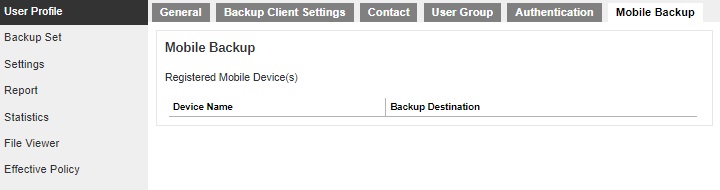
The “Mobile Backup” tab will only be displayed if the Mobile add-on module is enabled for the backup account. It will display the name of the mobile device(s) registered for backup with the corresponding backup destination.
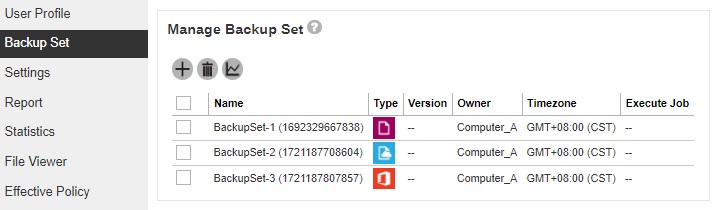
Backup Set
This function is used to create backup sets for this user account. In some cases, you may need to create backup sets first before you install a backup client on the client machine, or it may be an alternative option for administrator to create/modify a backup set for Linux users with no graphical interface, or there may be access restrictions for administrator to access the backup machine again after the backup client installed.
The following shows the Backup Set tab under Users, Groups & Policies > Backup User.
Timezone information will be automatically updated when the user logs in to the client backup agent, such as AhsayOBM and AhsayACB, or perform backup job to avoid the false alarm of missed backup job.
Access the backup set
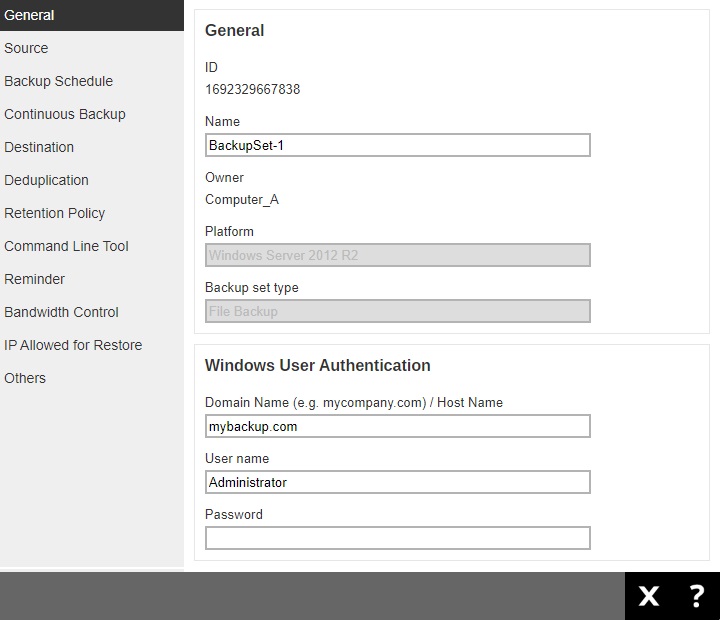
Click the backup set name of the user account you want to manage from the “Backup Set” tab. It is sub divided into the following tabs:
- General
- Source
- Backup Schedule
- Continuous Backup
- Destination
- Deduplication
- Retention Policy
- Command Line Tool
- Reminder
- Bandwidth Control
- IP Allowed for Restore
- Others
For more information on the different features of the backup set, refer to the Overview part.
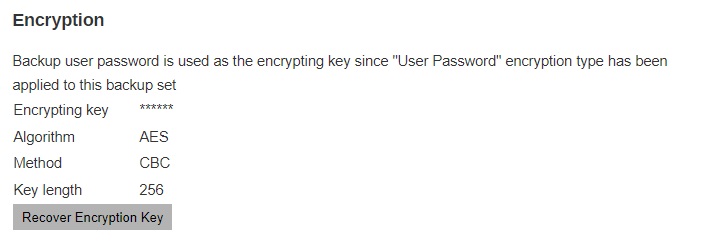
Recovering encryption key via AhsayCBS web console
It is possible to engage the AhsayCBS Encryption Key Recovery Service via the AhsayCBS web console under the “Others” menu of this section. Click here for details on the scope of this professional service.
Required Permission
Only system user with Admin role has the right to access the Recover Encryption Key feature via the AhsayCBS web console.
Required Settings
Encryption key is recoverable only if the following three settings are ENABLED:
- The Upload Encryption Key feature in the Encryption Key section under the Users, Group & Policies > Policy Group > %Policy Group Name % > User Settings menu which applies to the corresponding backup set.
- The Encryption Recovery feature under the Profile > Encryption Recovery menu in your AhsayOBM or AhsayACB.
- The Upload Encryption Key feature under the Users, Group & Policies > Backup User > %User Name % > User Profile of the backup user requesting for key recovery.
With these three features on, encryption keys will be uploaded to the backup server during the backup process, so as to make recovery possible.
Preparation Before Getting Started
Make sure the following items are valid before getting started with the encryption key recovery process.
- Valid login credentials to log on to the Ahsay Shopping Centre.
- Valid maintenance. For inquiries about maintenance, please contact our Sales Team at partners-kb@ahsay.com.
If your AhsayCBS is branded, the Recover Encryption Key feature is HIDDEN by default. This measure is enforced to prevent backup users from accessing the Ahsay Shopping Centre directly after clicking the Recover Encryption Key button under a branded environment.
Your AhsayCBS is considered “branded” when the following criteria are met:
Under the System Settings > Basic > Administrative Access > %system user% > Rebrand Web Console > User Interface page in the web management console, if any one of the following parameters is not empty or not holding default image:
- Title
- Product Name
- User Interface logo
- Report logo
- AhsayCBS logo
- AhsayOBM logo
- AhsayACB logo
The Recover Encryption Key button can be forced to show by enabling the debug option as shown below in the cbs.opt file under the %CBS_INSTALL%\conf folder. This debug option will make the Recover Encryption Key button visible to backup users even if the AhsayCBS is branded. com.ahsay.cbs.system.config.accounts.editSysUserBean.ShowRecoveryEncryptionKeyBtn.debug=true
Recovery Steps
Follow the steps below to submit an encryption key recovery request.
-
Click on the backup set, which you wish to recover the encryption key for, under the “Manage Backup Set” section.
-
Navigate to the Others tab.

Look for the Encryption sub-section on this page and click on the Recover Encryption Key button.
-
You will be prompted to log in to the Ahsay Partner Portal as shown below, if you have not done so yet.
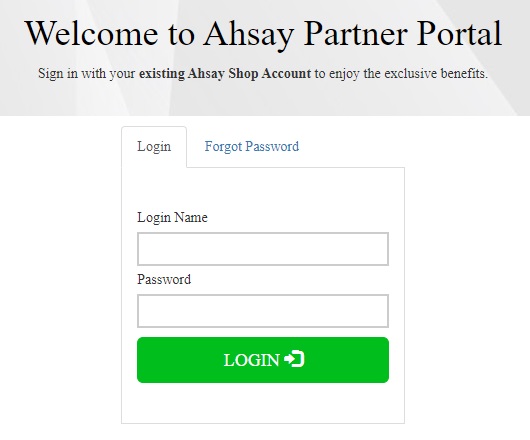
- Upon successful login, you will be re-directed to the Ahsay Shopping Centre to proceed with the encryption key recovery process. You will see a page with your User ID, license information and backup set name listed.
-
In the “Recipient” drop-down menu, the backup user’s email will be selected as the primary recipient of the decrypted key by default, provided that the backup user has provided an email in his/her user profile. Otherwise, the decrypted key will be sent to you instead, where you can choose to deliver to either your Primary or Alternative Email registered under your account.
Click Generate Now when you are ready to proceed.
- You will then be taken to the Invoice page where you can confirm the details of the Encryption Key Recovery Service and the service price. Click the Pay Now button when you are ready to proceed with payment.
- Select the desired payment method on this page. You are strongly recommended to pay by Credit Card so that the payment can be confirmed immediately in order to expedite the recovery process. Click OK when you are ready to proceed.
- Depending on the payment method you have selected, you will be taken to the corresponding page to process your payment. Follow the relevant on-screen instructions to confirm the payment.
-
When the payment is processed successfully, you will be re-directed to the Invoice page again with the green icon labeled “Paid”.
The Encryption Key Recovery request process is now completed.
- The decrypted key will be delivered to the selected email within 15 minutes after the payment has been confirmed.
Settings
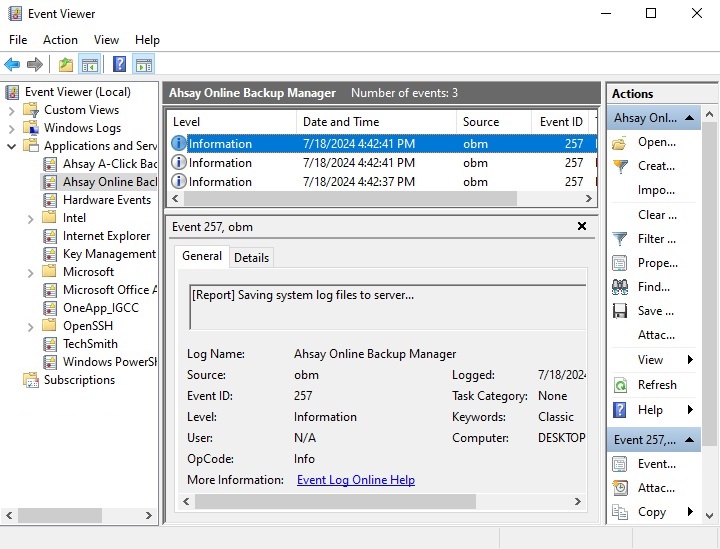
The Settings tab allows user to backup client to log the optional events, besides AhsayOBM/ AhsayACB logs, to the Windows event log. This feature is supported on AhsayOBM/AhsayACB clients installed on Windows platform only.
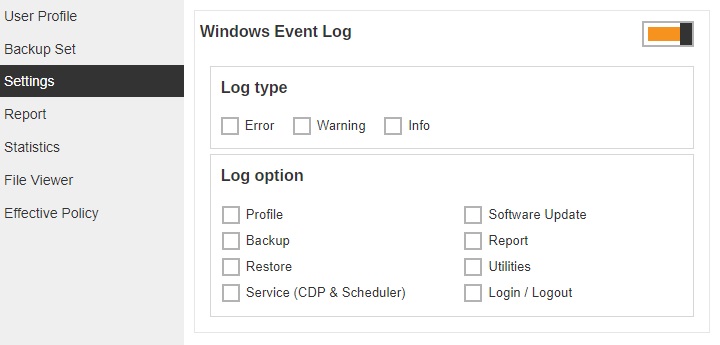
- Log type - there are 3 log types: Error, Warning and Info. Select any of the 3 log types, they will be logged in the Windows event log.
- Log option - there are 8 different log options: Profile, Backup, Restore, Service (CDP & Scheduler), Software Update, Report, Utilities, Login/ Logout.
The events are logged in the Windows event log and can be viewed from the Windows Event Viewer.
Report
The Report tab allows you to check the backup, restore and restore drill reports for the backup user.
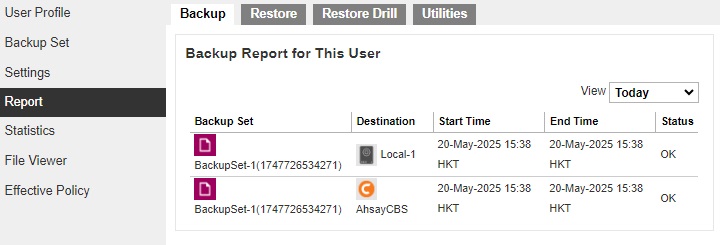
Click the report to see the details. Below is an example of a backup report.
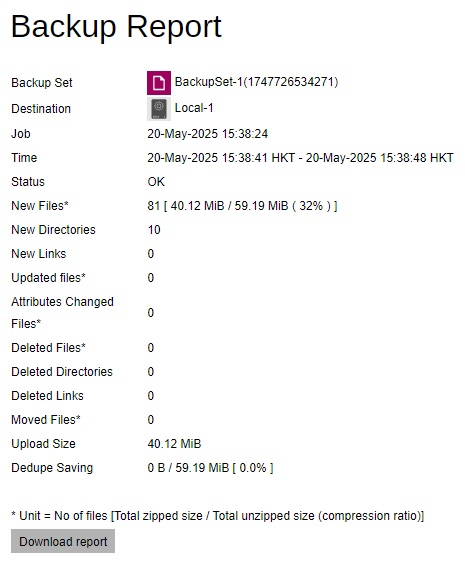
Click the Download report button at the bottom of the "Backup Report" page to download the complete report in PDF format. The report contains the following information in detail.
- Backup Job Summary
- Backup Set Settings
- Backup Logs
- Backup Files
The Download report button should be visible around 20 minutes after the backup job has completed.
OpenDirect restore of file backup sets or granular restore of files from VMware and Hyper-V backup sets performed using Windows File Explorer will NOT generate any restore reports on AhsayCBS. Restore reports are only available when the restore is performed directly through AhsayOBM/ AhsayACB/ AhsayOBR or AhsayCBS User Web Console.
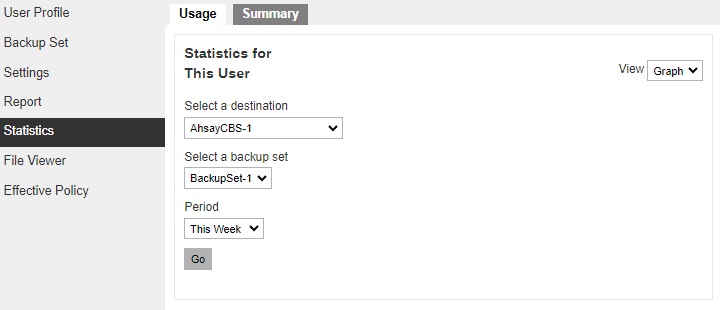
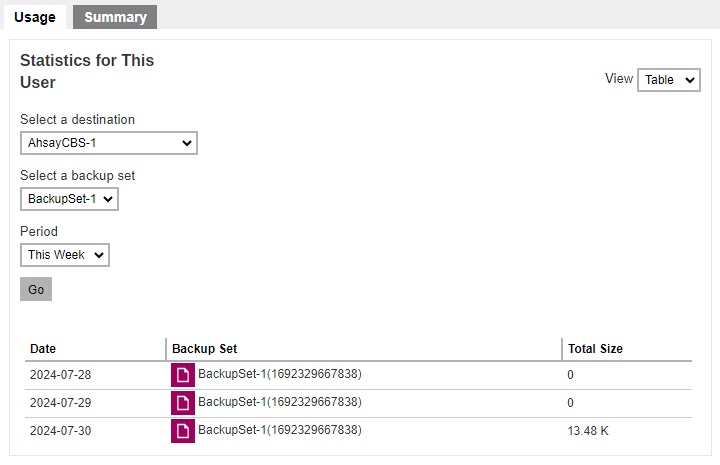
Statistics
The Statistics tab allows you to generate a graph of storage statistics for the user by modifying a few factors such as the backup destination, backup set and the period of the backup. The statistics shows the storage capacity of different backup sets on different dates.
- Only the restorable files in the data and retention area for each backup set is included in the calculation of storage statistics.
-
The following items are excluded from the calculation of storage statistics:
- Uploaded AhsayOBM/AhsayACB client log files
- Backup and restore reports in PDF file format
- Audit log files
- Index files
-
The storage statistics of a backup set are updated every time the following functions are run:
- Backup job
- Data Integrity Check (DIC)
- Periodic Data Integrity Check (PDIC)
- Space Freeing Up
- Delete Backup Data
Usage
The following options are configurable for generating statistics in your desired view.
- Select a destination – select the backup destination of your choice
- Select a backup set – you can choose a specific backup set or all backup sets
- Period – select the period of time during which backups were performed
- View – you can choose a view, graph or table
Graph View
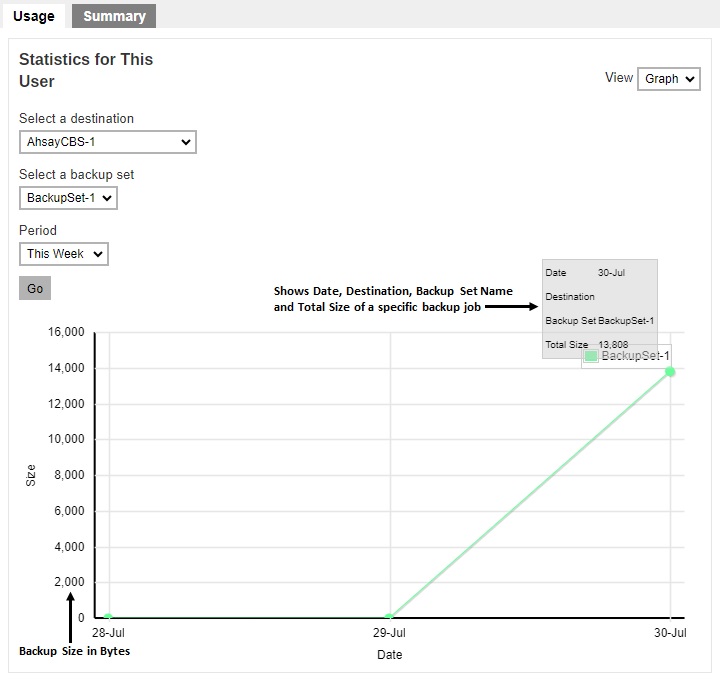
Table View
Summary

There are five (5) columns showing the following information of each backup set.
Data Area
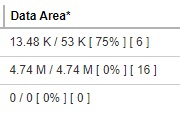
Format:
[Compressed Size] / [Uncompressed Size] [Compression Ratio in %] [Number of files]
Example: 3.71 M / 6.44 M [ 43%] [ 3 ]
The Data Area also include files that are in the Retention Area. The data interpreted as the backup set has 3 restorable files in the Data Area that is within the Retention Policy period; the files compressed and uncompressed sizes are 3.71 M and 6.44 M respectively; the compression ratio is 43%.
Recycle Bin

Format:
[Compressed Size] / [Total number of files]
Example: 2.6 M [ 2 ]
The data interpreted as the backup set has 2 files in the Recycle Bin with a compressed size of 2.6 M.
Total Upload
Format:
[Compressed Size] / [Total number of files]
Example: 3.71 M [ 8 ]
There are a total of 8 files with the size of 3.71 M uploaded for this backup set.
Total Restore
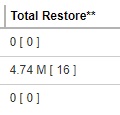
Format:
[Compressed Size] / [Total number of files]
Example: 1.7 M [ 4 ]
There are a total of 4 files with the size of 1.7 M restored from this backup set.
Dedupe Saving
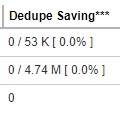
Format:
[Dedupe Size] / [Original Size][Deduplication Ratio in %]
Example: 5.53 M / 11.96 M [ 46.2% ]
The files dedupe size and original size are 5.53 M and 11.96 M respectively, the dedupe saving for this backup set is 46.2%.
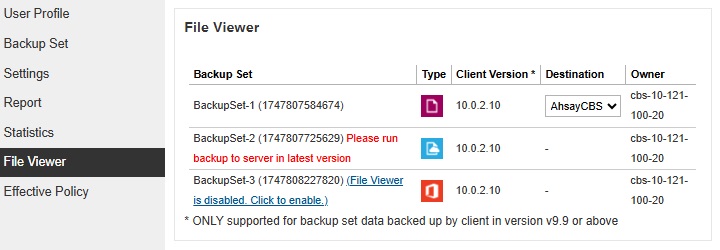
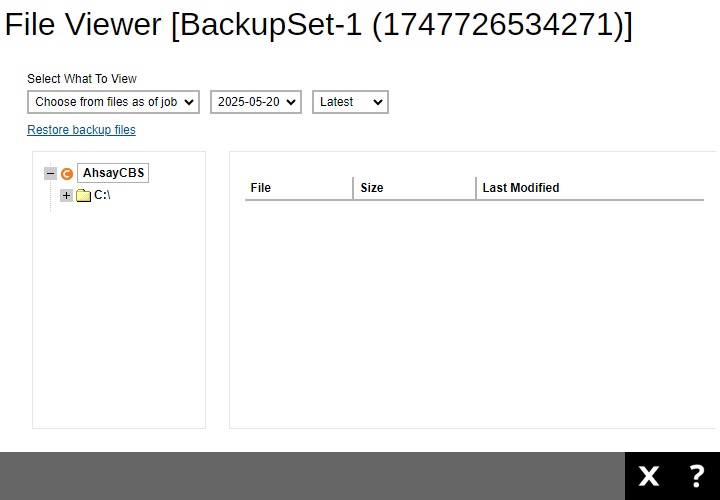
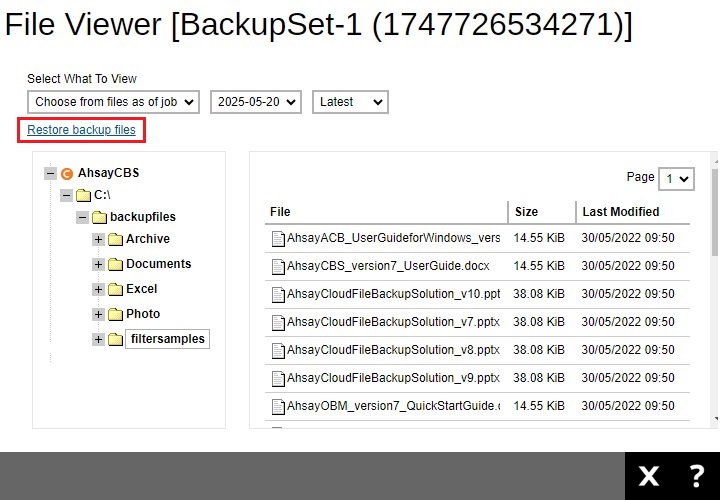
File Viewer
The File Viewer tab allows administrators to view the backup set file list. This will list the backup sets of each user. Here the administrator may view the files that were backed up for each backup set per destination. Also, this can only be used for viewing of backup files, if you decided that you want to restore a file, a link to the Ahsay Restorer is provided.
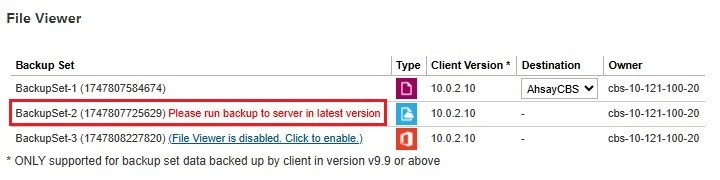
Make sure that the “Enable viewing list of backed up files on backup server without encryption key” checkbox is ticked.

You can access this by clicking the link provided or go to Backup / Restore > Users, Groups & Policies > Backup User > %Backup User Name% > Backup Set > %Backup Set Name% > Others > File Viewer on Backup Server.
After ticking the checkbox, run a backup job to access the backed up files and avoid getting this message “Please run backup to server in latest version”. This message will also be displayed if the backup destination used for the backup set is not AhsayCBS.
Click on the backup set to view the backed up files.
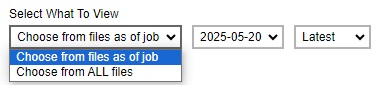
You can select what to view from Choose from files as of job or Choose from ALL files, just like when you are performing a restore.
Click the file tree to expand and display the backed up files.
A “Restore backup files” link is provided which you can click to download the Ahsay Restorer. You need to install it in order to restore your files, for more information please refer to the Restore User Guide.
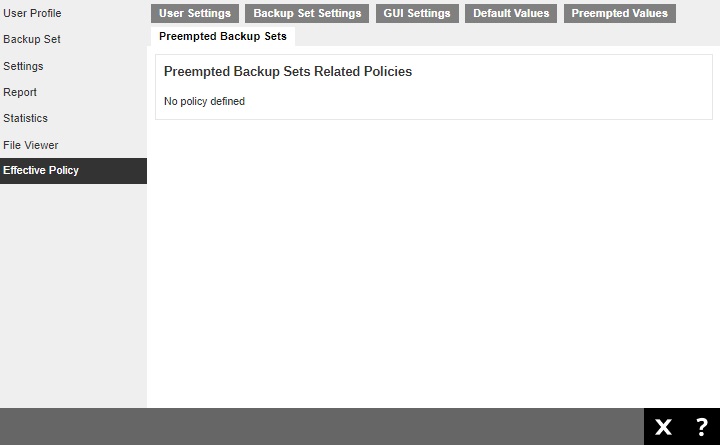
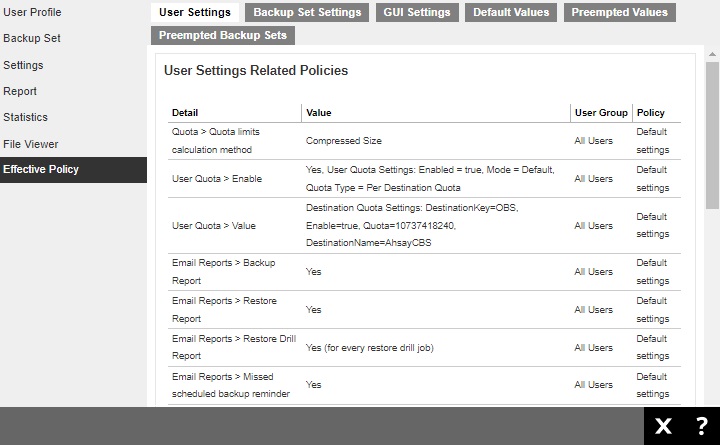
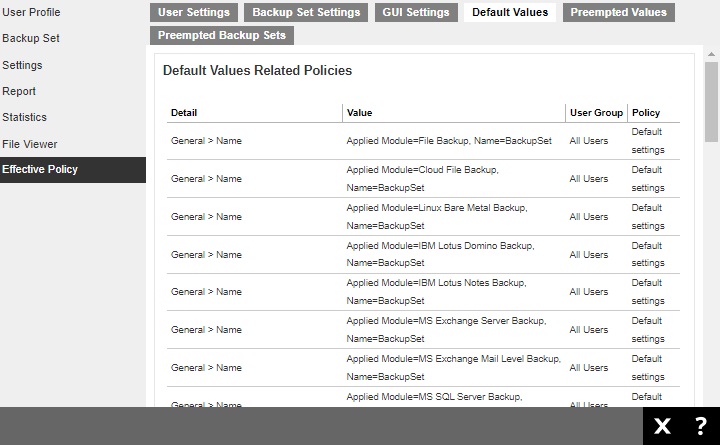
Effective Policy
The Effective Policy tab shows the details of all policies and settings which applies to the backup user account. The Effective Policy tab is located under Users, Groups & Policies > Backup User. It can be hidden by unchecking the box of View for “Effective Policy” under Users, Groups & Policies > Policy Group > Default settings > GUI Settings.
It is subdivided into 6 tabs, each of which is described below.
User Settings
You can see the effective policy on user settings for this user on the User Settings tab.
Backup Set Settings
You can see the effective policy on backup set settings for this user on the Backup Set Settings tab.

GUI Settings
You can see the effective policy on AhsayOBM or AhsayACB GUI settings for this user on the GUI Settings tab.

Default Values
You can see the effective policy on default values for this user on the Default Values tab.
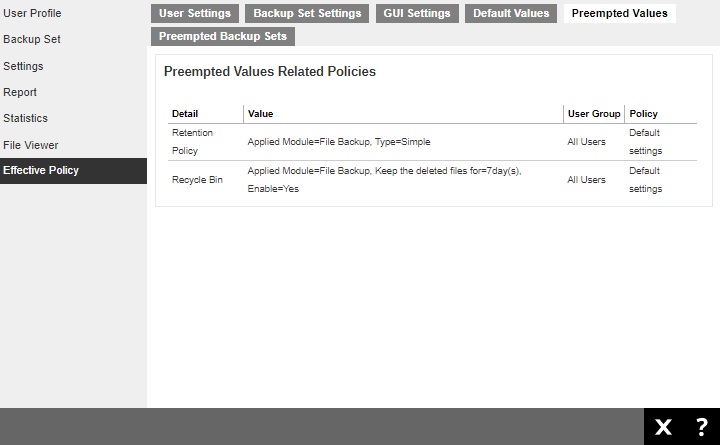
Preempted Values
You can see the effective policy on preempted values for this user on the Preempted Values tab.
Preempted Backup Sets
You can see the effective policy on preempted backup sets for this user on the Preempted Backup Sets tab.