AhsayCBS
[v10] Recovery Process
After you have deployed the replication server, data from the backup server will be replicated to the replication destination you have selected. In the event of a system down on your backup server, or you wish to retrieve deleted data from the replication destination, you can recover the configurations and backup data replicated from the backup server by using any one of the recovery methods below.
Method 1 - Rebuild AhsayCBS From Replication
Introduction
This recovery method rebuilds the AhsayCBS by extracting AhsayCBS configuration, system files, user profiles and backup data from the replication destination then restoring it either to the Backup Server or restoring the raw data alone using a Backup Client Agent (AhsayOBM / AhsayACB).
Pros
Selective Backup Set Restore
After extracting the backed up data from the replication destination, you have the flexibility to restore only the selected backup sets from selected backup users, instead of restoring all data at once.
Restore as Raw Data
Instead of restoring the backed up data to the backup server, you can only restore the raw data by using a client backup agent (AhsayOBM / AhsayACB).
Cons
Relatively Time and Effort Consuming
As opposed to Method 3 where you can quickly convert the replication server as backup server, this recovery method takes more time and effort to rebuild the backup server.
Steps
- Set up a new AhsayCBS on a new machine with similar hardware specification, and sufficient hard disk space as the original backup server.
- Make sure replication has been performed before you start restoring any replication data. Refer to To check replication logs on the Backup Server and To check the replication logs on the Replication Server for details.
-
Extract data in the 3 folders (conf, system and user) from the replication destination. Below are the links that can quickly direct you to the corresponding section for the detailed steps.
- from AhsayCBS Replication Server
- from a Predefined Destination
- from v6 Replication
- from Snapshot in Retention Area
- Stop AhsayCBS server on the new machine.
-
To rebuild the AhsayCBS on the new machine by restoring the extracted data, continue to read through the rest of the steps in this section.
or
To restore the backup raw data alone using a Backup Client Agent, disregard the steps below and skip to Restore Raw Data Using AhsayOBM / AhsayACB for further steps.
-
Copy all the contents in the 3 folders to your new server as instructed below:
- system > CBS_HOME\system
- user > CBS_HOME\user
- conf\conf.zip > CBS_HOME\conf
Expand the conf.zip first. - Start the AhsayCBS server on the new machine after copying the data as instructed above.
- Logon to the AhsayCBS web management console.
- You will notice that there is a license error. This is because your AhsayCBS is running on the new machine with hardware and settings changed. Please contact our support with your licensee name and license key. We shall relax the license for you. There is a 14 days grace period before the license deactivates.
List of suggested items to check after you started up your AhsayCBS
- Check SMTP settings in AhsayCBS web console by navigating to System Settings > Basic > Email.
- Check all users’ profile, backup and policy group settings in AhsayCBS web console by navigating to Backup/Restore > Users, Groups & Policies.
- Check https connection to the AhsayCBS on different browsers (IE, Firefox and Chrome).
Method 2 - Rebuild From Auto Save
Introduction
This recovery method only restores the AhsayCBS configuration, system files and user profiles but not the users’ backed up data. Users’ backed up data will have to be re-uploaded again to complete the recovery.
So it is very important to configure a replication for your AhsayCBS if you need to restore everything that was originally on the Backup Server.
- As the system keeps only a maximum of 30 Auto Save snapshots on software vendor’s cloud, if you want to keep these snapshot(s) on your server, you need to download these snapshots manually.
- If you restore an earlier snapshot, you will not be able to restore again all the snapshots beyond the restore date. For example, If today is Jan 21st 2024, after you restore the snapshot on Jan 19th, 2024, you will not be able to select the snapshot on Jan 20th and Jan 21st from the dropdown list.
Please refer to the Replication Scope for all the major system configuration files that are saved on the cloud daily by the Auto Save system job.
Pros
Quick Rebuild of AhsayCBS
AhsayCBS can be quickly rebuilt by applying only the configuration files and user profiles.
Cons
Longer Time to Re-upload Backup Data
Since the users’ backup data is not restored and required to be re-uploaded again, it is going to take a longer time to complete the whole recovery process.
Steps
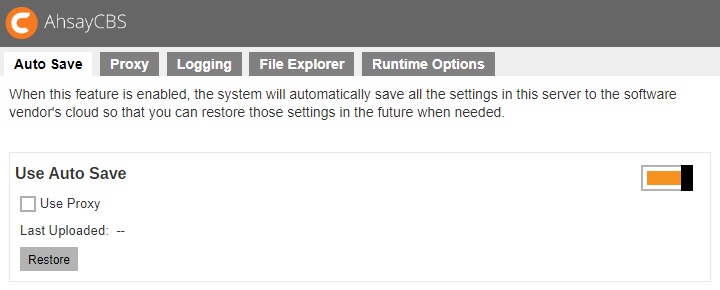
- Login to AhsayCBS management console and go to System Settings > Advanced > Auto Save.
-
Turn on the “Use Auto Save” switch, then click on the Restore button.
-
Select to download the snapshot file or to overwrite the existing configuration.
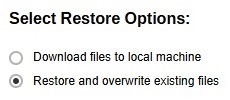
In this example, we have selected the Restore and overwrite existing files option, skip to the Manual Restore section if you want to restore the downloaded files manually.
-
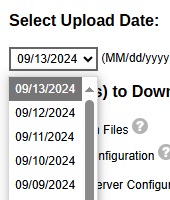
Select the snapshot that you want to restore.
-
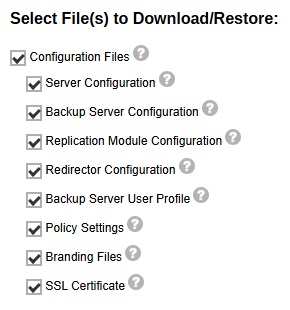
Select the items that you need to restore. Select all the items if you need to restore the configuration exactly on that restore point.
- Click on the Restore button if you want to restore and overwrite the existing configuration.
- Restart the AhsayCBS service, and the configuration will be overwritten.
Manual Restore
- Here is an example of the downloaded configuration file, the name of the folder follows this format dr-YYYY-MM-DD.zip
- (Optional) If you need to restore the file manually, you can unzip the 2 folders “conf” and “policies” into the CBS_HOME\system\recovery. After the restart of the AhsayCBS service, the configuration will be imported to the AhsayCBS.
Method 3 - Start Up Replication Server As Backup Server
Introduction
This recovery method allows you to quickly convert AhsayCBS in replication receiver mode to a backup server. This is a quick and direct way to access your backup data in the event of a system down on your backup server.
Pros
Fastest Recovery
This recovery method is the fastest way to turn the replication server as a backup server so as to minimize the system down time in the event of a backup server disaster.
Steps
-
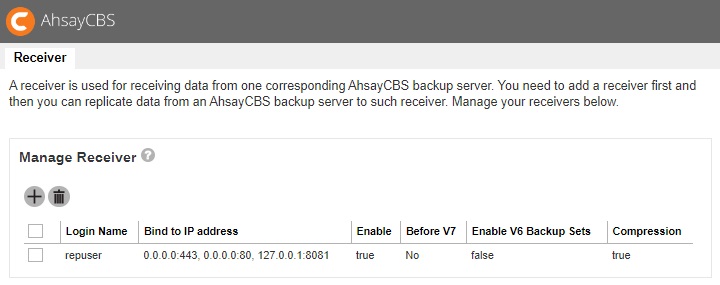
Check on the Receiver's Setting by following the steps below and make note of the Default Home Directory and Replication Home settings.
- On the AhsayCBS in replication receiver mode, login to the AhsayCBS web console.
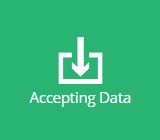
- Confirm on the replication receiver's settings. Under Replication, select Accepting Data.
-
Check on the Default Home Directory setting, as well as the Replication Home setting.
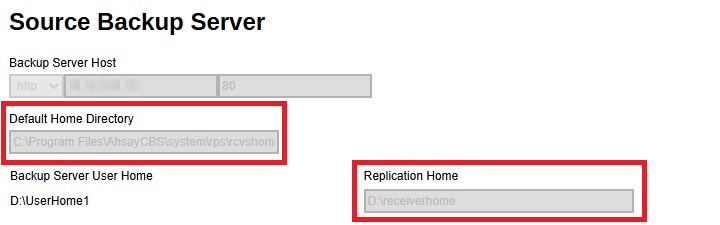
Default Home Directory is where the replication sender's system home, user settings, and configuration settings are stored (in the app folder).
Replication Home is the location where users' backup data and logs are stored.
In the example above, the following settings are used:
-
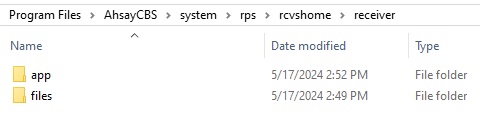
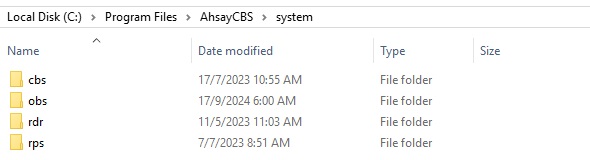
Default Home Directory is set to: C:\Program Files\AhsayCBS\system\rps\rcvshome\receiver
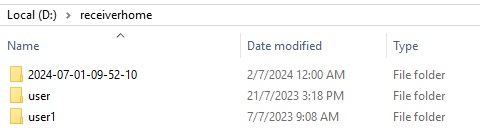
- Replication Home is set to: D:\receiverhome
-
Configure the Software License by following the steps below.
- On the AhsayCBS in replication receiver mode, login to the AhsayCBS web console.
-
Under System Settings, select Licenses, then apply the AhsayCBS license (the license from the AhsayCBS in backup server mode).
This will ensure that there are sufficient “Client Software” and “Client Add-on Modules” available to the backup users after the switch.
- Click Update, then click Save. Ensure that the license information is properly applied by checking the Client Software and Client Add-on Modules settings under “License Details”.
Before continuing with the next step, ensure that the license is properly applied. Failure to do so may result in backup accounts being suspended and all backup settings being reset.
Also, ensure to shut down the AhsayCBS on the backup server, so that you are not running two servers with the same AhsayCBS license.
-
Convert the AhsayCBS in Replication Receiver Mode to Backup Server Mode by following the steps below.
- Shutdown the AhsayCBS service.
-
Copy the replicated system config files to the corresponding location.
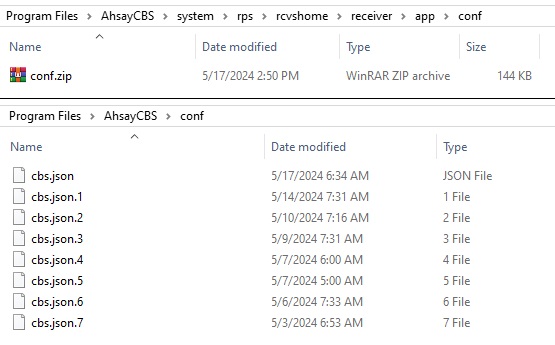
Extract the content of the conf.zip file from the “Default Home Directory” to the AhsayCBS installation conf folder.
Extract %Default Home Directory%\app\conf\conf.zip
to %AhsayCBS Install Home%\*
Using the example in Step 1, extract the content of C:\Program Files\AhsayCBS\system\rps\rcvshome\receiver\app\conf\conf.zip to C:\Program Files\AhsayCBS\conf
-
Copy the replicated system home from the “Default Home Directory” to the AhsayCBS system home folder.
Copy %Default Home Directory%\app\system\* to %AhsayCBS System Home%\*
Using the example in Step 1, copy the content of C:\Program Files\AhsayCBS\system\rps\rcvshome\receiver\app\system\* to C:\Program Files\AhsayCBS\system
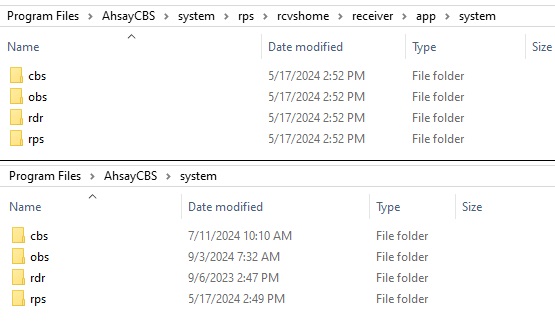 If you are planning to change the system home location, copy the replicated system home to the new system home location instead.
 -
Copy the replicated user home from the Replication Home to the AhsayCBS user home folder.
Copy %Replication Home%\%username% to %AhsayCBS User Home%\*
Do not copy over the folder in YYYY-MM-DD-hh-mm-ss format.Using the example in Step 1, copy the content of D:\receiverhome to C:\Program Files\AhsayCBS\user
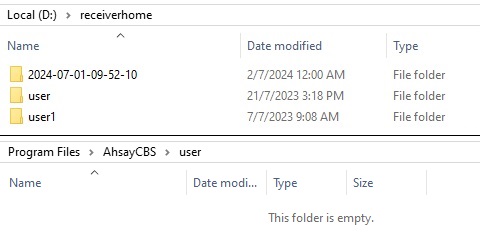 If you are planning to change the user home location, copy the replicated user home to the new user home location instead.
 - Startup the AhsayCBS services.
-
Login to the AhsayCBS web console, confirm the settings.
-
Confirm the system settings under the System Settings > Basic and System Settings > Advanced menus.
Modify the “System Home” setting under System Settings > Basic if necessary (e.g. if you had copied the replicated system home to a new location in the previous step).
-
Confirm the user and policy settings under Backup / Restore > Users, Groups & Policies menu.
Modify the “User Home” setting under
Basic if necessary (e.g. if you had copied the replicated user home to a new location in the previous step).
-
For AhsayCBS installation on Linux platforms, the conversion procedure is the same except all directory paths are in the Linux convention.
Extract Data from the Replication Destination
If you have chosen to recover your replication data using Method 1 - Rebuild AhsayCBS from Replication, you will have to extract the replication data from the replication destination first. Before getting started, make sure replication has been performed before you start restoring any replication data by performing the following checking.
To Check Replication Logs on the Backup Server
Log in to the AhsayCBS web console, go to Monitoring > Replication Logs > Replication Sending.
![]()
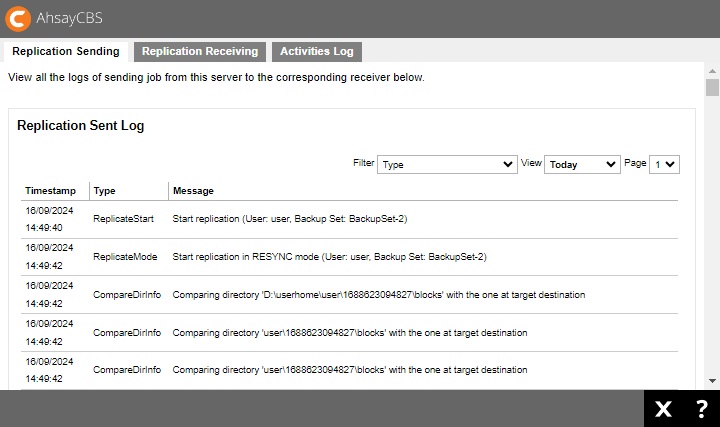
Use the drop-down filters at the top right corner to filter the desired replication sending logs.
- Type – select the desired type of replication log to display.
- View – select a specific date or range of time of the replication logs.
To Check Replication Logs on the Replication Server
Log in to the AhsayCBS web console, go to Monitoring > Replication Logs > Replication Receiving.
![]()
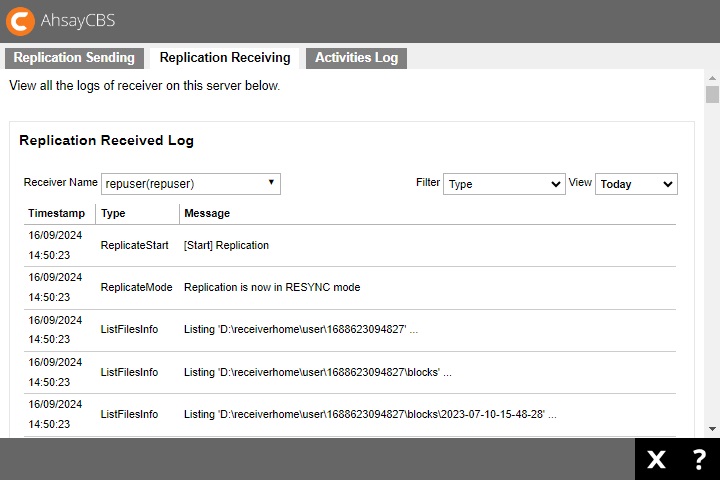
Use the drop-down filters at the top right corner to filter the desired replication receiving logs.
- Receiver Name – select the receiver name of whom the replication data is from.
- Type – select the type of replication log to display.
- View – select a specific date or range of time of the replication logs.
Here are the different ways how to extract the replication data:
- Extract from AhsayCBS Replication Server
- Extract from a Predefined Destination
- Extract from v6 Replication
- Extract Snapshot from Retention Area
Extract from AhsayCBS Replication Server
-
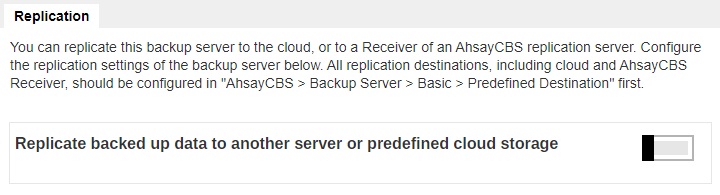
Follow the steps below to disable the replication service on both the Backup Server and the Replication Server.
-
To disable on the Backup Server Side
-
Click on the Sending Data icon under the Replication section on the AhsayCBS web console of the backup server.

-
Slide the switch to the left in the “Replicate backed up data to another server or predefined cloud storage” to turn the replication feature off.
-
-
To disable on the Replication Server Side
-
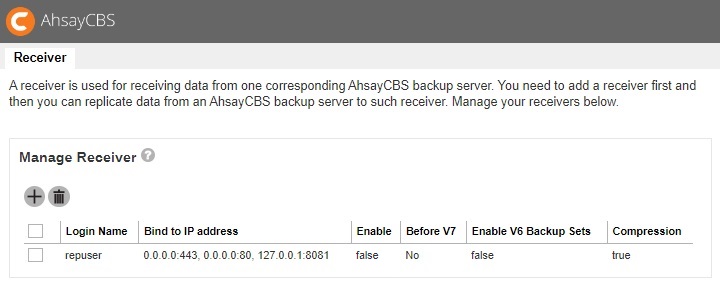
Click on the replication receiving end, go to Replication > Accepting Data on the AhsayCBS web console.
-
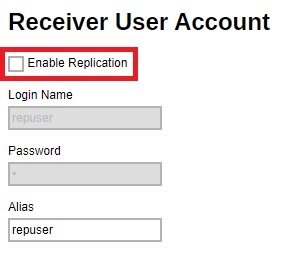
Click on the replication receiver user under the “Manage Receiver” section which you wish to turn off.
-
Untick the Enable Replication checkbox under the “Receiver User Account” section
-
-
-
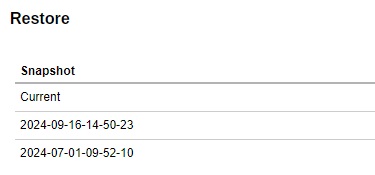
Go to Replication > Accepting Data > Manage Receiver > %receiver_name% in the Replication Server web console.
-
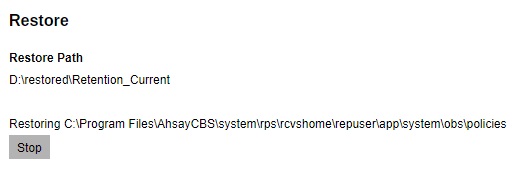
Locate the “Restore” section at the bottom of the page. Click on the Current snapshot to display all the replicated users.
-
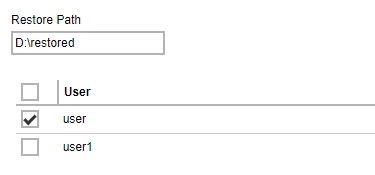
Enter the path you want to restore the data to (e.g. D:\restored). Then select the user(s) that you want to recover, select all if you want to recover all the users for the Backup Server.
- Click the Restore button to start the restoration.
-
It will then go back to the Edit Receiver page and you will see the restore progress under the “Restore” section.
-
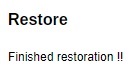
When you see the “Finished restoration !!” message, the restore is completed.
-
The data of the selected users and the server configuration are restored to the specified restore path on the Replication Server.
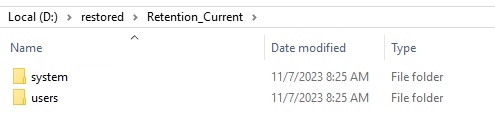
You will find the folder structure as:
-
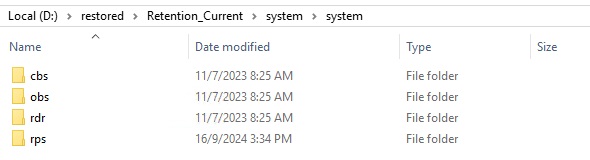
D:\restored\Retention_Current\system which contains “CBS_HOME\conf” and “SYSTEM_HOME”.
-
D:\restored\Retention_Current\users which contains the user folders.
-
- Copy the whole restored folder D:\restored to a free space on your Backup Server first, e.g. C:\Desktop
-
After extracting the replication data, you can follow the instructions in Restore Replication Data to the Backup Server to restore the replication data to your AhsayCBS backup server.
or
Refer to Restore Raw Data Using AhsayOBM / AhsayACB if you wish to recover the raw data alone without restoring them to AhsayCBS.
Extract from a Predefined Destination
There are different predefined destinations that may be used to replicate backed up data like cloud storage, FTP, SFTP, local drive, network drive, removable drive etc.
Google Drive will be used as an example for the predefined destination. The extraction method is basically the same for the other predefined destination.
Prerequisite: Google Drive is installed.
- Disable the replication on the Backup Server, for instructions please refer to the previous section.
- Locate the replication folder, go to your Google drive folder or login to the Google drive web interface to access to your storage.
-
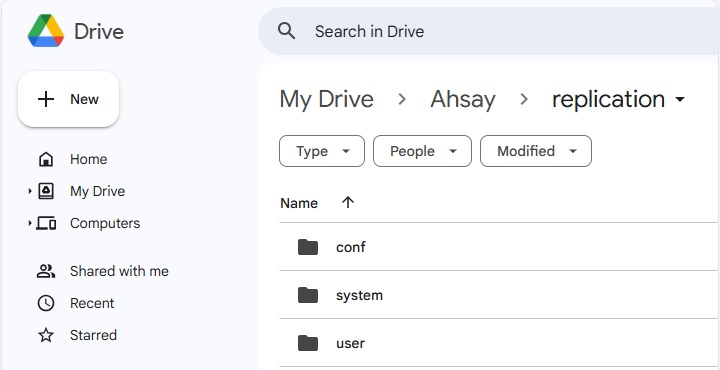
You will find the following path such as My drive > Ahsay > replication. (‘replication’ is the replication profile name)
Google Drive File Explorer
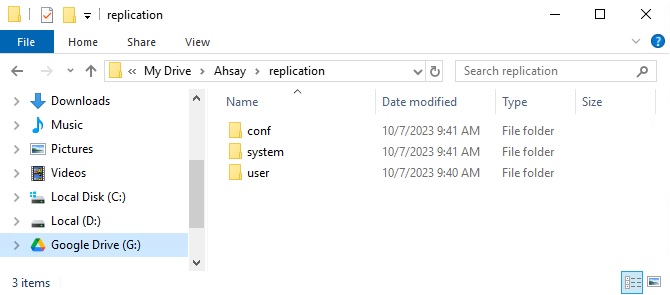
Google Drive Web Interface
The path of the replication folder is usually %Replication_Home%\Ahsay\%Replication_Profile_Name%.
Example for:
- Cloud storage = My Drive\Ahsay\replication
- SFTP = sftp_root/Ahsay/replication
- Local Drive = E:\rpshome\replication
-
You will see the following folders:
- conf
- system
- user
You may download/copy all three (3) folders to your local drive if you need to restore all the files. Or select the folder to download/copy according to your requirement.
The “conf” and “system” folders are AhsayCBS configuration or system related files. The “user” folder contains the replicated user folders. -
After extracting the replication data, you can follow the instructions in Restore Replication Data to the Backup Server to restore the replication data to your AhsayCBS backup server.
or
Refer to Restore Raw Data Using AhsayOBM / AhsayACB if you wish to recover the raw data alone without restoring them to AhsayCBS.
Extract from v6 Replication
This section provides steps on restoring replication data in v6 format to a v6 version backup server.
Please be reminded that the steps in this section apply only if you are restoring the replication data in v6 data format back to a backup server in v6 version.
If the backup server has been upgraded to v9, the replication data in v6 data format cannot be restored in the upgraded backup server due to the fundamental differences of the system structure and data format between v6 and v9. If you have upgraded your backup server to v9, you will have to configure the replication receiver again and make sure to select the Backup Server Version as 9 during the receiver creation process. Refer to the Create a Replication User Account section for further details on the configuration.
- Disable the replication on the Backup Server, for instructions please refer to the previous section.
- Follow steps 2 – 7 in the Extract from AhsayCBS Replication Server section.
-
The data of the selected users and the server configuration are restored to the restore path on the Replication Server.
You will find the folder structure as:
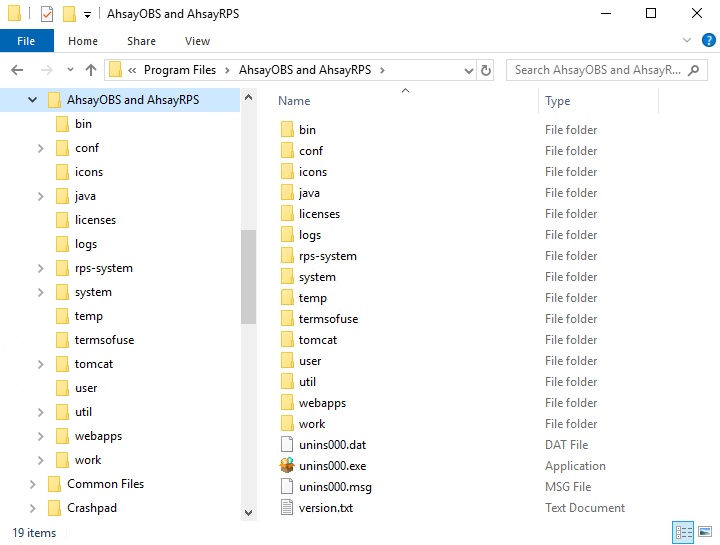
 The folder D:\v6rps\Retention_Current\ contains all the restore materials for your v6 OBS. Under the folder, D:\v6rps\Retention_Current\system, you can see the folder “C%3A” which indicate the drive letter of the installation, “%3A” is the URL encoding for the colon character which means “C:”.
Here is a summary of the restored folders under the path D:\v6rps\Retention _Current\system\C%3A\Program Files\AhsayOBS and AhsayRPS:
Folder Name Description bin Contains the startup scripts. conf PBS server configuration files. java Bundled Java for the OBS. system System configuration and policy settings. tomcat Bundled Tomcat for the OBS. webapps OBS and RPS application folder, OBC installer files etc. work Cache folder. - Copy the whole restored folder D:\v6rps to your AhsayOBS machine.
-
Locate the AhsayOBS installation directory in the AhsayOBS machine, conf folder, system folder and user folder.
In this case, all three (3) folders are located in the same directory. If you have changed the AhsayOBS system home or user home folder, you can check this information in your AhsayOBS Management Console > Manage System > Server Configuration page.
-
After extracting the replication data, you can follow the instructions in Restore Replication Data to the Backup Server to restore the replication data to your AhsayCBS backup server.
or
Refer to Restore Raw Data Using AhsayOBM / AhsayACB if you wish to recover the raw data alone without restoring them to AhsayCBS.
Extract Snapshot from Retention Area
A snapshot of the replicated data is taken and stored in the retention area for a certain period of time of your configuration. This gives you an extra layer of protection in case you need to retrieve the old replication data. For details of the retention policy setting, refer to the Retention Setting under the Create a Replication User Account section.
-
Go to Replication > Accepting Data > Manage Receiver > %receiver_name% in the Replication Server web console.
-
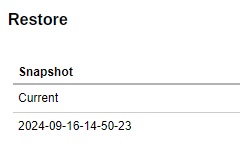
Locate the “Restore” section at the bottom of the page. The past snapshots are named in date and time when it was captured. Click on the desired snapshot you wish to extract the replication data from.
-
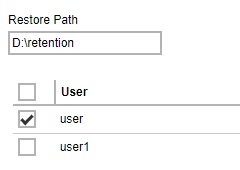
Enter the path where you want to restore the data in the retention area (e.g. D:\retention). Then select the user(s) that you want to recover, select all if you want to recover all the users for the Backup server.
 Do not restore the retention data in the same folder where you normally store the extracted replication data so as to avoid any possible confusion.
 - Click the Restore button to start the restoration.
-
It will then go back to the Edit Receiver page and you will see the restore progress under the “Restore” section
-
When you see the “Finished restoration !!” message, the restore is completed.
-
The data of the selected users and the server configuration are restored to the specified restore path on the Replication Server.
You will find the folder structure as:
-
D:\retention\Retention_2024-09-16-14-50-23\system which contains “CBS_HOME\ conf” and “SYSTEM_HOME”.
-
D:\retention\Retention_2024-09-16-14-50-23\users which contains the user folders.
-
- Copy the whole restored folder D:\retention to a free space on your Backup Server first, e.g. C:\Desktop.
-
After extracting the replication data, you can follow the instructions in Restore Replication Data to the Backup Server to restore the replication data to your AhsayCBS backup server.
or
Refer to Restore Raw Data Using AhsayOBM / AhsayACB if you wish to recover the raw data alone without restoring them to AhsayCBS.
Restore Replication Data
Restore Replication Data to the Backup Server
-
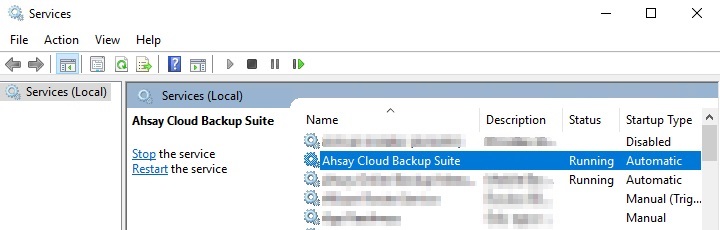
Stop the AhsayCBS service on the Backup Server by going to the “Services” console, click on Ahsay Cloud Backup Suite then click the Stop button on the left.
-
If you want to recover the user data, copy the %user_name% folder from the %Restored_folder%\Retention_Current\users folder, then paste it to the User Home folder located in “\AhsayCBS\user\” on your backup server machine.

-
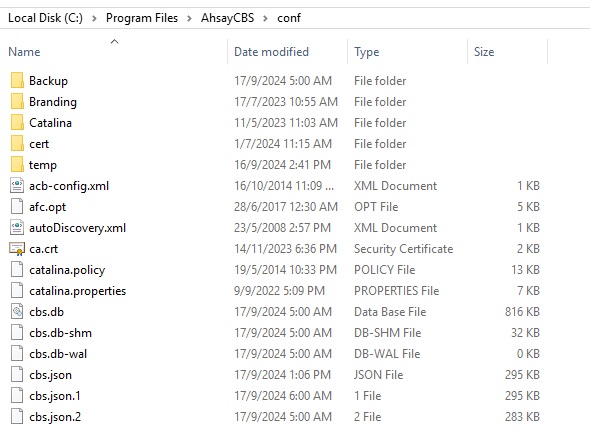
If you want to recover the server configuration, extract the %Restored_folder%\Retention_Current\system\conf\conf.zip, then unzip the file and replace all the unzipped files with those located on “\AhsayCBS\conf\”.

-
If you want to recover the system home, copy the content of the %Restored_folder%\Retention_Current\system\system folder in the restored folder, then paste it in the system folder located in “AhsayCBS\system\” on your backup service machine.
- Restart the AhsayCBS service on the Backup Server by going to the Services console, click on Ahsay Cloud Backup Suite then click the Start button on the left.
Restore Raw Data using AhsayOBM / AhsayACB
Besides restoring the replication data back to the backup server, you can also restore the raw data alone using either of the client backup agent (AhsayOBM / AhsayACB).
Make sure you have extracted the replication data from the replication destination before you start with the restore. Refer to the instructions in the Extract Data from the Replication Destination. Once you have extracted the replication data, follow the steps below to restore the raw data.
AhsayOBM is used in the following instructions for decrypting the data. The procedures work basically the same for AhsayACB.
-
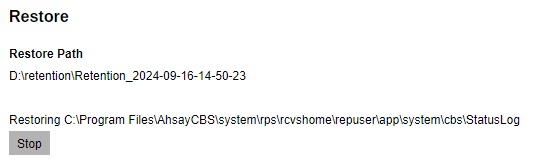
Log in to the AhsayOBM client backup agent, go to Utilities > Decrypt Backup Data section.
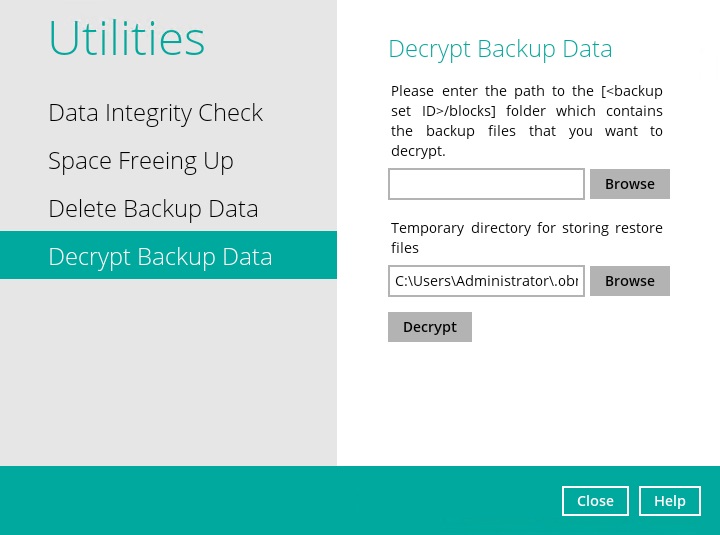
-
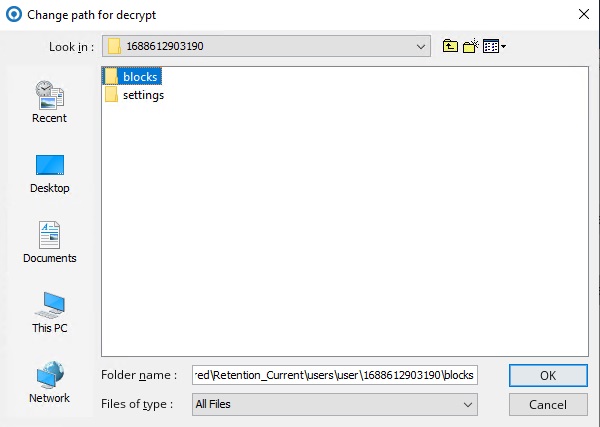
Click Browse to locate the backup set you wish to decrypt replication data you have extracted, then navigate to the %backup set ID%/blocks level of the backup set you wish to restore data from then click OK.
- Click Decrypt to proceed.
-
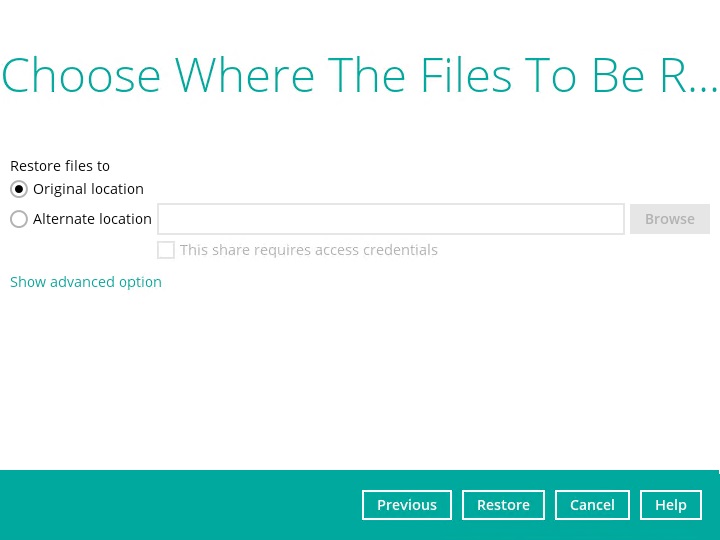
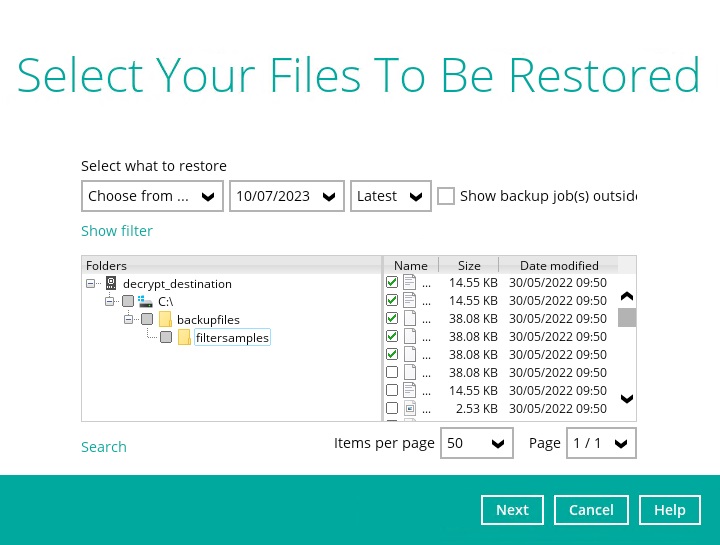
Select the file(s)/folder(s) you wish to restore from the selected source, then click Next to proceed.
-
Select to restore to the Original location or an Alternate location of your choice. Click Restore to start the decryption process.