
 FAQ
FAQFunctions
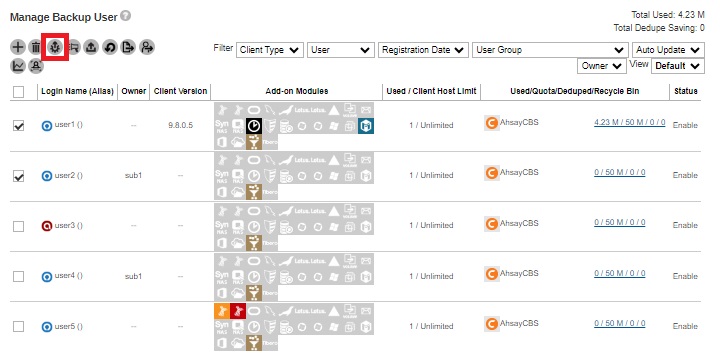
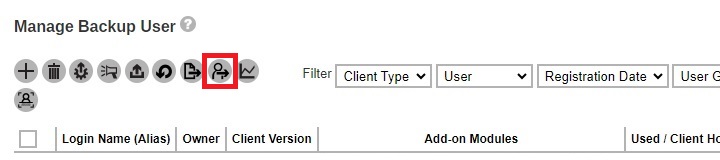
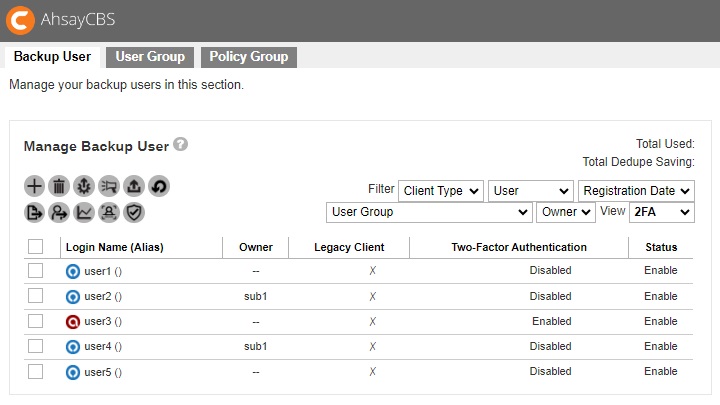
The following shows the “Backup User” tab under Backup / Restore > Users, Groups & Policies.
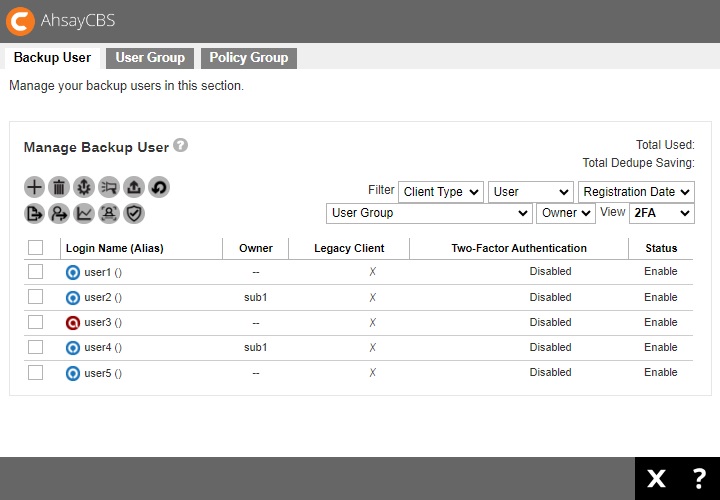
There are 11 functions available here:

- Create
- Delete
- Auto Update
- Broadcast
- Initiate Backup Job
- Run Restore Drill
- Export Users' Usage Statistics to CSV
- Move / Import / Export Users
- Rebuild Storage Statistics
- Rescan all user home directories
- Enable / Disable Two-Factor Authentication
Create a new backup user
If AhsayCBS is deployed for internal use, as a system administrator, you need to determine the following when you create a backup account:
- Backup client type, whether it is AhsayOBM or AhsayACB.
- Backup destination.
If you are a Managed Service Provider (MSP) or reseller you may require to take into consideration the following items when you create a backup user account:
- Types of users, whether it is Paid or Trial.
- Backup client type, whether it is AhsayOBM or AhsayACB. Also the modules subscribed by the client.
- The backup destination and the subscribed quota.
Follow the steps below to create a new AhsayOBM/AhsayACB backup user account.
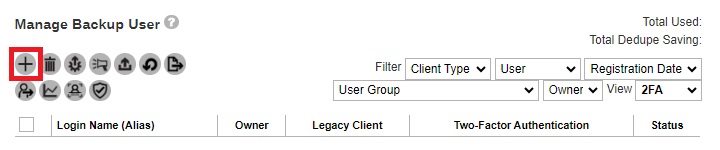
-
Click Create to add a backup user.
-
Enter the “Login Name”, “Password” and select the “Owner”. Also select the “User Group” by checking the desired user group. Click Next to proceed.
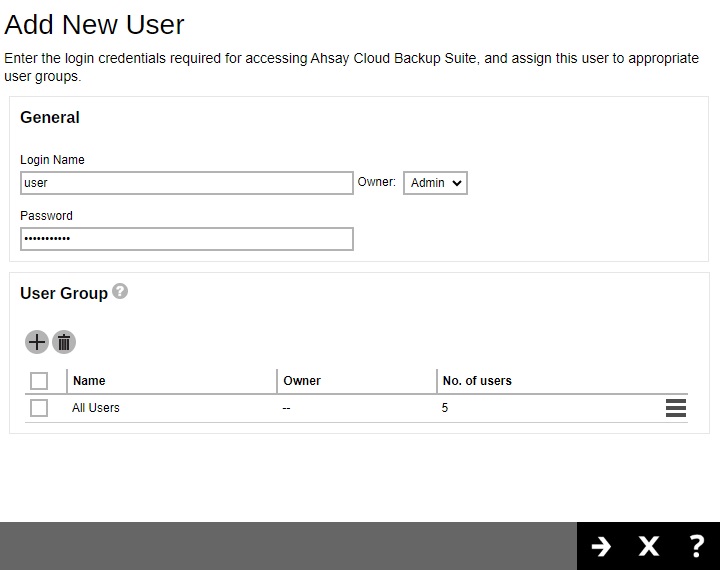
System user accounts that will be available for selection in “Owner” will only be Admin or Sub Admin accounts. All Admin accounts will just be listed as one Admin option, since all Admin accounts share the same functionality. While the Sub Admin accounts that will be available in the drop-down list will depend on the system user account that is creating the backup user account.
If a backup user account is being created by a system user account that was created by a Sub Admin account, only the main Sub Admin account will be available as a choice in the drop-down list for the “Owner”.
Example: Sub Admin 2 was created by Sub Admin 1, when Sub Admin 2 creates Backup User 1 only Sub Admin 1 will be listed in the “Owner” drop-down list.
-
Configure the following. Click Next to proceed when done with the settings.
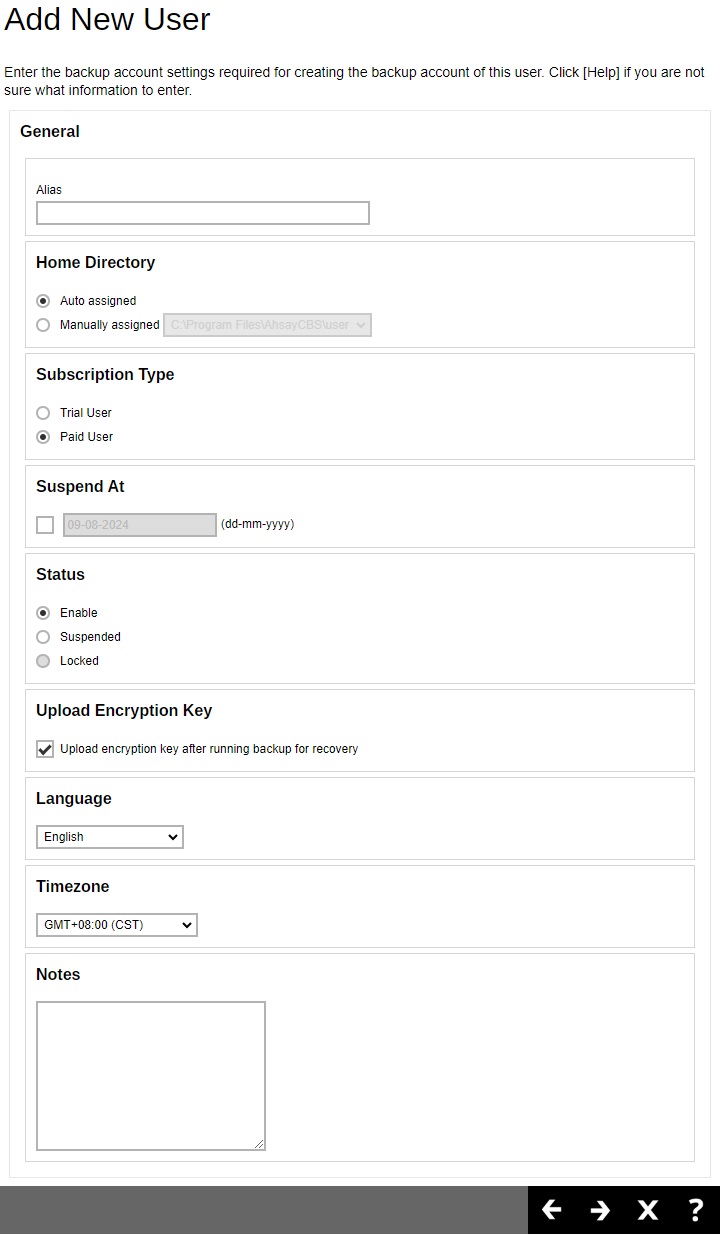
- Alias - another name for the backup user.
- Home Directory - select Auto assigned or Manually assigned user home path. The user backup data will be stored here.
- Subscription Type - there are 2 subscription types: Trial User and Paid User. Trial users are subject to automatic removal as defined by the Free Trial Options tab under Backup / Restore > Basic. The automatic removal option can be disabled.
- Suspend At - a scheduled date to suspend this user. For trial users, the suspension date is based on the settings in the Free Trial Options tab under Backup / Restore > Basic.
- Status - there are 3 types of status for a user account: Enable, Suspended, and Locked. Under normal circumstances, administrator may change the Enable or Suspended status of a user. The Locked status is referring to account lockout rules that are set inside the policy group, refer to the Policy Group section for more details. For example, if a user has 3 consecutive unsuccessful log in attempts in 10 minutes, the user account will be locked out. This is the default setting.
- Upload Encryption Key - once the encryption recovery option is enabled, the encryption key file is uploaded to the backup server. In case the user forgot the encryption key, the encryption key can be recovered using this step Recovering Encryption Key via AhsayCBS Web Console. The recovered encryption key will be sent directly to the email address registered on the user account. Refer to the Encryption key section for further details.
- Language - preferred language for all email reports of the backup user.
- Timezone - time zone of the backup user. Timezone information will be automatically updated when the user logs in the client backup agent, such as AhsayOBM and AhsayACB, or perform backup job to avoid the false alarm of missed backup job.
- Notes - field to add notes for the backup user.
-
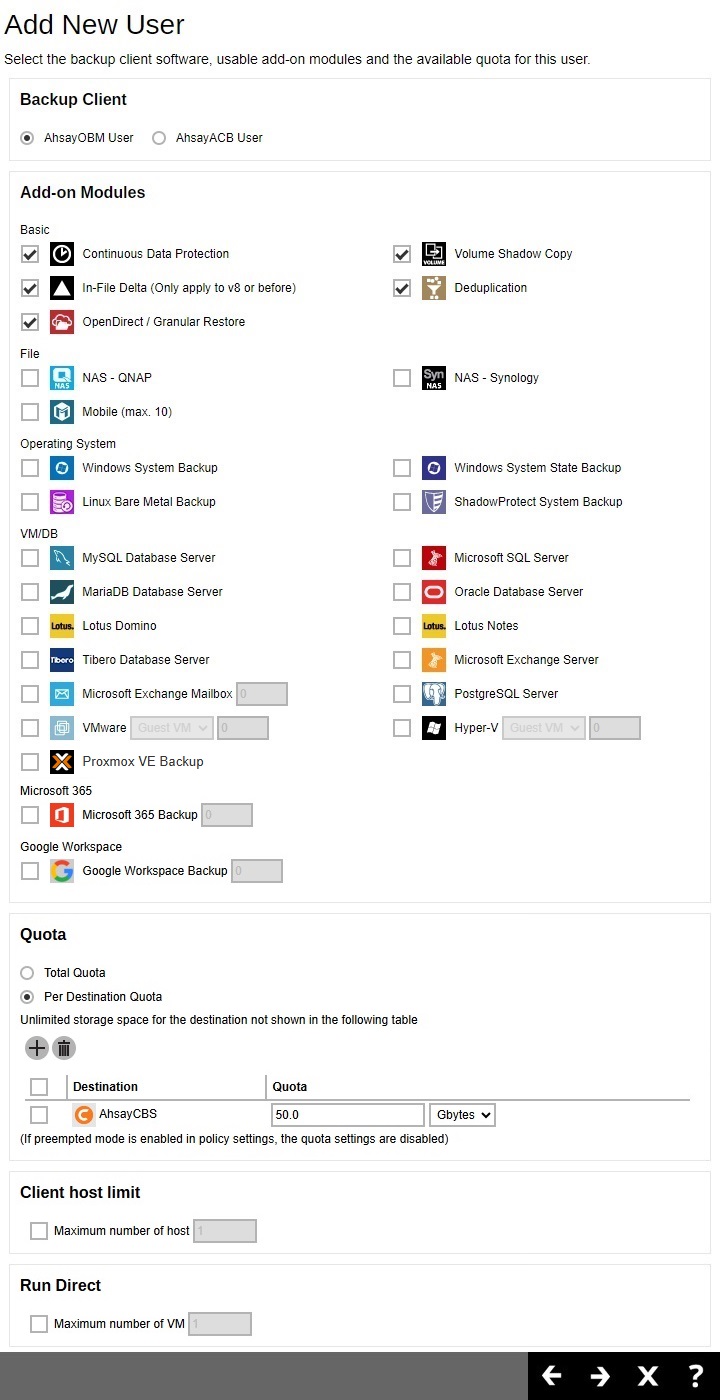
Configure the following. Click Next to proceed when done with the settings.
AhsayOBM User Account
AhsayACB User Account
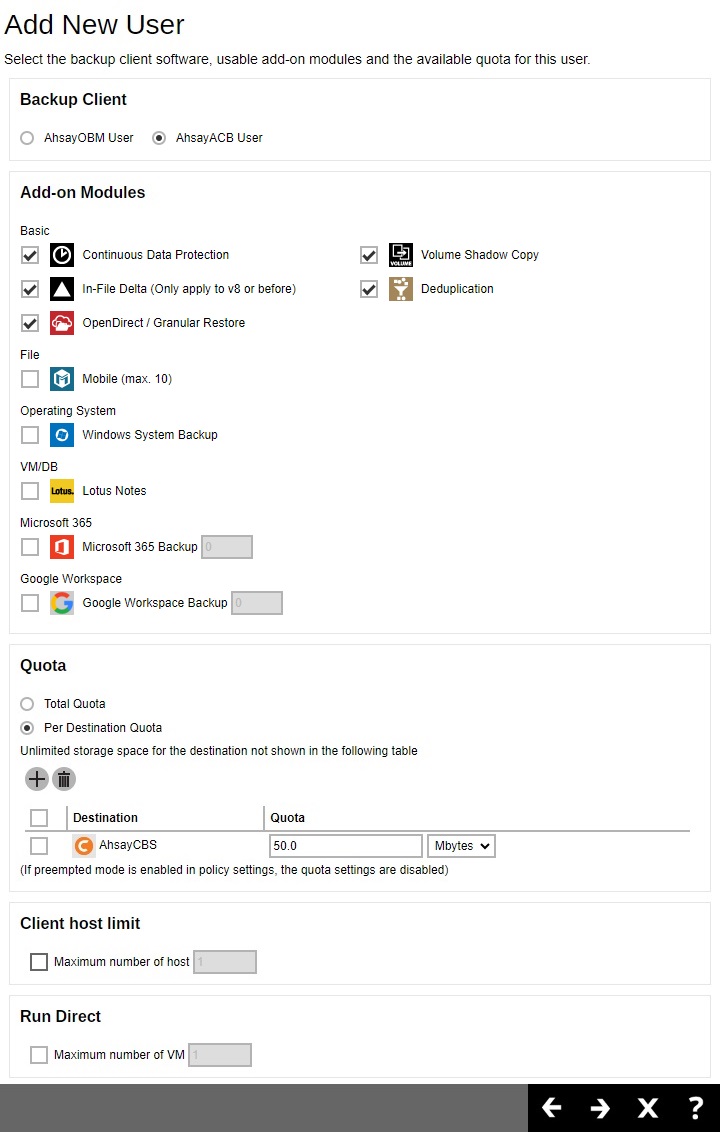
- Backup Client - if the backup client machine requires to backup files only, such as a desktop computer or a notebook, then you can simply create an AhsayACB backup account. Otherwise, you will need to setup AhsayOBM, because it comes with backup modules to perform Windows system backup, database backup and virtual machine backup. By default AhsayACB backup account is selected.
- Add-on Modules - select which add-on module to enable for the backup user. Some add-on modules has a text field after its name. For example, the number after Microsoft Exchange Mailbox defines the number of Exchange mailboxes that are allowed to be backed up under this user account.
- Quota - the backup quota of each destination for the user account. Refer to the User Settings section for details.
- Clien host limit - this is to limit the maximum number of hosts allowed in a client’s backup account, i.e. the number of devices that they can install AhsayOBM/AhsayACB on. Refer to the User Settings section for details.
- Run Direct (for AhsayOBM only) - set the maximum number of VMs for VM Run Direct restore on AhsayCBS for this user. Refer to the Run Direct section for details.
-
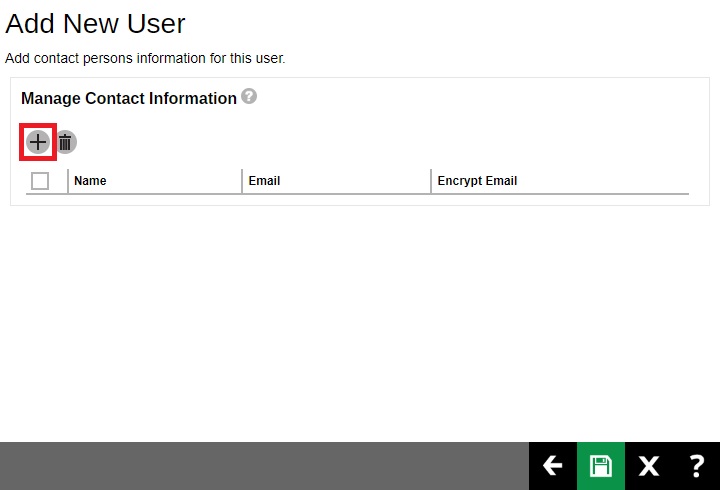
Click Create to add new contact information.
-
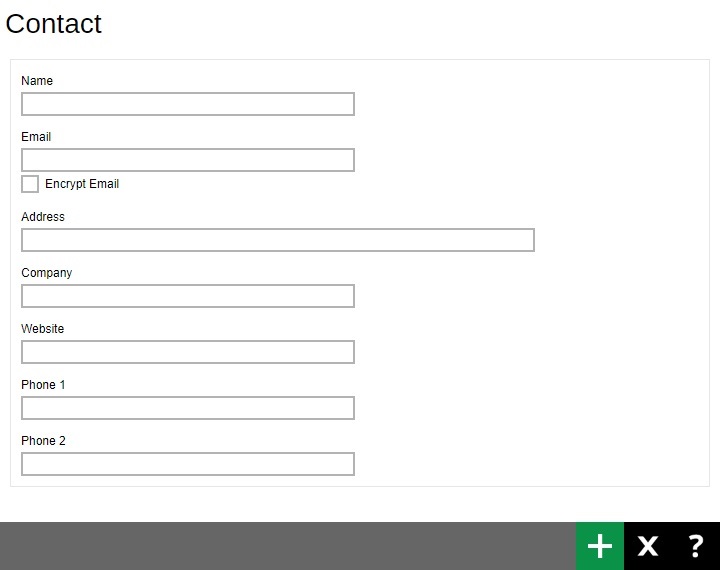
Enter the contact information such as “Name”, “Email”, “Address”, etc. Click Add to proceed when you are done with the settings.
- Click Save to save the backup user.
Delete a backup user
Used to delete an existing backup user account.
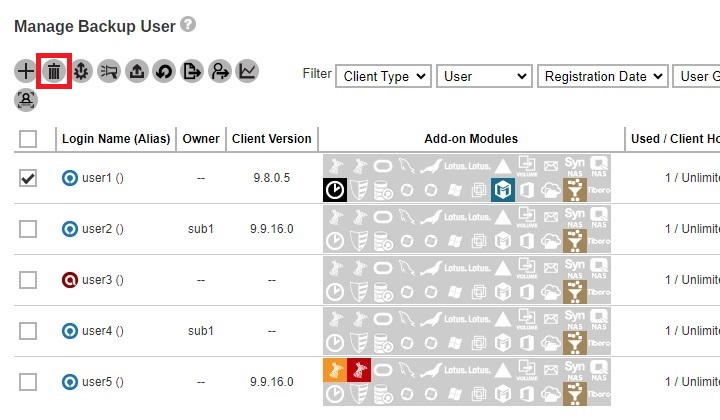
-
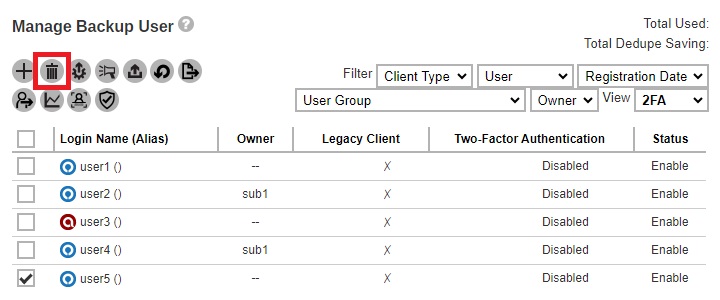
To delete an existing user, select the user you want to delete, then click the Delete button.
-
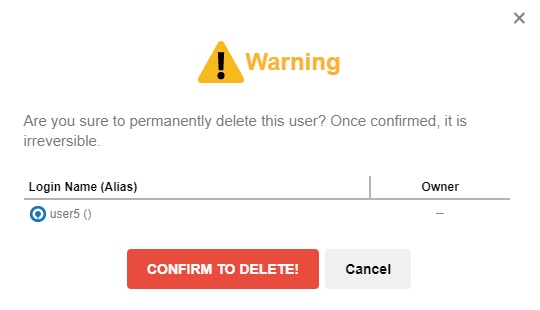
You will be prompted to confirm deleting the selected user, click CONFIRM TO DELETE! to confirm.
When you remove a backup user account, all the backup sets and backup data on AhsayCBS or predefined destinations, as well as the backup user profile on the AhsayCBS will be removed.
For the backup data residing on local destinations on the AhsayOBM/AhsayACB machine or on customers personal cloud storage accounts, SFTP/FTP servers will not be deleted.
Remind clients to uninstall the software (AhsayOBM/AhsayACB) from their device to avoid receiving failed login reports for deleted accounts. You can use the Broadcast feature before the account is deleted to inform the client.
Auto Update
The automatic upgrading of AhsayOBM/AhsayACB clients to the latest version is performed using the Auto Update function. To perform a successful auto upgrade of the AhsayOBM/ AhsayACB clients need to connect to the AhsayCBS backup server.
The AhsayOBM / AhsayACB client backup machine:
- must be powered on.
- must be connected to the Internet.
- scheduler services must be running.
- user account status must be Enable. (Auto Update will not work if the user account is suspended or locked.)
- application GUI must be closed.
- antivirus or firewall must allow the binaries to complete the download.
- network connection with the AhsayCBS server must be stable.
- AhsayACB must not run on Server OS.
- on Linux/FreeBSD machines, the GNU C or GLIBC library must be installed, version must at least be 2.14.
- on Linux/FreeBSD machines, the psmisc package which contains the fuser components must be installed fro Auto Update to work properly.
- on FreeBSD machines, OpenJDK 8 must be installed.
For v6 clients, it requires 720 minutes or whenever auto update agent restarts, AhsayOBM / AhsayACB will check with your AhsayCBS for any available updates when a scheduled backup job runs. While for v7 or above, it checks every 15 minutes or whenever the client agent service restarts. If any auto update instructions were found on the AhsayCBS, the update progress will be started.
-
To determine if a backup user account has Auto Update enabled, there are two (2) ways to view this:
-
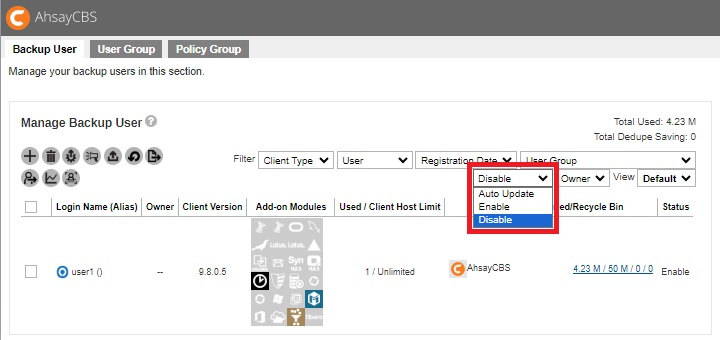
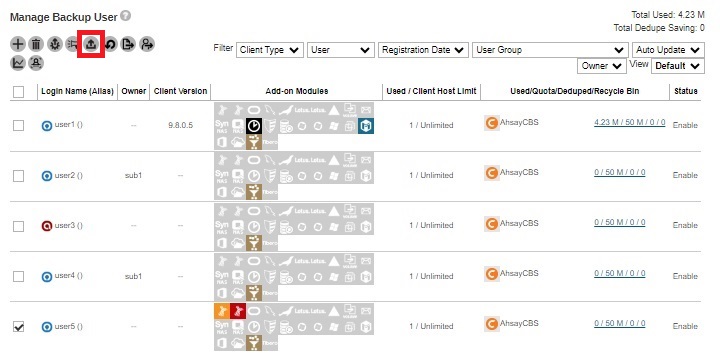
One is by using the filter, in the Auto Update filter you can choose between Enable or Disable. The backup user account will be listed according to the selected filter criterion. In the example below, the listed backup user accounts have auto update Disabled.
-
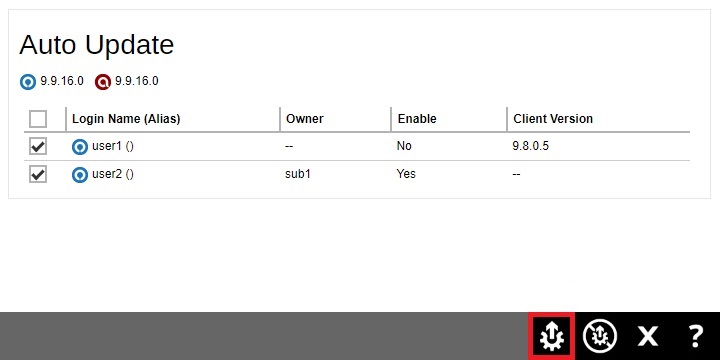
Another is by selecting a specific account. Select a specific account then click the Auto Update button.
You will see under “Enable” that auto update is not yet enabled.

-
-
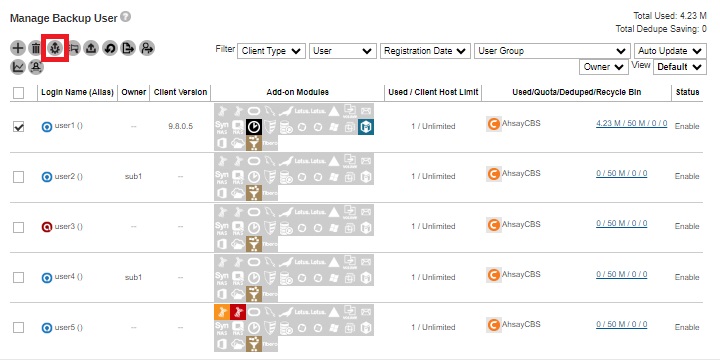
If you want to enable auto update, select the desired user(s) then click AutoUpdate.
-
Select the user(s) then click the AutoUpdate button to start.
-
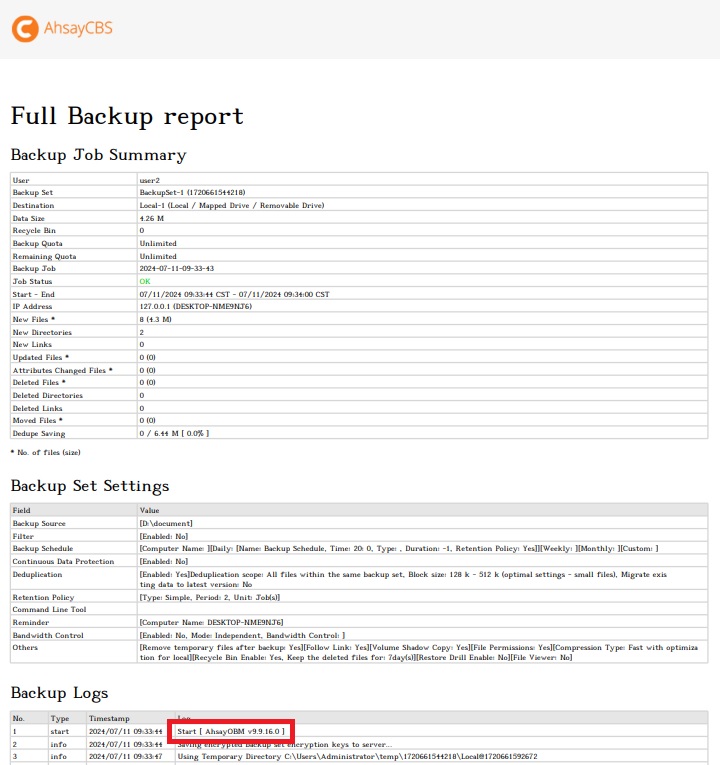
To check if auto update was successful, you can check it through:
-
the latest backup report.
-
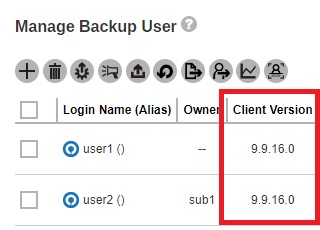
or on the AhsayCBS web console, Manage Backup User > Login Name, check the "Client Version".
-
Broadcast
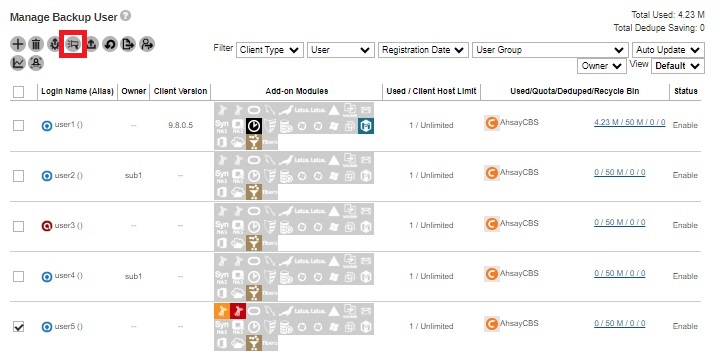
Used to send messages to AhsayOBM/AhsayACB user account. Message will be sent to the email address that was provided in the contacts for each user account. This is very useful when there is an announcement that must be sent to users, i.e. backup server system maintenance, applied latest patch or some promotion offers to your users.
After you selected a list of users for broadcast, you will be able to send a broadcast message to the selected users.
-
To broadcast a message to users, select the desired users then click the Broadcast button.
-
Edit the broadcast message by entering your subject and message. The message can be sent in text or html format. You may also include attachments. Once done, click the Send button to send the message.

-
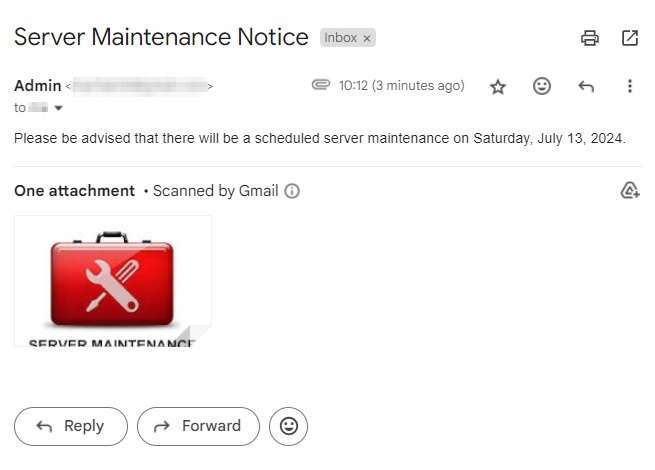
Here is an example of a message received in the users' mailbox.
-
Using Text with attachment
-
Using HTML
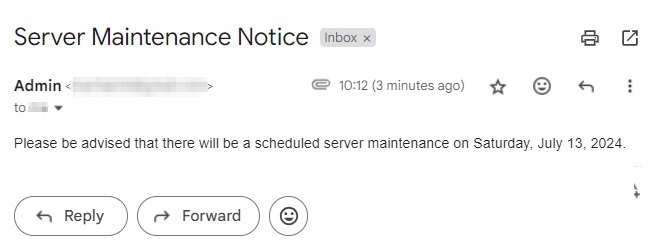
The message will be sent to the email address that was provided in the Contact Information of the user. -
Initiate Backup Job
This feature allows the AhsayCBS server administrator to start a backup job on a client’s machine remotely without the need to log in to the client machine or even if they do not have access to the client machine. This feature relies on the AhsayOBM/AhsayACB scheduler service to receive and process the start backup command.
Once a remote backup is triggered on the AhsayCBS web console, the backup job should be started within 5 minutes, as the AhsayOBM/AhsayACB scheduler on the client machine will connect to the AhsayCBS server every 5 minutes to retrieve any update information. When the scheduler connects to the AhsayCBS server, it will receive the start backup command and start the backup job.
A remotely started backup will work as long as the AhsayOBM/AhsayACB client backup machine:
- is powered on.
- is connected to the Internet.
- scheduler service is running.
- is connecting to the AhsayCBS server using the latest login credentials.
- backup schedule must be enabled on the related backup set.
- has no active backup job runnng. If there is an active backup job running, the received start backup command will be ignored.
-
Select the desired backup user then click the Initiate Backup Job button.
-
Select the backup set you would like to start a backup on and select the “Backup Type” when available. Click the Initiate Backup Job button to trigger a backup.

-
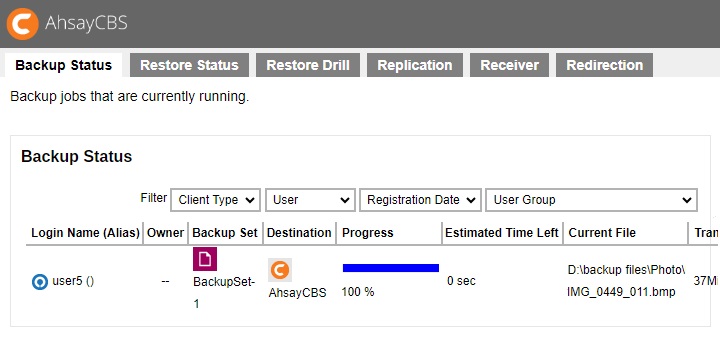
The backup will start shortly and you can monitor the progress using the Live Activities feature.
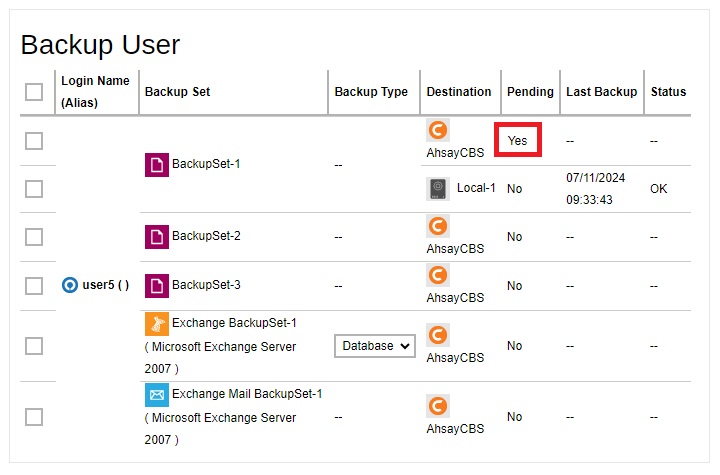
You can also check the status of the server if it initiates backup through Manage Backup User > Login Name > Backup User, check “Pending”. In the first screenshot below, after initiating the backup, you can see under the “Pending” column that the backup has not started yet.
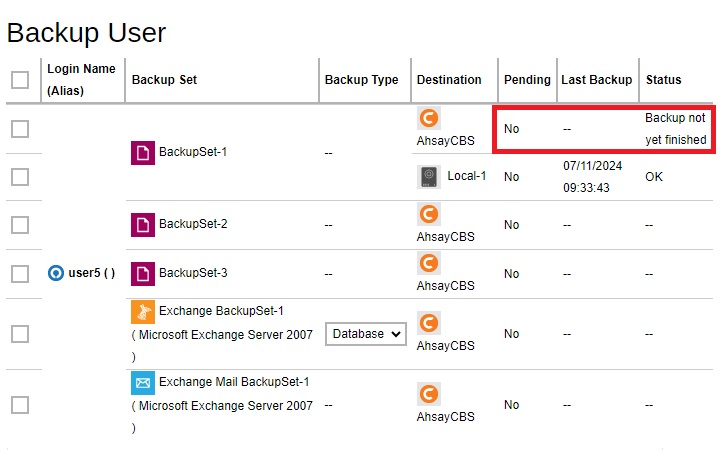
Once the start backup command is initiated, you can see under the “Pending” column that the backup job is not pending anymore because it has started and its “Status” will be changed to “Backup not yet finished”.
Run Restore Drill
The restore drill is a routine job which can be set to check for corrupted files every 6, 12 or 24 months. This feature ensures that backup data are always restorable by sending an email (depends on the settings in Backup / Restore > Users, Groups & Policies > Policy Group > %Policy Group Name% > User Settings > Email Reports) to the user to inform them if there are corrupted files in the backup data. In turn, the user should fix this by running a backup to replace the corrupted files.
But with the addition of this function, users can now manually run the restore drill to check for corrupted files whenever they want. They do not have to wait for the scheduled restore drill to find out if there are corrupted files in their backup data.
The restore drill can be manually triggered as long as the AhsayOBM/AhsayACB backup set:
- has been previously backed up.
- restore drill setting is enabled.
-
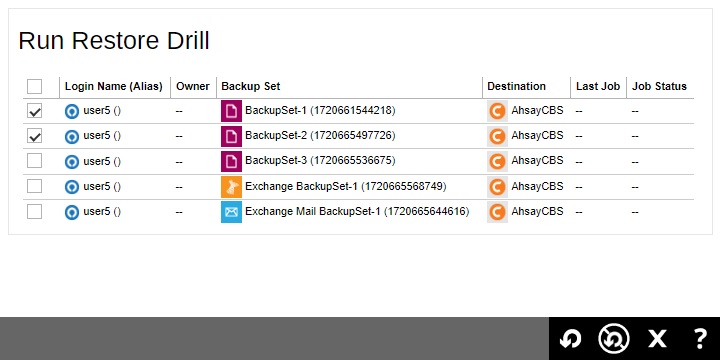
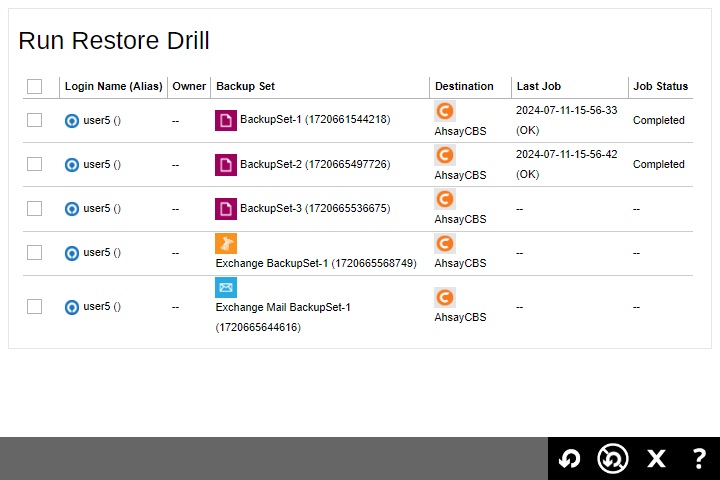
Select the user who owns the backup set that you want to check, then click the Run Restore Drill button.

-
Select the backup set then click the Run Restore Drill button to run the restore drill.
-
The restore drill status will be displayed in the “Job Status” column.
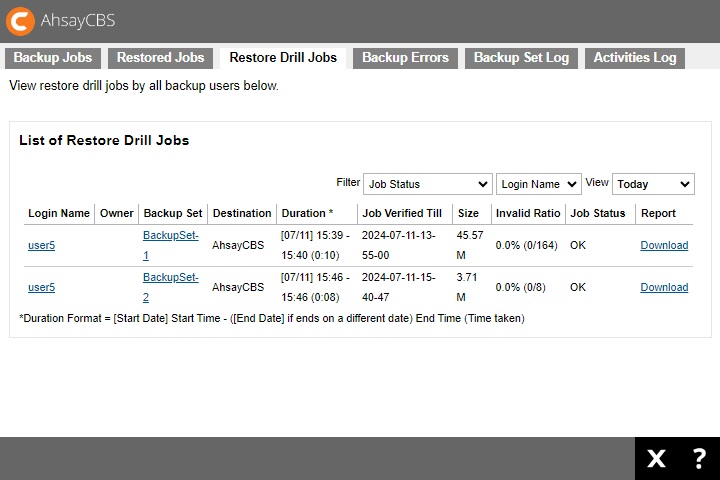
 You can still stop the restore drill when the job status is not “Completed”. You can do this by selecting the backup set then clicking the Stop Restore Drill ` button in the Run Restore Drill screen.
You can also check it from Monitoring > Backup / Restore Logs > Restore Drill Jobs.
Export Users' Usage Statistics to CSV
You can export the usage of your selected user(s) to a CSV (Comma Separated Value) file. This format can be imported into spreadsheets or other applications for further analysis or billing purposes.
-
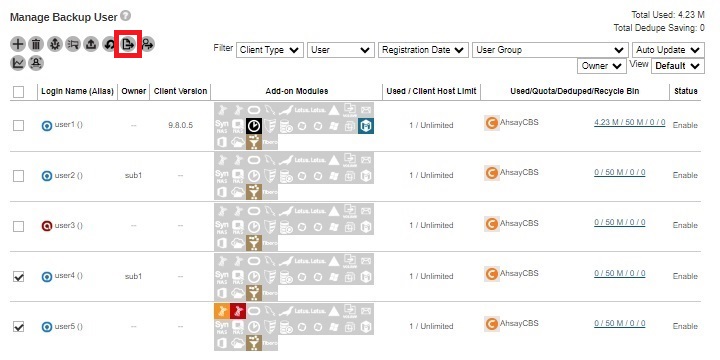
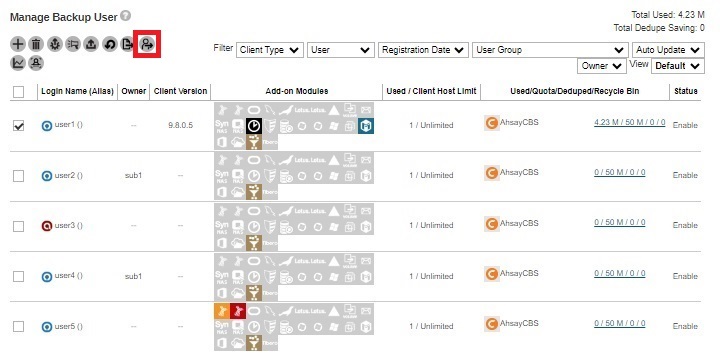
To export usage of users to CSV, select the desired users then click the Export Users' Usage Statistics To CSV button.
-
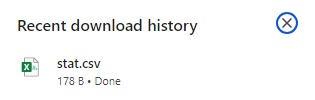
You will see a .csv file being downloaded.
-
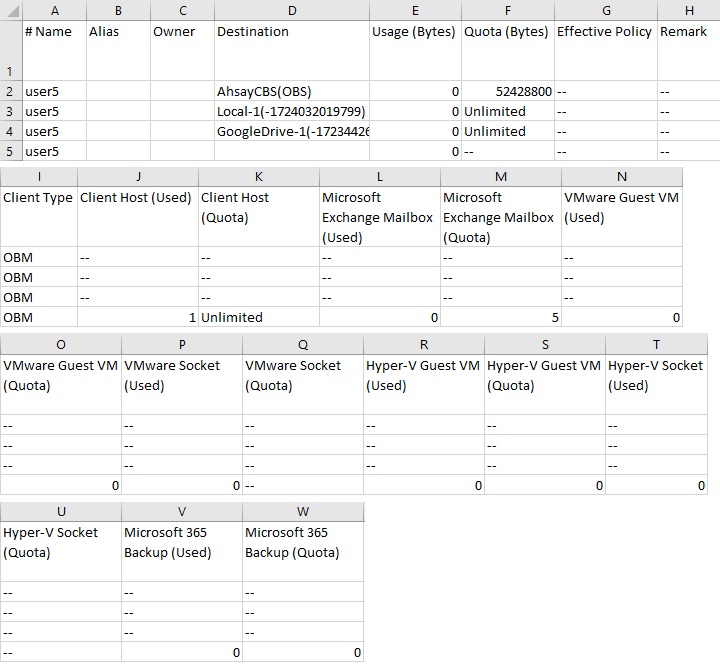
When you open it, it will display the Login Name, Alias, Owner, Destination, Usage in bytes, Quota in bytes, Effective Policy, Remark, Client Type, Client Host Used and Quota, Microsoft Exchange Mailbox Used and Quota, VMware Guest VM Used and Quota, VMware Socket Used and Quota, Hyper-V Guest VM Used and Quota, Hyper-V Socket Used and Quota and Microsoft 365 Backup Used and Quota.
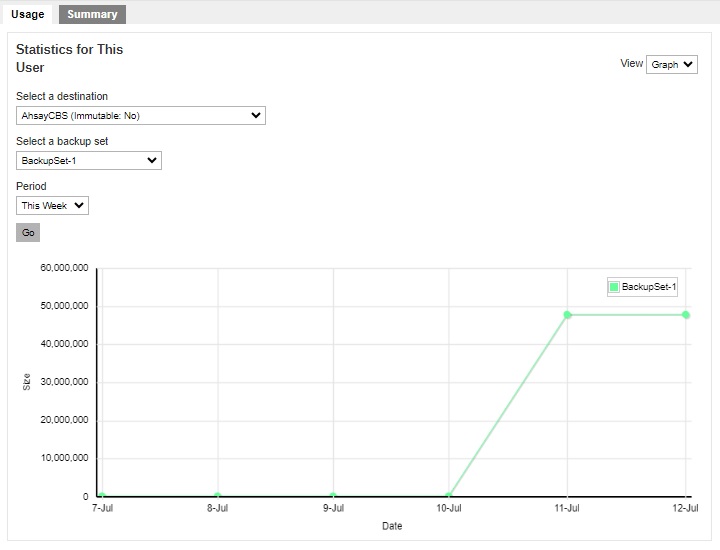
Below is a screenshot of the Statistics Usage Page, you can access this by going to Backup / Restore > Users, Groups & Policies > Backup User Tab > Login Name > Statistics > Usage.
Move / Import / Export Users
This function can be used to export users to a zip file and import users from a zip file.
You can also use this function to migrate users from one AhsayCBS server to another AhsayCBS server, or to migrate users from their current user home to another user home on the same server. You can also move users from one owner to another. This function is limited to system user with admin role.
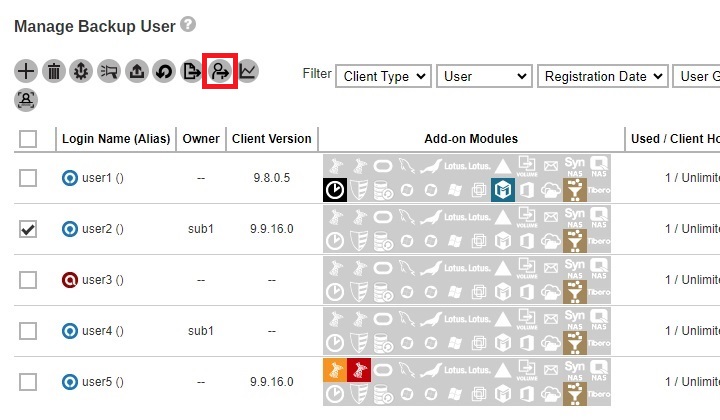
Select the desired user, and then click the Move / Import / Export Users button.
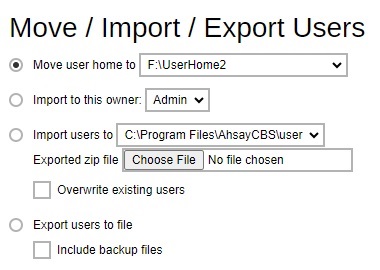
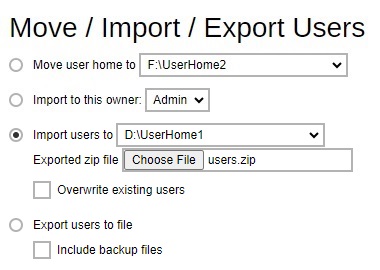
The following screen appears:
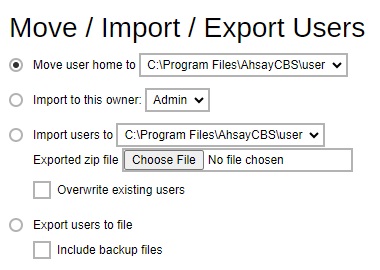
- Move user home to – Export user from a user home to another user home on the same AhsayCBS server.
- Import to this owner – Import user from one owner to another owner on the same AhsayCBS server.
- Import users to – Import a previously exported user to the selected user home.
- Export users to file – Export user profile and backup files to a zip file format.
- Please schedule a time with the backup user before migrating a user to another user home / to another AhsayCBS. Ensure that the AhsayOBM / AhsayACB client interface is closed, and that no backup / restore job is performed during the migration.
- It is highly recommended to temporarily suspend the backup user during the export / import procedure.
- It is not supported to import users that belong to AhsayCBS v9.1.0.0 or above to an old version of AhsayCBS server.
Since the migration of a backup user to another user home / AhsayCBS may involve export of the user profile and backup data, for user with a large amount of backup data, the time required for the export may take a while. During the export, please do not restart the AhsayCBS service or the server. In case of power failure or server shutdown, the export of the user will fail.
Migrate users from one User Home in D: drive to another User Home in F: drive within the same AhsayCBS
Assumptions
- The backup users to be moved only have small amount of backup files.
- These users are located in D:\UserHome1 to be moved to F:\UserHome2.
Steps
-
Select the user(s) to be migrated then click the Move / Import / Export Users button.

-
Make sure the radio button of “Move user home to” is selected and choose F:\UserHome2 from the dropdown box next to it.
- Click OK to proceed.
Migrate users from one owner to another owner within the same AhsayCBS
Assumptions
- The backup users to be moved is owned by sub1.
- The ownership of the backup user will be changed to sub2.
Steps
-
Select the user(s) to be migrated then click the Move / Import / Export Users button.
-
Make sure the radio button of “Import to this owner” is selected and choose sub2 from the dropdown box next to it.
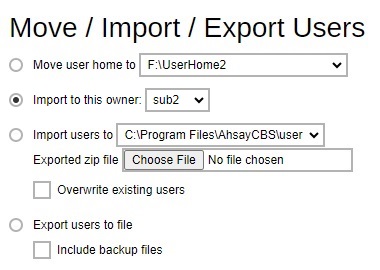
- Click OK to proceed.
Migrate users from one AhsayCBS server to another AhsayCBS server
There are two ways to do this:
Method 1: Export users including the backup files to a zip file.
Method 2: Export the user profile only to a zip file. Then manually copy the backup files later directly to the destination AhsayCBS server.
Limitations
- Migrating data on cloud storage or pre-defined destination is not supported.
- Exporting and importing user profile and large amount of data.
Suggestions
- Perform the export and import procedure for one user at a time, if exporting and importing user profile and backup files.
- Suspend the user during the export and import procedures to ensure that no backup / restore job is performed during the migration.
- If the exported “users.zip” file is not saved to a local destination, ensure that the network between the AhsayCBS server and the save destination remain stable throughout the export process.
-
For best result (performance and stability wise), it is recommended that:
- The export and import operation of the backup user is performed directly on the corresponding AhsayCBS server, or in the same LAN environment.
- The exported “users.zip” files are copied directly onto the destination AhsayCBS server, or a network drive in the same LAN environment.
- For backup user with large amount of data, migrate the user by using Method 2. Perform the user data export at a time when the resource usage is low on the AhsayCBS server.
Assumptions
- The user to be exported is located on AhsayCBS1, to be moved to AhsayCBS2.
- Before importing the user to AhsayCBS2, make sure that there is no backup user with the same username on AhsayCBS2.
- Backup data are stored directly on the AhsayCBS server.
- The user should be removed on the original server (e.g. AhsayCBS1) after exporting the user to the new AhsayCBS server. This is especially important if these AhsayCBS servers are under the same Redirector setup.
Please refer to the following article for further details about migration of users between different AhsayCBS under the same Redirector setup: Transfer backup users between AhsayCBS servers.
It is best to use Method 1 when exporting a user that has only a relatively small amount of backup data (i.e. like a few MB/GB) since this will be saved in a zip file. Otherwise, use Method 2.
Method 1
Export a user (including data) from one AhsayCBS and import to another AhsayCBS
-
Select the user you need to export and click the Move / Import / Export Users button.
-
Click the Export users to file radio button and tick the Include backup files check box to export the backup user data.
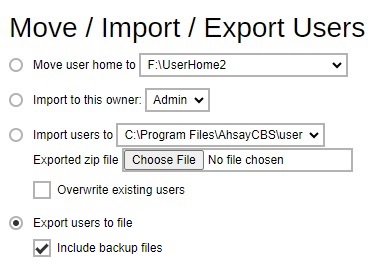
- Click OK to proceed. The system will prompt you to save the file (users.zip) in your local machine. You need to have enough disk space to save the zip file. If the user account has large backup sets, it is expected to wait for a long time
- After the exporting process, click Cancel to go back to the Backup User Tab page.
-
Log in to AhsayCBS2 and go to Backup/Restore > Users, Groups & Policies. Click the Move / Import / Export Users button.
-
Click the Import users to radio button and select the destination user home on the AhsayCBS2 from the dropdown list. Then click the Choose File button to select your previously exported zip file.
If the overwrite option is selected, the user account on the AhsayCBS2 which has the same username in the users.zip will be overwritten.

Click OK to proceed.
-
Restart the AhsayCBS service and log in to AhsayCBS2 to check the newly imported user in the “Backup User” page.

-
After the entire migration process is completed, delete the original backup account on AhsayCBS1. On the AhsayCBS web console of AhsayCBS1, under “Backup User” tab, select the migrated user account and click on the Deletebutton to delete it.
Method 2
Export a user from one AhsayCBS and import to another AhsayCBS, afterwards manually copy the backup files to the destination AhsayCBS server
While it is advisable to use Method 2 when exporting a user which has a large amount of backup data. In this option only the user profile will be saved in a zip file and the backup data will be manually transferred to the destination AhsayCBS server.
-
Select the user you need to export and click the Move / Import / Export Users button.
-
Click the Export users to file radio button and make sure the Include backup files check box is not ticked.
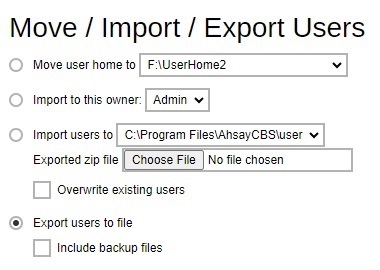
- Click OK to proceed. The system will prompt you to save the file (users.zip) in your local machine. You need to have enough disk space to save the zip file.
- After the exporting process, click Cancel to go back to the Backup User Tab page.
-
Log in to AhsayCBS2 and go to Backup/Restore > Users, Groups & Policies. Click the Move / Import / Export Users button.
-
Click the Import users to radio button and select the destination user home on the AhsayCBS2 from the dropdown list. Then click the Choose File button to select your previously exported zip file.
If the overwrite option is selected, the user account on the AhsayCBS2 which has the same username in the users.zip will be overwritten.
Click OK to proceed.
-
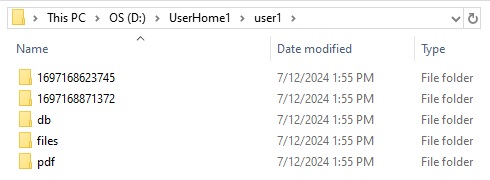
Go to the source AhsayCBS1 server and copy the backup files then paste to the destination AhsayCBS2 server. The backup files are located in %UserHome%\%username%. Copy the entire content to the destination AhsayCBS2 server using the same location.
 For backup files that has a large amount of data, it is advisable to compress the files first before copying to the destination AhsayCBS server. Or you may also use a third-party application (i.e. WinSCP) to transfer files.
 - Restart the AhsayCBS service and log in to AhsayCBS2 to check the newly imported user in the “Backup User” page.
- After the entire migration process is completed, delete the original backup account on AhsayCBS1. On the AhsayCBS web console of AhsayCBS1, under “Backup User” tab, select the migrated user account and click on the Delete button to delete it.
Post-migration Check
-
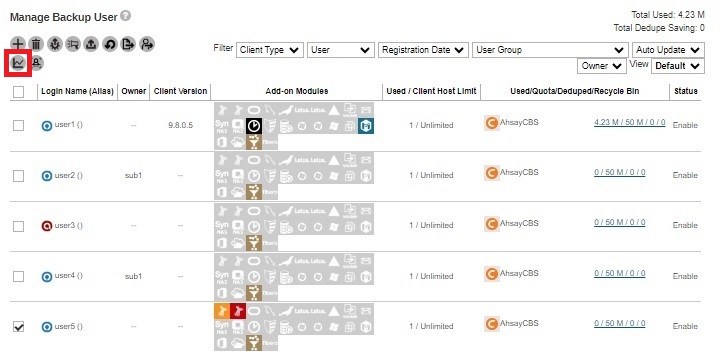
Check if the user has been copied to the destination AhsayCBS server by going to Backup / Restore > Users, Groups & Policies > Backup User.
-
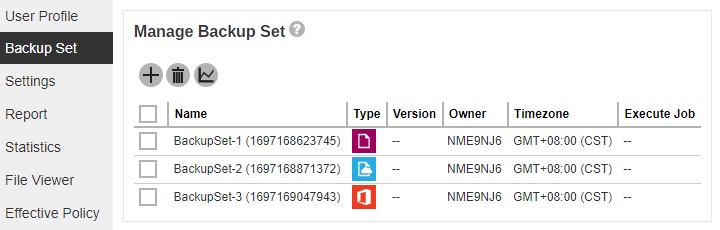
Also check if the backup sets were migrated by clicking on the Backup User Login Name > Backup Set.
-
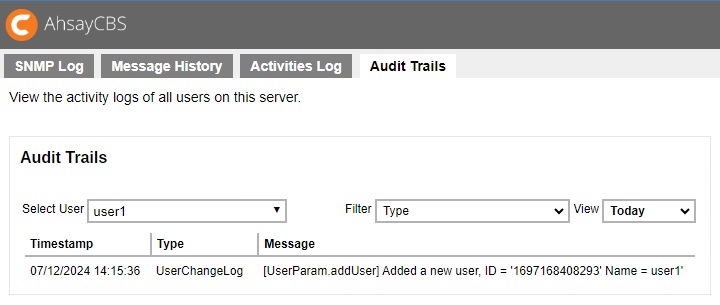
Also check from the Audit Trail if the user and backup were added. Go to Monitoring > Administration Logs > Audit Trails, select the login name from the Filter.
Rebuild Storage Statistics
This option can only rebuild legacy backup sets created in version 6, which have not been migrated to v9 block storage format. The option is used to enhance the accuracy of storage statistics for the backup set created in version 6.
The time taken to complete a rebuild depends on a number of factors such as the number of files / folders in the backup set(s), the number of backup sets, the hardware specifications of your AhsayCBS server such as the disk I/O and CPU performance, and if there are other resource intensive jobs running.
To rebuild legacy backup set, click the Rebuild Storage Statistics button.
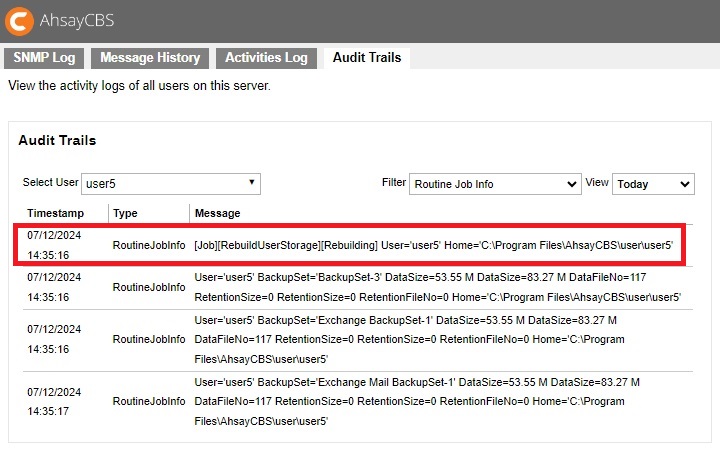
To check the progress or status of the Rebuild Storage Statistics job, go to Monitoring > Administration Logs > Audit Trails, select the backup user from the “Select User” dropdown and use the “Filter” Routine Job Info.
Rescan all user home directories
The feature ensures the status of all user home is updated so that the backup sets under available user home should be shown in the selected list for Admin user account to exclude while the backup sets under unavailable user home should not be listed during backup data migration. And also if the user home is offline, the backup and restore job cannot be run properly, so the feature helps confirm applicable backup and restore job.
The feature will be applied in the following 3 conditions:
- Startup AhsayCBS service.
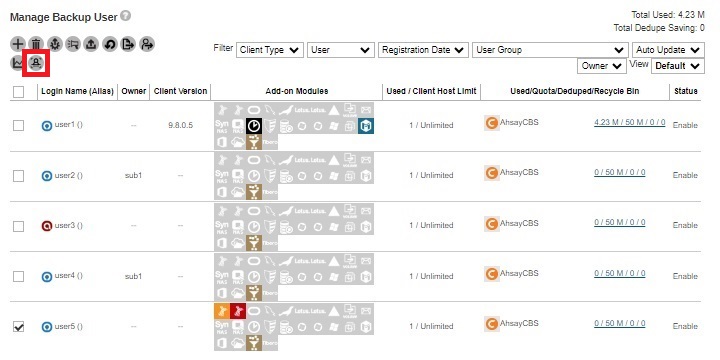
- Click the Rescan All User Home Directories button.
-
Run routine job (HourlyJob).
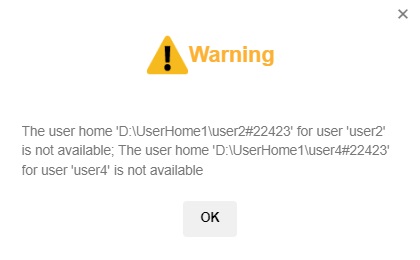
If there is a user home offline, which may be caused by disk temporary unavailable, user home directory rename, network drive disconnected or disk corrupted, a message will pop up as shown in the following screen shot.
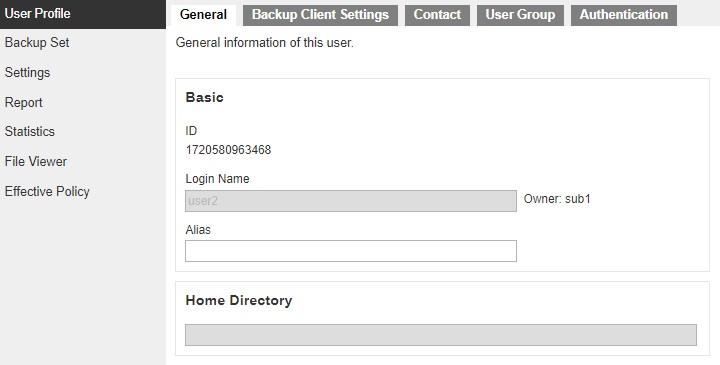
After clicking the according user account, “Home Directory” will be blank.
Enable / Disable Two-Factor Authentication
You can enable or disable the 2FA for several users using this feature. The Enable / Disable Two Factor Authentication button will only be available once 2FA is selected in the “View” filter. This feature is helpful when you want to enable or disable the 2FA of many users at once and not do it per backup user. For more information, please refer to Two-Factor Authentication in the System Settings part.
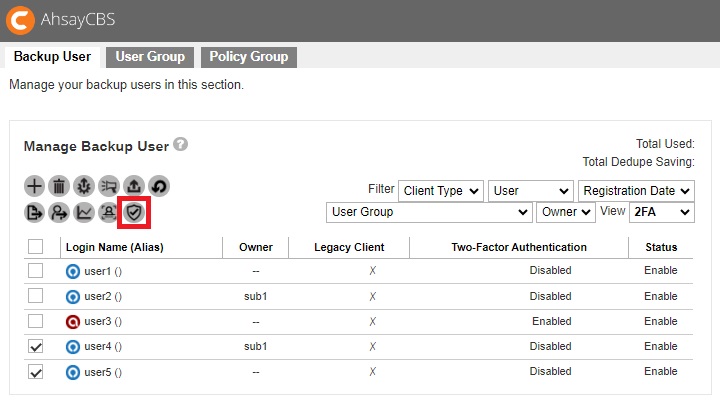
Select the backup user that you want to enable 2FA. Then click the Enable / Disable Two-Factor Authentication button.
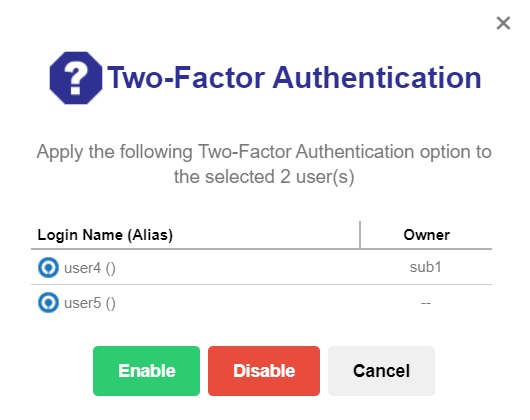
Click Enable to enable 2FA for the selected backup users.
Aside from the functions, there are 7 filters that can be used to narrow down the results and change the displayed information of the backup user:

- Client type - backup users can be filtered based on type, either AhsayOBM or AhsayACB client. By default, it displays backup users belonging to all client types.
- User - backup users can also be filtered based on the first letter of its login name. It can also be based on subscription type which is Paid or Trial. It can also be based on status which is Enable, Suspended or Locked. Additional criteria are Others and Inactive. By default, the backup users are displayed alphabetically.
- Registration Date - backup users can be filtered based on the date they were registered. The choices are Today, Last 7 days, Last 30 days and Last 100 days. By default, it displays all backup users created.
- User Group - backup users can be filtered based on the user group it belongs to. By default, it displays all backup users belonging to all user groups.
- Auto Update - backup users can be filtered based on the status of its auto update if it is Enabled or Disabled. By default, all backup users are displayed. This is only available in Default view.
- Owner - backup users can be filtered based on the owner of the user account. By default, all backup users are displayed.
- View - the information displayed regarding the backup user may be changed by changing the view. There are two (2) views available which are Default and 2FA. The 2FA view is only visible if Two-Factor Authentication has been enabled and setup in System Settings > Basic > Two-Factor Authentication (2FA) tab. By default, the Default view is displayed.