
 How-To
System
This section describes how to configure the AhsayUBS settings through the AhsayUBS WebAdmin.
When the mouse is pointed over the word "System" in the menu bar, the following menu will be displayed:

- Settings (Edit system settings)
- Backup/Restore (Backup or restore system settings as a file)
- Factory defaults (Restore system settings to factory defaults)
- Reboot (Reboot system now or scheduled time)
- Shutdown (Shutdown system now or scheduled time)
Settings
The general system settings can be configured on this page.

It is further divided into eight tabs:
General

Hostname
- Hostname: Sets the hostname of AhsayUBS. It is advised to use a name in order to identify AhsayUBS System in the network.
- Domain: Sets the domain of AhsayUBS.
DNS Settings
- IPv4 DNS servers: Specify a maximum of 2 different IP addresses of DNS server of AhsayUBS.
WebAdmin
- Protocol: Select WebAdmin protocol for AhsayUBS WebAdmin. The supported protocols are HTTP/HTTPS and the default protocol is HTTP.
Port: Change the WebAdmin port of AhsayUBS WebAdmin.
It is advised not to use the system service port 0-1023 for the WebAdmin port. Also, port 80 and port 443 has been reserved for the backup server. Please refer to the Firewall Settings section for the default port configuration.- Certifate (for HTTPS only): Paste a signed certificate in X.509PEM format in the textbox provided for AhsayUBS.
- Private key (for HTTPS only): Paste a private key in PEM format in the textbox provided for AhsayUBS.
Time
- Timezone: Set the time zone for AhsayUBS.
- System time: Set the system time for AhsayUBS.
- Enable NTP: NTP standard for Network Time Protocol. If you have a time server for synchronization of the time, it is better to enable this service for keeping the time in your AhsayUBS.
- NTP time server (Displayed only when NTP is enabled): Enter the IP address of time server(s) for time synchronization.
- Time update interval (Displayed only when NTP is enabled): Enter the interval in minutes for synchronization from the AhsayUBS to server.
Password
This page allows you to set the password for the default administrator account of the AhsayUBS (i.e. admin). You need to provide the old password to authenticate the change in password. It is required to type the new password. Then you can click the Save button to save your settings.

Settings
A status report helps you to check the AhsayUBS status. If you want to check AhsayUBS regularly, please setup the Email Status Report Settings. Then, you may receive the status report in HTML format through email attachment regularly.

To setup the Email Status Report Settings, you need to setup the General Email Settings first. Here are the fields that you need to configure in the General Email Settings:
- Outgoing mail server: Please enter the outgoing SMTP mail server address e.g. smtp.mycompany.com.
- Port: Please enter the SMTP mail server port. The default port number for SMTP server is port 25.
- Security: Please select the security protocol. You can choose None, SSL/TLS or STARTTLS.
- Authentication: Tick the checkbox to enable the SMTP authentication.
- Username (Displayed only when Authentication is enabled): The login name for the SMTP name server.
- Authentication Method (Displayed only when Authentication is enabled): The authentication method to login to the SMTP mail server. Here are the choices for the login methods: Plain, Cram-MD5, Digest-MD5, GSSAPI, External, Login, NTLM and Best Available.
- From email: Set the sender's email.
- To email: Destination email address. Multiple email addresses can be set. Separate email address by semi-colon.
Please click the Save button to save the above settings if necessary. For verifying the email settings, please refer to the below section which describes how to send a test email by using the send test email feature included in AhsayUBS firmware (i.e. System > Settings > Email > Test).
After setting up the General Email Settings, you may now setup the Email Status Report Settings. Please tick the Enable checkbox on the top-right hand corner to enable this function.

The following fields can be set in the Email Status Report Settings:
- To email: Show the status report recipients. The "To email" settings can be set in the General Email Settings.
- Subject: The email subject.
- Reports: Select the sending time of the email.
- Polling time: Set the sending time of the email.
Please click the Save Email Status Report Settings button to save the settings. Please refer to the page System > Settings > Email > Test for details to verify the settings.
Test

The Test Email Settings is for verifying the General Email Settings in the page System > Settings > Email > Settings. To verify the settings, you can now send a test email to the “From email” entered in the General Email Settings by:
- Entering the test email subject in the Subject field.
- Entering the test email contents in the Email Content field.
- Click the Send test email to... button to save the settings and send the test email to the email address entered in the From email.
You may save the test email subject and contents by clicking Save test email settings WITHOUT sending any test email.
You may also verify the settings inside the Email Status Report Settings by sending a test email to the email entered inside the "To email" field in the Email Status Report Settings table (i.e. System > Settings > Email > Settings).
To send a test status report email, you may click the Send Status Report to… in the table "Test Send Status Report Email". You may also click the Status Report Email link inside the table to set the settings.

Proxy
You may use this page to configure the HTTP proxy server if your AhsayUBS requires an outgoing proxy server. Please tick the Enable checkbox on the top-right hand corner to enable the proxy server.

- Address: The address of the proxy server.
- Port: The port to access the proxy server.
- Authentication: If the proxy server is needed to login, please tick this checkbox.
- User (Displayed only when Authentication is enabled): Enter the username to login to the proxy server.
- Password (Displayed only when Authentication is enabled): Enter the password to login to the proxy server.
Please click the Save button to save the above settings.
SSHD
SSHD daemon provides remote console access to AhsayUBS. This feature is designed for troubleshooting purposes only, and not meant for 24x7 access. The root access and SSL tunneling feature will be enabled by default.

The default login account for SSH:
- Username: root
- Password: <The password of the admin account of AhsayUBS WebAdmin>
Here are the options that will be displayed or can be configured in the Secure Shell table:
Status:
- Running: SSHD is enabled.
- Stopped: SSHD is stopped.
- TCP Port: The port for the SSHD. Default port is 22.
- Compression: If the file is larger or the network is slow, the transfer of the files will be faster when enabling this option.
- Private Key: Paste a DSA PRIVATE KEY in PEM format.
If you want to Start/Stop/Restart SSHD in AhsayUBS, please click the buttons under the Secure Shell table.
When the SSHD service has been started, the options inside the Secure Shell table will be disabled. You need to Stop the SSHD in order to modify the settings.
UPS
UPS (Uninterrupted Power Supply) is an electrical apparatus which provides emergency power to a server when the main power source fails. UPS prevents power interruptions by supplying energy stored in its batteries. The UPS device can be connected to the AhsayUBS machine through serial port or USB port. The UPS will notify the AhsayUBS machine in case of power failure events.
NUT (Network UPS Tools) is the system service which conducts communication between AhsayUBS and the UPS device. It can:
- Initiate AhsayUBS shutdown sequence upon defined UPS power events.
- Monitor and log the UPS status [On Line Power / On Battery]
The daemon will be started once the UPS settings are saved in the page System > Settings > UPS > Settings. UPS status can be checked in the page Information > System Status > UPS. NUT daemon will also log the UPS triggered event in the AhsayUBS system log. The system log can be checked in the page Information > System Logs.
Settings
This is the main page to configure the connected UPS device.

Remarks:
- DO NOT connect the serial port and USB port between UPS device and AhsayUBS at the same time.
- Make sure the A.C. power supply is connected to the UPS device when configuring the AhsayUBS WebAdmin page. Otherwise, the AhsayUBS shutdown sequence will be initiated immediately once the UPS settings are saved (Shutdown mode: UPS goes on battery, Shutdown timeout: 0).
The NUT daemon can be configured by the following options:
- Enable 'checkbox': Enable/Disable the NUT daemon.
- Status: NUT daemon current status [Running / Cannot be enabled / Stopped].
- Driver: The UPS device driver name. The available driver name can be found from the Driver List according to the UPS manufacturer, model name and connecting port type.
- Port Device Path: The serial / USB port device path. The available serial / USB device can be found from the Device List. Please choose the appropriate device path by UPS connection type.
- Auxiliary parameters (optional): Additional hardware-specific parameters for the UPS driver which will be applied to the ups.conf file. Please refer to the NUT official website for more information.
- Description (Optional): Customized message to describe the UPS connection.
Shutdown mode: The AhsayUBS shutdown sequence will be triggered by one of the following UPS power events:
- UPS reaches low battery: UPS runs on battery and the battery level is low. The low battery alert percentage is defined by the UPS driver.
- UPS goes on battery: UPS runs on battery (i.e. A.C. power supply is disconnected in UPS) and shutdown sequence will be started after the countdown defined in "Shutdown timeout".
- Shutdown timeout: The countdown time (default: 300 seconds) to shutdown AhsayUBS when "UPS goes on battery". This option is available only when the "UPS goes on battery" option is selected in the Shutdown mode. The timeout should NOT be larger than battery discharge time.
- Email notification: Send email to addresses defined by the "To email" in the General Email Settings when the UPS changes its status [ On Line Power / On battery] or the UPS triggered the AhsayUBS shutdown event. Whenever the email notification is enabled or disabled, power event will always be logged to the system log in page Information > System Logs.
Please click Save and Restart to save the above settings.
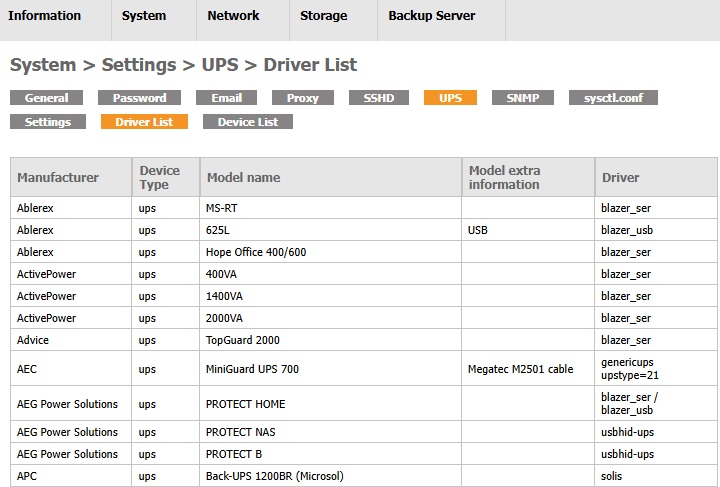
Driver List
This page lists the UPS drivers according to the manufacturer, model name, and the connection type supported by the NUT daemon. To look for a suitable driver:
- Check the UPS manufacturer, model name and the connecting port.
Search the driver in the page accordingly.

Device List
This page lists the serial and USB device path in the system. The connected device path pattern for serial device and USB device are /dev/ttyu and /dev/ugen*.* respectively. Since some other USB devices could be connected to the system, it is suggested to connect the system to UPS by serial port. Once the appropriate device path is found, administrator may copy the full path and fill it in the "Port Device Path" field in the UPS settings.

SNMP
SNMP (Simple Network Management Protocol) is a protocol defined for managing computer devices such as servers, workstations, and desktops, etc. through IP networks.
The software which monitors and configures the devices in the network is called NMS (Network Management Server).
When the SNMP agent daemon is enabled in AhsayUBS, the AhsayUBS administrator may monitor the system status such as performance of CPU, memory, disk and network with a properly setup NMS from a remote machine.
The AhsayUBS has been bundled with the FreeBSD SNMP agent ‘bsnmpd’ daemon which supports up to SNMP v2c standard. The functions of this daemon include:
- Report OID object value upon SNMP query from the NMS via UDP port '161'.
- Send traps to the NMS upon defined events in AhsayUBS.
It is better for the AhsayUBS administrator to install a 'bsnmpd' supported NMS for communication.
Here are the SNMP modules bundled with the 'bsnmpd' daemon:
- MIB-II: Implements parts of the internet standard MIB-II.
- Netgraph: Enable remote access to FreeBSD Netgraph subsystem.
- Host resources: Implements the HOST-RESOURCES-MIC as standardized in RFC 2790.
- UCD-SNMP-MIB: Retrieve system performance information and device detail.
The SNMP daemon will be started once the settings are saved in the page System > Settings > SNMP. SNMP triggered event can be found in the AhsayUBS system log at page Information > System Logs.
SNMP Settings
AhsayUBS Administrator can configure the SNMP settings and check the SNMP daemon status in the page System > Settings > SNMP.

Please enter / select the fields below to configure the ‘bsnmpd’ daemon:
- Enable: Enable/Disable the 'bsnmpd' daemon.
- Status: 'bsnmpd' daemon current status [Running / Cannot be enabled / Stopped].
- Location: The physical location of the AhsayUBS machine.
- Contact: The textual identification of the contact person for the AhsayUBS machine, together with information on how to contact this person.
- Community: The community string acts as a password to communicate with the NMS. Default is ‘public’. It is better to set a value different from the default one or any dictionary words in order to prevent brute force attack. Only read-only community is supported by AhsayUBS.
- Traps: Enable traps (notifications) sent from the SNMP daemon.
- Trap host (Displayed when 'Traps' is enabled): Enter hostname that the trap will be sent to.
- Trap port (Displayed when 'Traps' is enabled): The listenting port of the trap host for receiving traps. Default is USP port '162'.
- Trap string (Displayed when 'Traps' is enabled): The passcode for the trap. It should match the one defined in the NMS.
Please click the Save and Restart button to save the above settings and update the status of the 'bsnmpd' daemon in AhsayUBS.
Import MIB files to the NMS which are supported by this 'bsnmpd' daemon
After the 'bsnmpd' is enabled, please download the MIB Zip Archive from the WebAdmin page. The zip file contains all the MIB files which are supported by the 'bsnmpd' daemon. Please extract the file and import them to the NMS / MIB browser.

Browse the OID in the MIB browser to get / monitor the information
After importing the MIB files into the MIB browser, the system information can be browsed in the MIB tree. Administrators may configure the MIB browser to monitor AhsayUBS by selective OID. Please refer to the Appendix for the OID list and the OIDs description.
For further details on how to use the MIB browser, please refer to the Appendix for MIB browser example. If you are using an MIB browser other than that stated in the Appendix, please refer to the corresponding MIB browser user guide.
sysctl.conf
“sysctl.conf” is located inside the “/etc” which is a configuration file for making changes in FreeBSD (which is the OS of AhsayUBS). This includes many advanced options for the TCP/IP stack and virtual memory system that can dramatically improve the performance of the OS. For more information on “sysctl.conf”, please refer to the FreeBSD Documentation.
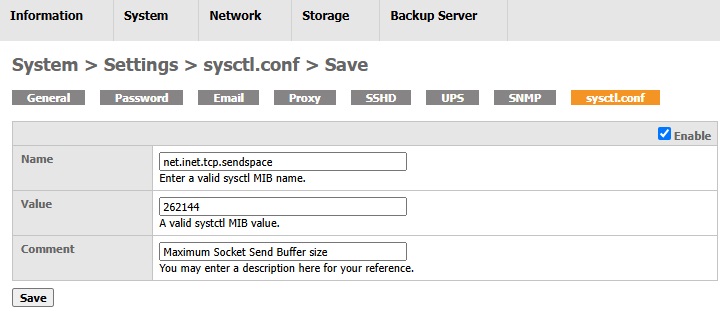
Here are the fields that you can set per MIB entry:
- Name: The MIB name.
- Value: The value with respect to the MIB name.
- Comment: Specify the human-readable description corresponding to this entry.
A screenshot of the System > Settings > sysctl.conf is captured below. It shows that all the MIB entries are enabled except the entry "hw.acpi.power_button_state".

Here are the guidelines to make changes in “sysctl.conf” file in AhsayUBS.
Add an MIB entry
- Click the Add MIB icon.
Fill in the required fields in the table. Check the Enable checkbox to enable the MIB. Leave it unchecked if you do not want the MIB to be enabled after adding.
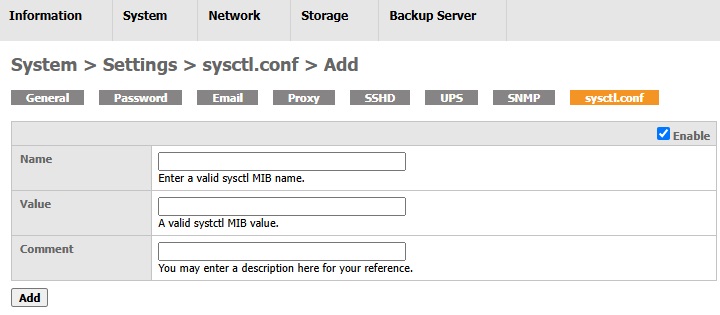
- Click the Add button to add the MIB entry.
- Click the Apply Changes button.
- The MIB entry is added successfully.

Edit an MIB entry
- Look for the MIB entry to be edited.
- Click the Edit MIB icon.
Edit the fields in the page.
- Click the Save button to update the MIB entry.
- Click the Apply Changes button.
- The MIB entry is updated successfully.

Enable/Disable an MIB entry
- Look for the MIB entry to be enabled/disabled.
- Click the Edit MIB icon.
Tick the checkbox Enabled to enable the MIB. Untick it to disable the MIB.
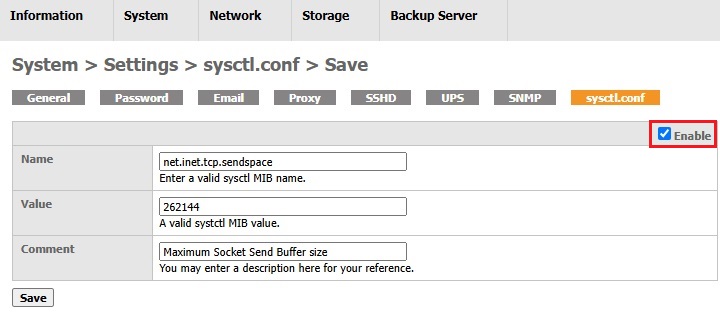
- Click the Save button to update the MIB entry.
- Click the Apply Changes button.
- The MIB entry is edited successfully.

Delete an MIB entry
- Look for the MIB entry to be deleted.
- Click the Delete MIB icon at the row of the MIB entry to be deleted.
- In the alert box, click OK to confirm the deletion of the MIB entry. Click Cancel to abort.
- Click the Apply Changes button.
- The MIB entry is deleted successfully.
Delete all MIB entry
- Click the Delete MIB icon next to the Add MIB icon.
- In the alert box, click OK to confirm deleting all the MIB entries in the table. Click Cancel to abort.
- Click the Apply Changes button.
- All the MIB entries in the table are deleted successfully.
Backup/Restore
The AhsayUBS runtime configuration is stored as an XML file. The XML file contains all settings information available in AhsayUBS WebAdmin.

In this page you can backup or restore the AhsayUBS runtime configuration in XML file format.
Backup Configuration
You can download the runtime configuration file of AhsayUBS WebAdmin by clicking the Download configuration button.

Restore Configuration
The configuration can be restored in one of the following situations:
- Adapted a new AhsayUBS with the same configuration of hardware, IP settings.
Mistakenly configured anything wrongly in the AhsayUBS WebAdmin.
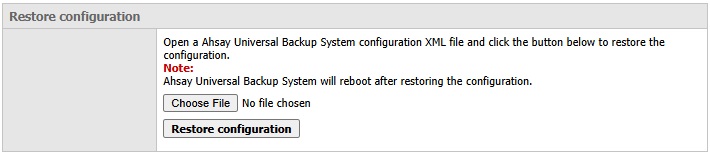

The settings can be restored with your last downloaded configuration file:
- Click the Choose File button to select the configuration file to restore.
- Click the Restore configuration button to restore the previous configuration to your AhsayUBS.
Factory defaults
You can restore AhsayUBS to factory defaults by clicking Yes or clicking No to cancel.


- The data on the block devices will NOT be erased after AhsayUBS is reset to factory default.
- You can restore the previous settings in AhsayUBS WebAdmin in the page System > Backup/Restore. Please refer to the section System > Backup/Restore for details.
After resetting AhsayUBS to factory defaults, all iSCSI sessions will be removed in the Storage > iSCSI page. The status of Expandable Storage will change to "Missing". The Expandable Storage can be re-configured for use by AhsayUBS:
- Adding it back to the iSCSI session inside the Storage > iSCSI page.
- Import the Expandable Storage. Note that the data in the Expandable Storage will not be erased after "factory defaults". For details, please refer to the Storage section.
Reboot

Now
Click Yes to reboot your AhsayUBS or No to cancel.

Scheduled
You may tick the Enable checkbox on the top-right hand corner to enable scheduled shutdown and schedule the shutdown time by selecting the options in the table Scheduled reboot and click the Save button to save your settings.

Shutdown

Now

Click Yes to shutdown or No to cancel.
Scheduled
You may tick the Enable checkbox on the top-right hand corner to enable schedule shutdown and schedule the shutdown time by selecting the options in the table Schedule shutdown and click the Save button to save your settings.
