
 How-To
Storage
When the mouse is pointed over the word "Storage" in the menu bar, the following menu will be displayed:

The Storage > Summary page shows a summary of the volumes created in AhsayUBS.
There are two types of storage volumes defined in AhsayUBS:
- System Storage - This is the core storage volume, which is created during AhsayUBS installation. The System Storage contains AhsayUBS system files. Therefore, it cannot be removed or unmounted when AhsayUBS is running.
- Additional Storage - Can be added when the LSFW storage has run out of space. It is used for storing more backup user account data. As Additional Storage are not core storage volumes. They can be removed or unmounted when AhsayUBS is running.
Details of the storage model in AhsayUBS can be found in the section AhsayUBS Storage Concepts.
Under this page, volume information will be shown, and the actions that can be done include:
- Add or remove Additional Storage
- Mount or unmount Additional Storage
- Filesystem check on a volume
- Rebuild degraded LSFW or Additional Storage inside AhsayUBS.
The page Storage > iSCSI shows a summary of the iSCSI session created in AhsayUBS. The iSCSI session can be created, information be edited, disconnected, and removed in AhsayUBS on this page.
After an iSCSI session is created, it can be used as a provider for Expandable Storage (a type of Additional Storage).
Summary
Storage Information in the WebAdmin
A summary of the storages installed in AhsayUBS will be shown on this page.

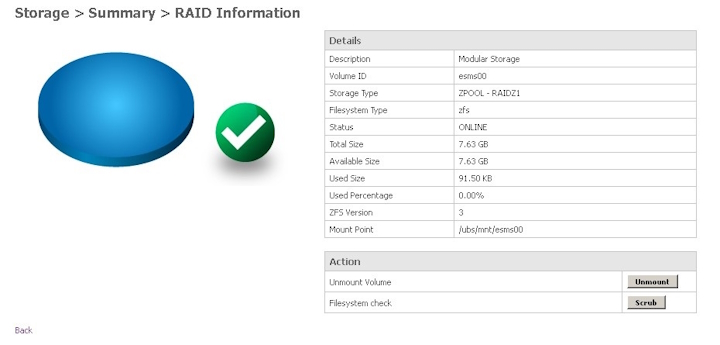
The Storage > Summary shows the summary of the storages inside AhsayUBS with volume view. Here is the information that will be shown in the volume:
Volume Pie Chart - for the volume size distribution:
- Yellow means the approximate used space in a volume.
Blue means the approximate free space available in a volume.

The missing volume pie chart means the volume is not available for AhsayUBS. It may be due to factors such as:
- The volume is exported.
Some of the providers (block devices or iSCSI session) are missing.


Volume status icons indicate the various statuses of the volume. It is put beyond the volume pie chart.
Description of the volume status icons:
| Icon | Status | Definition |
|---|---|---|
| Healthy | The volume is healthy. | |
| Degraded | The volume is degraded. One or more providers (block devices) of the volume are missing though the volume can still be used. The volume can become healthy again with a rebuild after replacing the missing providers. For details, please refer to the Troubleshooting section. | |
| Rebuilding | This state will occur after the provider is replaced in the volume. After rebuilding completed, the status will become healthy again. The rebuilding state will not affect the read or write operation of the volume. | |
| Critical | The volume is not available. It is better to suspend all I/O activity before the volume undergoes further damage. | |
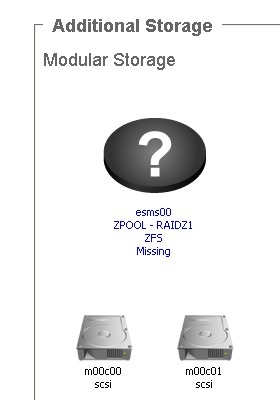
| Missing | The volume is missing. It cannot be accessed by AhsayUBS. It may be caused by:
For details, please refer to the Troubleshooting section. |
|
| Disconnected | The corresponding remote disk’s connection is lost. Please bring the remote storage host up (e.g. iSCSI initiator) to reconnect the remote disk. In order to prevent any data access to the remote storage, the AhsayCBS and OBSR Share service will not be allowed to start. Do not try to access anything before reconnecting the remote volume. |
The following volume information will be shown below the volume pie chart:
- Volume ID: 'system' denotes system storage while 'es????' pattern denotes the volume identity.
- RAID Type: RAID type of the volume.
- Filesystem Type: Filesystem type of the volumes (UFS or ZFS)
- Total: Total size available for the volume.
Free: Free space available for the volume to use.
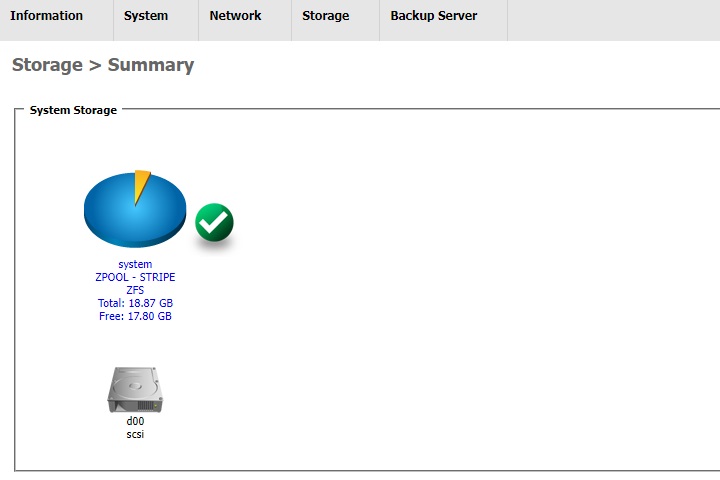

The hard disk icons below the text shows number of the providers for the volume and its status:
| Icon | Status | Definition |
|---|---|---|
| Healthy | The provider is healthy. | |
| Degraded | Part of the provider is not available. It is advised to backup the data in the volume and build a new volume again. | |
| Rebuilding | The state will occur after the provider is replaced in the volume. After rebuilding is completed, the status will become healthy again. | |
| Critical | The connection of the remote disk is lost. Please bring the remote storage host up (e.g. iSCSI initiator) to reconnect the remote disk. |
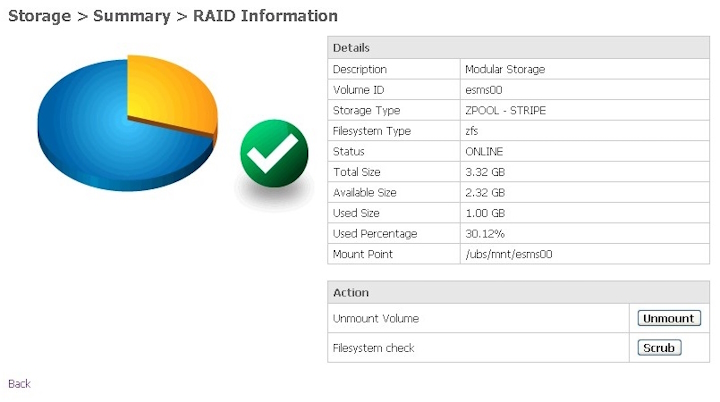
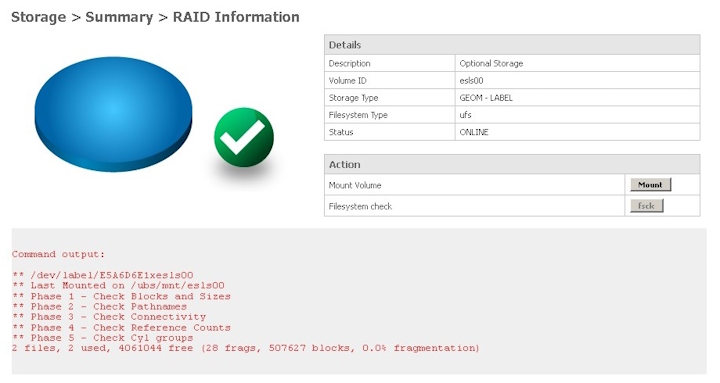
- Description: Description of the volume.
- Volume ID: The ID to identify the volume.
- Storage Type: RAID type of the volume.
- Filesystem Type: Filesystem type of the volumes (UFS or ZFS).
- Status: State of the volume (ONLINE / DEGRADED / REBUILDING / CRITICAL / DISCONNECTED).
- Total Size: Total size available for the volume.
- Available Size: Free space available for the volume to use.
- Used Size: Used space of the volume.
- Used Percentage: Volume space used percentage.
Mount Point: Dirpath where the volume is mounted.

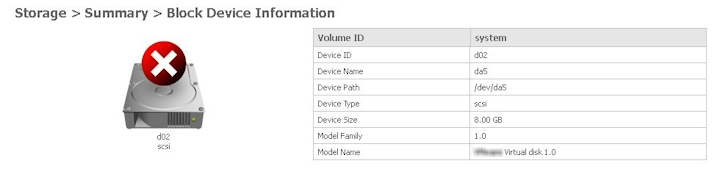
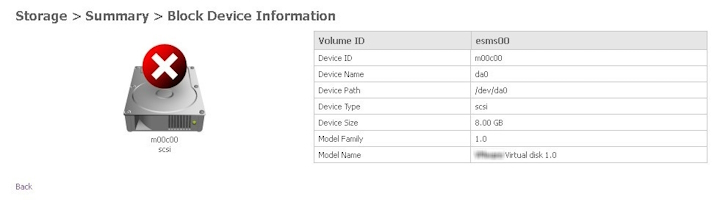
When the hard disk icon is selected, details of each provider will be shown. This page is called Storage > Summary > Block Device Information.
Some Block Device Information will be shown on this page:
- Volume ID: 'system' denotes it is a System Storage provider. Other represents the volume it belongs to.
- Device ID: The logical ID that identifies the provider.
- Device Name: Physical name of the block device named by the kernel.
- Device Path: Block device physical path in AhsayUBS.
- Device Type: Connection type of the device, e.g. ata, ide, scsi, hwraid, iscsi etc.
- Device Size: Physical size of the device.
Physical device information, such as Model Family, Model Name, Serial Number, and Device Firmware Version are shown which is useful for the AhsayUBS admin to identify the physical block device.

System Storage
In the Storage > Summary page, only the volume LSFW will be shown.

After clicking the volume pie chart, details of all System Storage will be shown in the page Storage > Summary > RAID Information.

Additional Storage
All configured Additional Storage devices can be found in the Storage > Summary. After clicking the volume pie chart icon, details of the Additional Storage will be displayed.
Additional Storage can be added when master storage LSFW runs out of space. Once created, the Additional Storage can be used for storing more user accounts data and their backup snapshots of AhsayCBS in AhsayUBS.
Supported types of Additional Storage in AhsayUBS:
Modular Storage
- Supports one or multiple physical block devices for building RAID0, RAID1, and RAIDZ in ZFS from local storage.
- Supports one remote disk (i.e. iSCSI target) to build a RAID 0 ZFS remote storage.
Expandable Storage: Created with an iSCSI initiator sessions and hardware RAID volumes.
Only one iSCSI initiator session (one provider) can support creating an expandable storage.
Since iSCSI target / hardware RAID volume can be expanded, the entire disk will be consumed by a single ZPOOL.
Create Additional Storage
Additional Storage can be added by clicking the Add icon in the Storage > Summary page.
If there are no available providers for creating the Additional Storage, the icon will be hidden.
In cases where there are no available providers for creating additional storage, admins may:
- Shutdown AhsayUBS and insert the block devices. Power on AhsayUBS on again, or;
- Connecting to the iSCSI target (Please refer to the section Storage > iSCSI for details) for the icon to appear again.
The provider which has been used by other AhsayUBS before will not be listed as an empty block device. It should be zeroed out before putting into AhsayUBS.
Create Module Storage (Physical Block Devices)
[Local Storage Provider] Make sure the block devices / hardware RAID volume is connected to the AhsayUBS server. If not, shutdown AhsayUBS. Insert a physical block device(s) / create a hardware RAID before booting AhsayUBS again.
[Remote Storage Provder] Make sure an iSCSI initiator session is connected and enabled. To verify the existence of an iSCSI initiator, please refer to the section Storage > iSCSI for details.
- Go to the page Storage > Summary.
- Click the Add icon.
- Select the provider(s) included in the volume in the drop-down list. Multiple providers can be selected.
- [Local Storage Provider] Select the RAID type of the volume (RAID 0 / RAID 1 / RAID Z).
- Click the Done button.
- Read the warning message in the alert box carefully. Confirm that "All of the data will be destroyed in the provider(s)" by clicking the OK button.
- The page then will be redirected to the page Storage > Summary when the modular storage is created. A dialog box will show that whether creating modular storage action is done successfully or not. Click OK to close the dialog.
Remove Additional Storage
Please ensure that the volume is NOT IN USE before removing. Otherwise, the volume removal action will fail.
- Go to the page Storage > Summary.
- Click the Delete icon.
- Click the X icon beyond the volume to be removed.
- Confirm the alert dialog to remove the Additional Storage.
- The page will be refreshed. A dialog box will pop up to show that the volume was removed successfully. The volume will no longer exist in AhsayUBS now.
Mount and Unmount Additional Storage
Unmount Additional Storage
- System Storage volume is always in use and it cannot be unmounted.
- Please ensure that the volume is NOT IN USE before unmounting. Otherwise, the unmount volume action will fail.
- Go to page Storage > Summary.
- Click the volume pie chart icon which is to be unmounted.
- The page is redirected to Storage > Summary > RAID Information. Click the Unmount button to unmount the volume.
- The page will be refreshed and shows the result that the volume was unmounted successfully or not. Click the OK button to close the dialog.
Mount Additional Storage
Storage volumes cannot be used by AhsayUBS or AhsayCBS when it is not mounted. To use the volume, please follow the steps to mount a volume:
- Go to page Storage > Summary.
- Click the volume pie chart icon which is to be mounted.
- The page is redirected to Storage > Summary > RAID Information. Click the Mount button to mount the volume.
- The page will be refreshed and shows the result that the volume was mounted successfully or not. Click the OK button to close the dialog.
Filesystem Check
To verify the data integrity of the files and recover the filesystem if there are defects inside the file system.
[ZFS] Scrub
Scrub is the filesystem check process for the ZFS volumes. It can be performed on a volume in either mounted or un-mounted state.
To trigger the filesystem check manually, please follow these steps:
- Go to page Storage > Summary.
- Click the volume pie chart icon which will go through the scrubbing process.
- The page is redirected to Storage > Summary > RAID Information. Click the Scrub button to start the scrubbing.
- Read the alert dialog message and confirm it to start the scrubbing process.
- The page will be refreshed. A dialog will be shown whether the scrubbing command can be issued successfully or not. Click the OK button to close the dialog.
Scrubbing message will be shown and refreshed at the bottom of the page during scrubbing.

[UFS] FSCK
The FSCK process is the filesystem check process for UFS volumes. It must be performed when the UFS volume is offline. Therefore, fsck checks are only available for Additional Storage volumes, as the System Storage volumes cannot be unmounted. An "fsck" check for System Storage is performed during the AhsayUBS boot process.
To trigger the FSCK process manually, please follow these steps:
- Go to page Storage > Summary.
- Click the volume pie chart icon to start fsck process.
- If the volume is not unmounted, please refer to the section Mount and Unmount Additional Storage.
- After the volume is unmounted, click the button fsck to start the fsck process.
- Read the alert dialog message and confirm it to start the fsck process.
- The page will be refreshed. A dialog will pop up to show whether the fsck is started successfully. Click the OK button to close the dialog.
"fsck" messages will be shown at the bottom of the page if the fsck process is started successfully.

Export and Import Additional Storage (ZFS)
- When the corresponding block devices or the iSCSI target is undergoing maintenance, or;
- [Expandable Storage] The iSCSI target / hardware RAID volume is expanded; the Additional Storage is needed to be exported and imported again to recognize the expanded size.
- The System Storage cannot be unmounted. So, the volume(s) in System Storage cannot be exported.
- The volume is needed to be unmounted before exporting. Therefore, make sure that the volume is not in use.
Export Additional Storage
- Unmount the volume first if it is mounted. For the steps to unmount a volume, please refer to the section Mount and Unmount Additional Storage.
- Go to the page Storage > Summary.
- Click the volume pie chart icon which is going to be exported.
- Click the Export button.
- The page will be refreshed, and a dialog will be shown that the volume is exported successfully. Click OK to close the dialog box.
The volume is now exported. So, the volume is missing in AhsayUBS now.
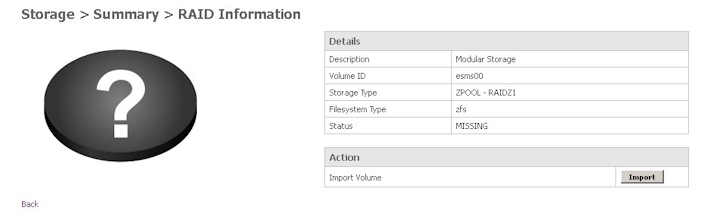

Import Additional Storage
The volume needs to be imported again when it is going to be used by the AhsayUBS.
- Make sure the corresponding block device(s) (Modular Storage) or the iSCSI connection (Expandable Storage) is connected to AhsayUBS before importing the volume.
- Go to the page Storage > Summary.
Click the volume pie chart icon which is going to be imported.
- Click the Import button.
- The page will be refreshed, and a dialog will be shown that the volume is imported successfully. Click OK to close the dialog box.
The volume information is now shown in the AhsayUBS WebAdmin. It means that the volume can now be used again by AhsayUBS after mounting.


iSCSI


In AhsayUBS, iSCSI can only be used for creating Additional Storages.
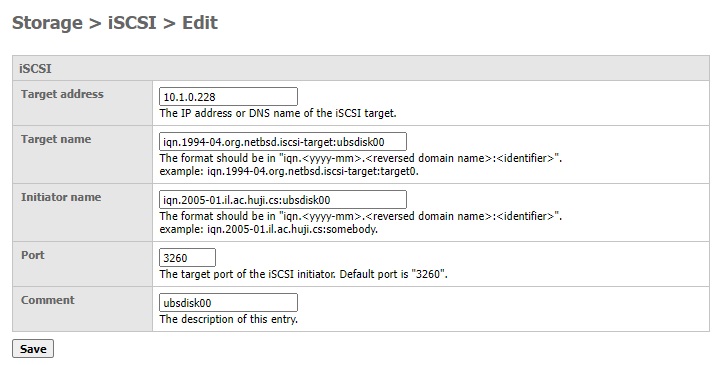
The information that will be shown for each of the iSCSI session entry:
- Target address: The IP address / DNS name to the iSCSI target.
- Target name: The IQN name of the iSCSI target.
- Initiator name: The IQN to identify the iSCSI target.
- Port: The port of the iSCSI target. Default value is "3260".
- Comment: The description of this entry.
- Connected: "Yes" when the iSCSI session is connected. "No" when the iSCSI session is disconnected.
- Enable / Disable: Enable / Disable the iSCSI session.
Rules for Enable / Disable / Delete iSCSI Session
You may enable / disable the iSCSI initiator session for maintenance of the iSCSI target server. However you cannot disable the iSCSI initiator session when the corresponding Additional Storages are in use.
Disable and delete iSCSI initiator differences:
Disable
The iSCSI initiator session entry still exists in the AhsayUBS. Use this function when you want to temporarily disable the session and reconnect it later.
Delete
The iSCSI initiator session entry will no longer be used in AhsayUBS.
Create a Connection to an iSCSI Target
- Go to the page Storage > iSCSI.
- Click the Add icon.
Enter the required information inside the iSCSI table.
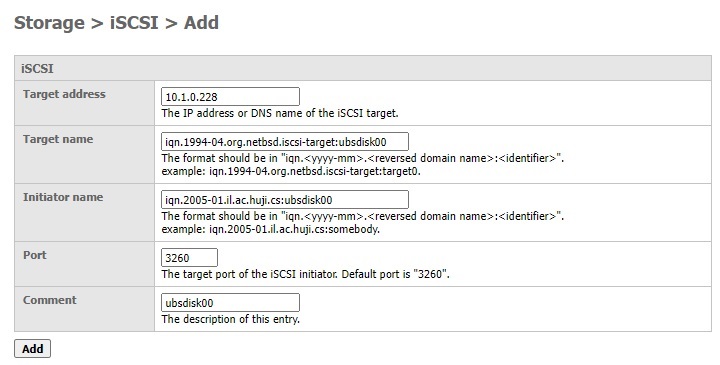
- Click the Add button.
- An iSCSI initiator session is now enabled. The connected iSCSI disk is now ready to be added as Additional Storage for AhsayUBS. Please refer to the section Create Additional Storage for details.

If the iSCSI initiator session remains in a “Connecting…” state for a long time, incorrect connection information may have been used or the iSCSI target host / service could be down. You may destroy this entry and try again.

Edit iSCSI Entry Configuration
- The corresponding Additional Storage should be exported or removed before proceeding.
- Removing the Additional Storage will erase all the data in the storage.
- For steps to export an Additional Storage, please refer to the section Export and Import Additional Storage.
- For steps to remove an Additional Storage, please refer to the section Remove Additional Storage.
Follow the steps below to change the configuration of an iSCSI initiator entry:
- Go to the page Storage > iSCSI.
- Look for the iSCSI initiator entry that is going to be edited.
- Click the Edit iSCSI Initiator icon.
Edit the fields under the iSCSI table. (Only the Initiator name and the Comment can be edited).
- Click the Save button to save the changes.

Disable an iSCSI Initiator Entry
- The corresponding modular / expandable storage should be exported, or Optional Storage should be unmounted before disabling any iSCSI initiator session. The Additional Storage removal will result in the destruction of all the data on the storage volume.
- The corresponding Additional Storage should not be DELETED after disabling the iSCSI initiator entry. Otherwise, the data inside the Additional Storage may not be accessible again by AhsayUBS after re-enabling the iSCSI initiator session.
- For steps to export an Additional Storage, please refer to the section Export and Import Additional Storage.
- For steps to remove an Additional Storage, please refer to the section Remove Additional Storage.
Follow the steps below to disable an iSCSI initiator entry:
- Go to the page Storage > iSCSI.
- Look for the iSCSI initiator entry that is going to be disabled.
- Click the Disable button.
- The iSCSI initiator entry is now disabled successfully.
Enable an iSCSI Initiator Entry
- Go to the page Storage > iSCSI.
- Look for the iSCSI initiator entry that is going to be enabled.
- Click the Enable button.
- The iSCSI initiator entry has been enabled successfully.
- (Optional) The corresponding Additional Storage can be imported again for use. For details, please refer to the section Export and Import Additional Storage.
Destroy an iSCSI Initiator Entry
Follow the steps below to destroy an iSCSI initiator entry:
- Go to the page Storage > iSCSI.
- Look for the iSCSI initiator entry that is going to be deleted.
- Click the Delete iSCSI Initiator icon.
Click OK in the dialog box that will appear.
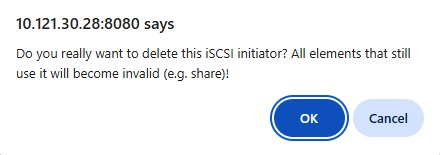
- The iSCSI initiator entry is destroyed successfully.

Troubleshooting
Rebuild Degraded Storage
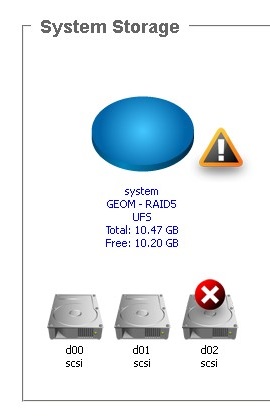
When one or more block devices have degraded in a volume, the volume can be rebuilt for recovery. The AhsayUBS administrator can get the latest status of the storage volumes by viewing the page Storage > Summary.
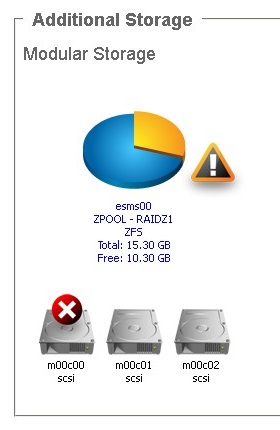
The following example shows the System Storage as being degraded:

The volume is degraded when the Degraded icon is shown next to the volume.
- The provider which has been used by other AhsayUBS before will not be listed as an empty block device. It should zero out before putting it into AhsayUBS.
Only two kinds of degraded storage are supported for rebuilding their volume:
- System Storage
- (Additional) Modular Storage
Rebuilding System Storage
- Go to the page Storage > Summary.
Note down the volume and block device which are degraded.
 To locate any missing or degraded block devices in AhsayUBS, please refer to Identifying Physical Local Block Devices on AhsayUBS for details.
- Shutdown AhsayUBS in AhsayUBS WebAdmin.
- Replace the block device with a healthy one.
- Power on AhsayUBS.
- After AhsayUBS is booted, login to AhsayUBS WebAdmin again.
- Go to the page Storage > Summary.
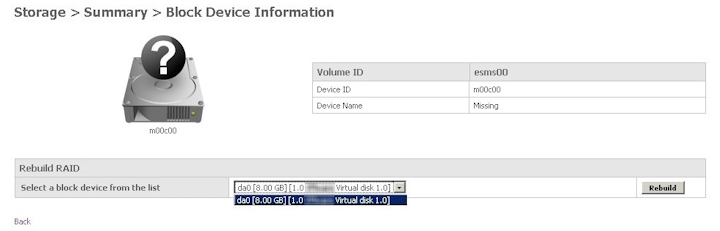
- Inside the degraded storage entry, click the storage icon.
Select a block device to rebuild the volume.
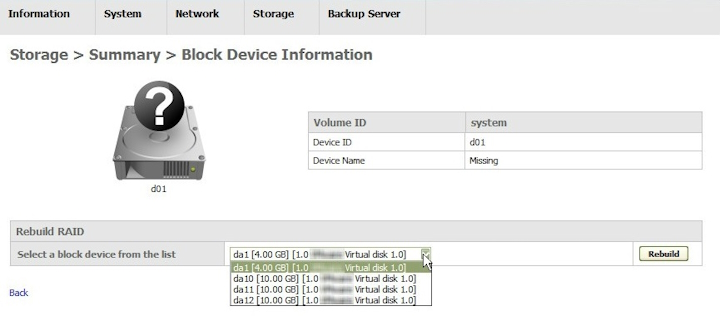
- Click the Rebuild button to start the rebuild volume process.
- A warning message will be shown in the alert box. Read it carefully before proceeding. Click the OK button to continue the rebuild process. Click Cancel to return to the previous page.
- After the rebuilding process is started, the page will be redirected to Storage > Summary > RAID Information. A dialog will pop up to show that the rebuild process is started successfully. Click OK after reading the message.
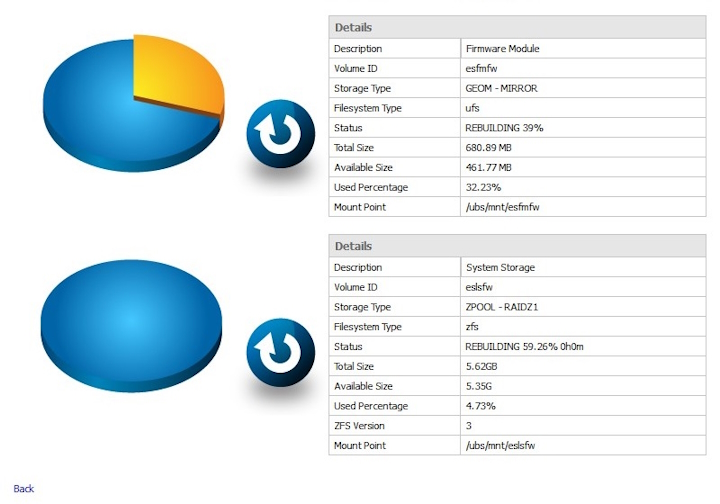
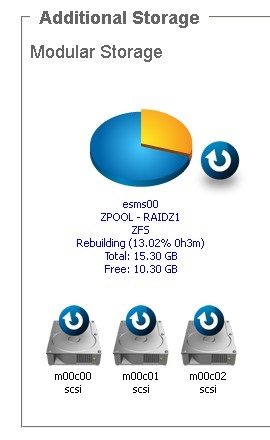
When the block device in the volume is synchronizing, the rebuild icon will be shown in the volume like this:
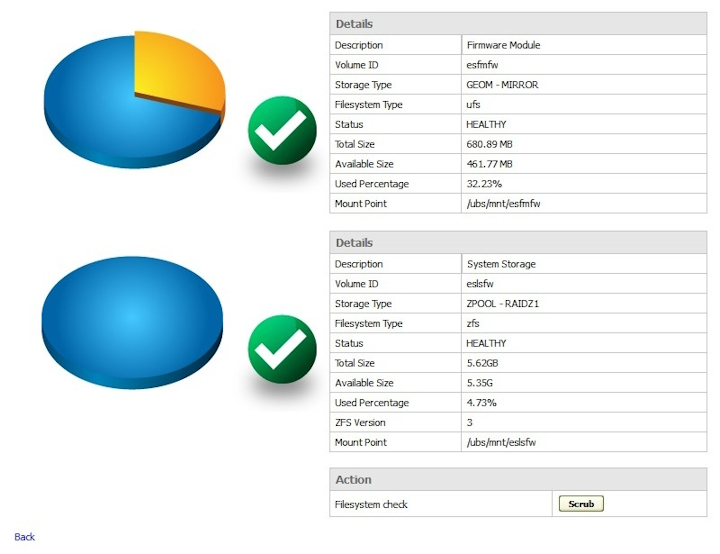
The healthy icon will be shown again beside the volume when the volume is synchronized completely.
The block device missing icon will be replaced by the block device healthy icon since the block device is replaced and it is not missing.


Rebuilding Modular Storage
- Go to the page Storage > Summary.
Jot down the volume and block device which are degraded.
 To locate any missing or degraded block devices in AhsayUBS, please refer to Identifying Physical Local Block Devices on AhsayUBS for details.
- Shutdown AhsayUBS through the WebAdmin.
- Replace the block device with a healthy one.
- Power on AhsayUBS.
- After AhsayUBS is booted, login to AhsayUBS through the WebAdmin again.
- Go to the page Storage > Summary.
- Inside the degraded storage entry, click the storage icon.
Select a block device to rebuild the volume.
- Click the Rebuild button to start the rebuild volume process.
- A warning message will be shown in the alert box. Read it carefully before proceeding. Click the OK button to continue the rebuild process. Click Cancel to return to the previous page.
- After the rebuilding process is started, the page will be redirected to Storage > Summary > RAID Information. A dialog will pop up to show that the rebuild process is started successfully. Click the OK button after reading the message.
When the block device in the volume is synchronizing, the rebuild icon will be shown in the volume like this:


The healthy icon will be shown again beside the volume when the volume is synchronized completely.

The block device missing icon will be replaced by the block device healthy icon since the block device is replaced and is no longer missing.

Additional Storage(s) in Disconnected State

The Additional Storage DISCONNECTED state will only appear in the volume which is created on a remote disk (i.e. iSCSI initiator session). This states that the Additional Storage corresponding remote disk provider (i.e. iSCSI initiator session) is disconnected from AhsayUBS.
In order to identify disconnected Additional Storage, an additional schedule job has been added to AhsayUBS. When any Additional Storage has been detected in disconnected state, the following actions will be taken in order to prevent further loss of data:
Service stop and prohibit the service start of the following services:
- AhsayCBS
- Share AhsayCBS
- The enabled Additional Storage volumes will remain mounted. The system will wait for iSCSI initiator reconnection. In case the iSCSI initiator exits due to session timeout, AhsayUBS administrator may create another iSCSI initiator session by clicking the Retry button in the Storage > iSCSI page.
- Email will be sent to the AhsayUBS administrator (The 'To email' defined in the AhsayUBS 'General email setting').
At this stage;
- The corresponding remote disk's (i.e. the iSCSI initiator session) network connection to this AhsayUBS machine is lost.
- Though the corresponding Additional Storage is still mounted, the data in this volume cannot be accessed nor anything can be written to the storage.
To fix this problem, log into the AhsayUBS WebAdmin.
- Alert dialog contains the disconnected Additional Storage and their corresponding iSCSI initiator information will be shown after AhsayUBS WebAdmin login.
- The loss of iSCSI connection may result from network connectivity issue. Try to use "Network > Ping / Traceroute" tool to test if the iSCSI target host is reachable. After resolving the network issue, the iSCSI target host will be reconnected with AhsayUBS machine and the data in the Additional Storage can be accessed again.
After resolving the Additional Storage disconnection issue, service start will be allowed for the following services. Please refer to the section Backup Server for details.
- AhsayCBS
- Share AhsayCBS
Additional User Storage Migration
AhsayUBS additional user storage migration is performed using a UNIX shell script. The migration process only supports additional user storage volumes, the system storage (firmware) volume, i.e. FreeBSD and AhsayCBS binaries are not supported. After a successful migration, the data on the file system can be used by the AhsayCBS service on the new AhsayUBS server.
Supported Hard Disk Interfaces:
- Local: IDE, SCSI, SATA, Hardware RAID
- Foreign: iSCSI
Supported Additional Storage Types:
- Optional Storage: GPT Partition 6 with UFS
- Expandable Storage: No Partition with ZPOOL on entire disk
- Modular Storage with CLOG only: GPT Partition 7 with ZFS
- Modular Storage with CLOG & SLOG: GPT Partition 11 / 13 with ZFS
- AhsayUBS System Storage (esosfw and eslsfw) is NOT supported by the storage migration shell script.
- After volume migration, the original storage label in the migrated storage volume will be updated. The previous AhsayUBS installation will no longer be able to use the migrated storage volume.
- Since the profile.ini file (/ubs/conf/profile.ini) will be updated by this shell script, DO NOT perform any add or remove storage operations via the AhsayUBS WebAdmin console when the volume migration is in progress.
Storage Migration Procedure
Assumptions:
- The volume to be migrated is in a healthy state.
- There are no disk errors prior to migration.
- SSH is enabled on AhsayUBS.
To perform a migration of an existing Additional Storage volume to a new AhsayUBS server:
Connect ONE hard disk containing foreign storage volume to the new AhsayUBS machine.
For local hard disk:
- Shutdown the old AhsayUBS machine.
- Remove the specific hard disk from the old AhsayUBS machine.
- Shutdown the new AhsayUBS machine.
- Connect the hard disk to the new AhsayUBS machine.
- Power on the new AhsayUBS machine.
- If the additional user volume is created on a hardware RAID, then the RAID card along with all the hard drives which make up the RAID logical volume must be installed onto the new AhsayUBS server.
- After connecting the RAID logical volume on the new AhsayUBS machine, please ensure the logial volume can be detected on the RAID card BIOS.
For iSCSI hard disk:
- Login to the old AhsayUBS machine WebAdmin console.
- Unmount specific iSCSI volume.
- Disconnect the iSCSI hard disk from the old AhsayUBS machine.
- Power on the new AhsayUBS machine.
- Create a new iSCSI session in the AhsayUBS WebAdmin to connect the iSCSI hard disk.
- Login to AhsayUBS via SSH.
Enter the following command to start migrating the Additional Storages:
#sh /ubs/bin/migrate-storage-single-disk.shThe shell script will begin the process of 'discovering' any connected foreign user storage volumes. Once the user storage volume 'discovery' has been completed, the storage volumes eligible for migration will be listed.
ahsayubs:/# sh /ubs/bin/migrate-storage-single-disk.sh

Loading UBS Framework information, please wait..

The following storage entries have been found available for migration:
1  :  76E7AAE1xesms00  [ad4]

Please select either (1 – 1) :

Confirm you want to migrate [76E7AAE1xesms00] from [ad4] as [esm00]? (y/n)
After confirming the volume to be migrated, the script will proceed with the migration process. The storage migration result will be shown when the process is completed.
ahsayubs:/# sh /ubs/bin/migrate-storage-single-disk.sh

Loading the UBS Framework information, please wait..

The following storage entries have been found available for migration:
1  :  76E7AAE1xesms00  [ad4]

Please select either (1 – 1) :

Confirm you want to migrate [76E7AAExesms00] from [ad4] as [esms00]? (y/n) y

Start migrating modular storage [76E7AAE1xesms00] to [873391A2xesms00]

ad4p11 labeled
ad4p13 labeled

Completed migrating modular storage [76E7AAE1xesms00] to [873391A2xesms00]

Successfully updated the profile.ini file on the current system!!!
After completion, AhsayUBS will automatically mount the migrated volume.
- When the storage migration process is completed, please login to AhsayUBS WebAdmin. Go to Storage > Summary to check if the migrated storage is mounted.
- The migrated storage volume is ready for use. Please update the new User Home path in the AhsayCBS web console.